uniapp主题切换功能的方式终结篇(全平台兼容)
前面我已经给大家介绍了两种主题切换的方式,每种方式各有自己的优势与缺点,例如“scss变量+vuex”方式兼容好但不好维护与扩展,“scss变量+require”方式好维护但兼容不好,还不清楚的可点下面链接直达了解一下
uniapp主题切换功能的第一种实现方式(scss变量+vuex)
uniapp主题切换功能的第二种实现方式(scss变量+require)
理解了这些才能更好的理解我接下来给大家总结的。
最后做的这个能兼容所有平台的主题切换效果,大家可以微信扫码一睹为快,切换功能在”个人中心“那里(模仿的b站),目前分白天与夜间模式

接下来就给大家介绍一下如何做一个兼容好,又好维护的主题切换功能
解决思路
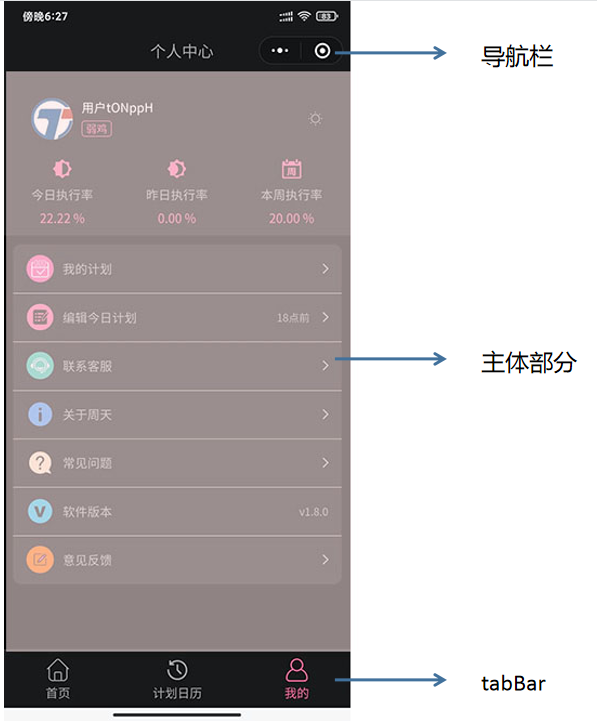
uniapp应用在做开发的时候,拆分页面其实就分两大部分,主体部分+导航栏与tabbar

为什么要这么分,因为主体部分的样式通常是普通css代码控制的,而导航栏+tabBar(例如原生的情况)须要通过api去修改。而css与js目前还不能完全互通。
因此要做全平台兼容同样须要维护主体部分的样式(纯css)与导航栏+tabBar部分的样式(js),明白了原理,接下来就上代码
第一部分:全局“主体部分”主题样式
这样其实就是之前讲过的,上代码
定义common/css/_theme.scss
$themes: (
	// 白天模式
    light:(
        page: (
            background-color: #fff,
            color: (
                color: #333,
            ),
            block: (
                background-color: #333,
                color: (
                    color: #fff,
                ),
            ),
        ),
        user-page: (
            background-color: #f2f2f2,
            color: (
                color: #666,
            ),
            block: (
                background-color: #999,
                color: (
                    color: #000,
                ),
            ),
        ),
    ),
	// 夜间模式
    dark:(
        page: (
            background-color: #333,
            color: (
                color: #fff,
            ),
            block: (
                background-color: #fff,
                color: (
                    color: #000,
                ),
            ),
        ),
        user-page: (
            background-color: #1a1a1a,
            color: (
                color: #fff,
            ),
            block: (
                background-color: #FFFFFF,
                color: (
                    color: #000,
                ),
            ),
        ),
    )
);
生成主题样式
@mixin map-to-class($map, $divider: "-", $select: ".theme", $isRoot: false, $root-select: ".theme") {
    $select: if($select== "" and &, &, $select);
    @each $k, $v in $map {
        $currSelect: if($isRoot, #{$root-select}#{$divider}#{$k}, #{$select}#{$divider}#{$k});
        #{$currSelect} {
            @if type-of($v) ==map {
                @include map-to-class($v, $divider, "", true) {
                    @content;
                }
            } @else {
                @at-root #{$select} {
                    #{$k}: $v !important;
                }
            }
        }
    }
}

@each $key, $mode in $themes {
    @if $key== "light" {
        @include map-to-class($mode);
    }
}
// 或
@each $key, $mode in $themes {
    @if $key== "dark" {
        @include map-to-class($mode);
    }
}
其实可以循环一次性输出,这个交给你们了。。。
页面使用
<template>
	<view class="tpf-page theme-page">
		<text class="theme-color">订单</text>
		<view class="theme-block block flex flex-align-center flex-pack-center">
			<text class="theme-color">板块里面的文本</text>
		</view>
		<view class="flex flex-align-center flex-pack-justify change-theme">
			<text class="button" @tap="changeTheme('light')">白天模式</text>
			<text class="button dark" @tap="changeTheme('dark')">夜间模式</text>
		</view>
	</view>
</template>
这里主要通过加theme前缀(你自己可以改成想要的)的类theme-page、theme-color、theme-block等等等的方式给内容块加背景,给字体加颜色等
这样页面是不是就很好维护,不同颜色的页面,你只须要在_theme.scss主题里面进行添加或修改后,在页面添加回应的theme-xxx类即可。
这样就处理了主体部分的样式主题切换问题。
第二部分:全部“导航栏+tabBar”主题样式
因为这部分涉及到原生操作,须要用到api,所以必须是js来维护主题样式
定义theme.js
// 定义导航栏 与 tabbar 主题色
const themes = {
	light:{
		navBar:{
			backgroundColor:'#FFF',
			frontColor:"#000000"
		},
		tabBar:{
			backgroundColor:'#FFF',
			color:'#333',
			selectedColor:'#0BB640',
			borderStyle:'white'
		}
	},
	dark:{
		navBar:{
			backgroundColor:'#333',
			frontColor:"#ffffff"
		},
		tabBar:{
			backgroundColor:'#333',
			color:'#fff',
			selectedColor:'#0BB640',
			borderStyle:'black'
		}
	}
}
export default themes;
第一种使用方式vue.prototype的全局挂载(不推荐)
不推荐的原因:::有兼容问题!!!
mian.js
//引入主题
import themes from '@/common/theme/theme.js';
....
//全局挂载
Vue.prototype.$themes = themes;
第二种使用方式:Vuex / globalData
为什么使用这两种,因为他们是目前官方兼容所有平台的,这里我只介绍Vuex的方式
创建store.js
import Vue from 'vue'
import Vuex from 'vuex'
// 引入主题
import themes from '@/common/theme/theme.js';
Vue.use(Vuex);

const store = new Vuex.Store({
	state: {
		theme:themes[uni.getStorageSync('theme') || 'light']
	},
	getters: {

	},
	mutations: {
		updateTheme(state,mode = 'light'){
			state.theme = themes[mode];
		}
	}
})

export default store
页面使用
创建好store之后,就可以在页面里面动态设置导航栏与tabBar了,具体大家自己去根据喜好封装。
onReady(){
    //Vuex的方式
    // 设置导航条
    uni.setNavigationBarColor(this.$store.state.theme.navBar);
    // 设置tabbar
    uni.setTabBarStyle(this.$store.state.theme.tabBar);
},
如何实现切换
更新就是更改store的状态,因为他是全局的,所有页面都能应用到
this.$store.commit("updateTheme",mode);
// 设置导航条
uni.setNavigationBarColor(this.$store.state.theme.navBar);
// 设置tabbar
uni.setTabBarStyle(this.$store.state.theme.tabBar);
最后总结
要想实现全端兼容,肯定所有的代码都要考虑到兼容所有平台,因为做的时候要就考虑到。
主题切换对于应用来说是一个大工程,原理给大家说了,实现部署还须要大家好好的思考,其中扩展性,可维护性等都必须事先考虑的,不然项目肯定做不大。
想看我做的最终成品怎么样,可以扫码看看

有什么做得不好的,或没有考虑到位的,欢迎大家留言讨论交流,共同学习进步。

 前面我已经给大家介绍了两种主题切换的方式,每种方式各有自己的优势与缺点,例如“scss变量+vuex”方式兼容好但不好维护与扩展,“scss变量+require”方式好维护但兼容不好