 总结了Ajax中几个常见的实战案例,登录认证,上传文件,如何处理json格式数据····5分钟get??
AJAX(Asynchronous Javascript And XML)翻译成中文就是“异步Javascript和XML”。即使用Javascript语言与服务器进行异步交互,传输的数据为XML(当然,传输的数据不只是XML,现在更多使用json数据)
优点
常见应用场景
'''需求:实现简单的计算器,加法举例通过Ajax,实现前端输入两个数字,服务器做加法,返回到前端页面''''''urls.py'''path('', views.test_Ajax)'''views.py'''from django.shortcuts import render, HttpResponsedef test_Ajax(request): if request.method == 'POST': num1 = int(request.POST.get('num1')) # 获取前端提交的数据 num2 = int(request.POST.get('num2')) print(num1, num2) return HttpResponse(num1 + num2) # 返回给前端 return render(request, 'sum.html')'''sum.html''''''html结构'''<div > <div > <h1 >Ajax</h1> <div > <input type="text" id="d1" > <p >+</p> <input type="text" id="d2" > <p >=</p> <input type="text" id="d3" > <br> <button id='btn' >calculate</button> </div> </div></div>'''js实现'''<script> {#绑定点击事件#} $('#btn').click(function () { {#获取input元素内输入的值#} var num1 = $('#d1').val() var num2 = $('#d2').val() $.ajax({ url: '', //ajax请求的地址 method: 'post', //请求方式 data: {num1: num1, num2: num2}, //携带参数 success: function (data) { //服务端成功返回会回调,执行匿名函数 console.log(data) $('#d3').val(data) } }) })</script>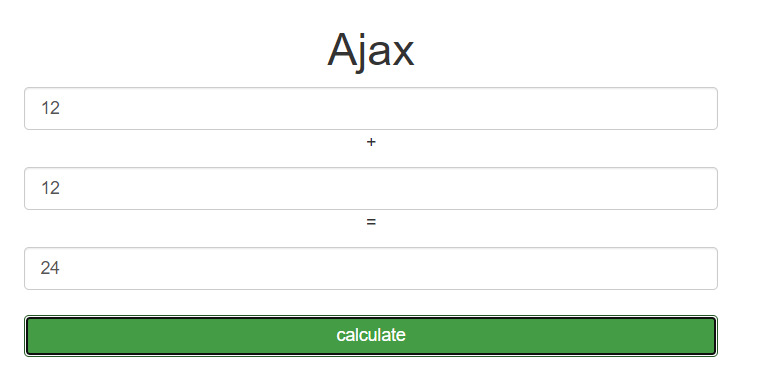
注意:
使用Ajax的时候,在视图函数中使用request对象方法判断什么类型的请求,如果是Ajax,不管本质是post还是get等,写request.is_ajax()即可
需求:
1.前端登录页面
2.后端数据库验证前端提交的信息
'''urls.py'''path('login/', views.login),'''views.py'''from django.shortcuts import render,redirect,HttpResponsefrom app01 import modelsfrom django.http import JsonResponseimport jsondef login(request): if request.method == 'GET': return render(request,'login.html') # elif request.method=="POST": elif request.is_ajax(): response = {'status':200,'msg':None} username = request.POST.get('username') password = request.POST.get('password') # 数据库校验 res = models.User.objects.filter(username=username,password=password).first() if res: # 登录成功 # return redirect('http://www.baidu.com') # ajax使用重定向出错 response['msg']='登录成功' else: response['msg']='登录失败,用户名或密码错误' response['status']=404 # return HttpResponse(json.dumps(response)) return JsonResponse(response,safe=False,json_dumps_params={'ensure_ascii':False})'''models.py'''from django.db import modelsclass User(models.Model): name=models.CharField(max_length=32) password=models.CharField(max_length=32)<body>{#<form action="" method="post">#} <div > <h1 >Ajax登录认证</h1> <div > <div > <p>Username: <input type="text" name="username" id="user_id"></p> <p>Password: <input type="password" name="password" id="pwd_id"></p> <p><button type="submit" >提交</button> <span ></span></p> </div> </div> </div>{#</form>#}</body><script> $('.btn').click(function (){ $.ajax( { url:'/login/', method:'post', data:{username:$('#user_id').val(),password:$('#pwd_id').val()}, //返回给后端的数据 success:function (data){ console.log(data) //data是对象类型 if(data.status == 200){ //登录成功,前端重定向 location.href='http://www.baidu.com' }else{ //登录失败 $('.error').html(data.msg) } }, error:function (data){ console.log(data) alert('请求错误') } } ) })</script>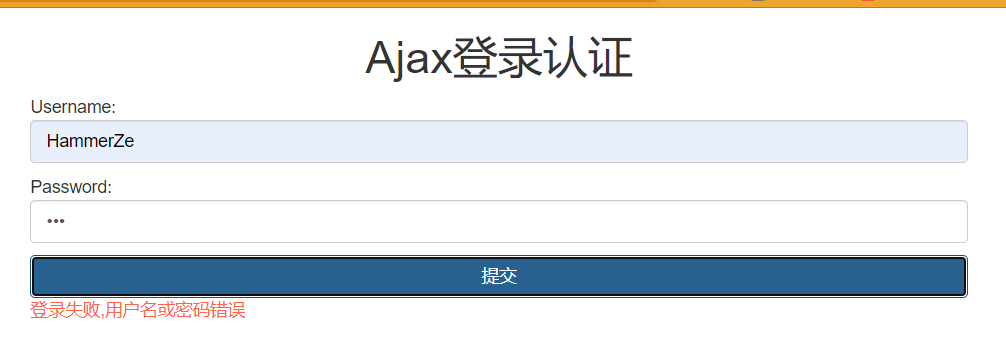
注意
如果使用Ajax,form表单提交完数据会自己刷新,所有在使用button元素提交的时候会刷两次,可以讲form元素去掉;
如果使用Ajax,form元素也可以不去掉,那么就不能使用button元素,可以使用input元素,type=‘button’
在Ajax中,如果使用json模块序列化数据,前端返回的是字符串不是对象,响应头中是text/html格式,需要自己在html页面通过JSON.parse(data)反序列化,ajax接收到数据后需要自己转成对象
在Ajax中,如果使用JsonResponse模块序列化数据,返回的就是一个对象,响应头中是application/json格式,不需要自己手动反序列化,ajax接收到数据后会自动转成对象
如果使用Ajax,能不能解析返回的数据,取决于响应的类型,如果是json类型,那么就自动解析,不是需要自己手动解析
如果使用了ajax,后端就不要返回rediret,render,HttpResponse,直接返回JsonResponse,因为返回json前端才能处理
总结:后端返回数据,统一都用JsonResponse
我们知道请求和响应都有数据格式,请求格式常用得比如:urlencoded、form-data、json····响应格式常用得有:text/html、json····
现有HTML代码如下:用属性enctype的值来区分Content-Type
<form action="http://localhost:8080" method="post" enctype="application/x-www-form-urlencoded"> <input type="text" name="userName" value="zhan gsan"/> <input type="text" name="password" value="password"/> <input type="file" name="resultFile" /> <input type="submit" value="submit"/></form>当Content-Type为不同值时,报文结果分别为下:
浏览器用x-www-form-urlencoded的编码方式把form数据转换成一个字串(name1=value1&name2=value2…),然后把这个字串append到url后面,用?分割,加载这个新的url。 当action为post时候,浏览器把form数据封装到http body中,然后发送到server。
POST / HTTP/1.1Host: localhost:8080Connection: keep-aliveContent-Length: 62Cache-Control: max-age=0Upgrade-Insecure-Requests: 1Origin: nullContent-Type: application/x-www-form-urlencodedUser-Agent: Mozilla/5.0 (Windows NT 10.0; WOW64) AppleWebKit/537.36 (KHTML, like Gecko) Chrome/63.0.3239.132 Safari/537.36Accept: text/html,application/xhtml+xml,application/xml;q=0.9,image/webp,image/apng,*/*;q=0.8Accept-Encoding: gzip, deflate, brAccept-Language: zh-CN,zh;q=0.9userName=zhan+gsan&password=password&resultFile=dddddddddd.vlx浏览器会把整个表单以控件为单位分割,并为每个部分加上Content-Disposition(form-data或者file),name(控件name)等信息,并加上分割符(boundary)。
此报文分割符为:boundary=—-WebKitFormBoundarys70zFPQBqcgHeMy9
POST / HTTP/1.1Host: localhost:8080Connection: keep-aliveContent-Length: 659Cache-Control: max-age=0Upgrade-Insecure-Requests: 1Origin: nullContent-Type: multipart/form-data; boundary=----WebKitFormBoundarys70zFPQBqcgHeMy9User-Agent: Mozilla/5.0 (Windows NT 10.0; WOW64) AppleWebKit/537.36 (KHTML, like Gecko) Chrome/63.0.3239.132 Safari/537.36Accept: text/html,application/xhtml+xml,application/xml;q=0.9,image/webp,image/apng,*/*;q=0.8Accept-Encoding: gzip, deflate, brAccept-Language: zh-CN,zh;q=0.9------WebKitFormBoundarys70zFPQBqcgHeMy9Content-Disposition: form-data; name="userName"zhan gsan------WebKitFormBoundarys70zFPQBqcgHeMy9Content-Disposition: form-data; name="password"password------WebKitFormBoundarys70zFPQBqcgHeMy9Content-Disposition: form-data; name="resultFile"; filename="dddddddddd.vlx"Content-Type: application/octet-stream{"nodes":[{"name":"11111","image":"theme/gast/ren.png","entityId":"1000001"},{"name":"5555","image":"theme/gast/ren.png","entityId":"1000001"}],"edges":[{"source":"11111","target":"5555","relation":"ssss","count":"1","currentExtDepth":"1"}]}------WebKitFormBoundarys70zFPQBqcgHeMy9--POST / HTTP/1.1Host: localhost:8080Connection: keep-aliveContent-Length: 66Cache-Control: max-age=0Upgrade-Insecure-Requests: 1Origin: nullContent-Type: text/plainUser-Agent: Mozilla/5.0 (Windows NT 10.0; WOW64) AppleWebKit/537.36 (KHTML, like Gecko) Chrome/63.0.3239.132 Safari/537.36Accept: text/html,application/xhtml+xml,application/xml;q=0.9,image/webp,image/apng,*/*;q=0.8Accept-Encoding: gzip, deflate, brAccept-Language: zh-CN,zh;q=0.9userName=zhan gsanpassword=passwordresultFile=dddddddddd.vlx参考:请求头编码格式
1 http --post--请求,有编码格式,主流有三种 -urlencoded :默认的----》从request.POST取提交的数据 -form-data :上传文件的----》从request.POST取提交的数据,request.FILES中取文件 -json :ajax发送json格式数据-----》request.POST取不出数据了,需要request.body 2 使用ajax和form表单,默认都是urlencoded格式3 如果上传文件:form表单指定格式,ajax要使用Formdata对象4 如果编码方式是urlencoded格式,放到body体中数据格式如下 username=Hammer&password=123 # post请求,Ajax预处理后得数据格式,urlencoded数据格式 5 如果是formdata编码格式,body体中是:两部分,数据和文件 6 如果是json格式,body体中的格式是:就是json格式字符串 -注意:注意:注意:如果这种格式,request.POST取不到值了 前面我们介绍到上传文件可以通过form表单来上传文件,通过input元素修改type=file就上传单个文件,如果加multiple参数就可以上传多个文件等····
form表单上传文件
<h1>form表单上传文件</h1><form action="" method="post" enctype="multipart/form-data"> <p>用户名:<input type="text" name="name"></p> <p>文件:<input type="file" name="myfile"></p> <input type="submit" value="提交"></form> def file_upload(request): if request.method=='GET': return render(request,'file_upload.html') else: myfile=request.FILES.get('myfile') with open(myfile.name,'wb') as f: for line in myfile: f.write(line) return HttpResponse('ok')现在我们可以使用ajax上传文件,那么格式和编码有什么要求?实例如下:
<h1>ajax上传文件</h1><p>用户名:<input type="text" id="id_name"></p><p>文件:<input type="file" id="id_myfile"></p><button id="id_btn">提交</button><script> $('#id_btn').click(function () { //如果要上传文件,需要借助于一个js的FormData对象 var formdata = new FormData() //实例化得到一个FormData对象 formdata.append('name', $('#id_name').val()) //追加了一个name对应填入的值 //追加文件 var file = $('#id_myfile')[0].files[0] formdata.append('myfile', file) $.ajax({ url: 'file_upload', method: 'post', //上传文件,一定要注意如下两行 processData: false, //不预处理数据, contentType: false, //不指定编码格式,使用formdata对象的默认编码就是formdata格式 data: formdata, success: function (data) { console.log(data) } }) })</script>def file_upload(request): if request.method=='GET': return render(request,'file_upload.html') else: name=request.POST.get('name') myfile=request.FILES.get('myfile') print(type(myfile)) # 查看类型 from django.core.files.uploadedfile import InMemoryUploadedFile with open(myfile.name,'wb') as f: for line in myfile: f.write(line) return HttpResponse('上传成功')先拿到input元素:
$(‘#id_myfile’)[0]再拿到所有文件:
$(‘#id_myfile’)[0].files再通过索引取出要取得文件:
$(‘#id_myfile’)[0].files[0]

总结
processData: false不预处理,contentType: false不指定编码格式注意:json模块在3.5版本之前不可以直接loads二进制格式(bytes),在3.6版本以后可以
Ajax传json格式只需指定编码格式和序列化数据就能上传
后端需要注意得是post请求得从body体里取数据,然后反序列化即可
<!DOCTYPE html><html lang="en"><head> <meta charset="UTF-8"> <title>Title</title> <script src="https://cdn.bootcdn.net/ajax/libs/jquery/3.4.1/jquery.min.js"></script></head><body><h1>ajax提交json格式</h1><p>用户名: <input type="text" id="id_name"></p><p>密码: <input type="password" id="id_password"></p><button id="id_button">提交</button></body><script> $('#id_button').click(function () { $.ajax({ url: '/ajax_json/', method: 'post', contentType: 'application/json', //指定编码格式 data: JSON.stringify({name:$('#id_name').val(),password:$('#id_password').val()}), //json格式字符串,序列化数据 success: function (data) { console.log(data) } }) })</script></html>后端
def ajax_json(request): if request.method=='GET': return render(request,'ajax_json.html') else: # json格式,从POST中取不出来 name=request.POST.get('name') print(type(request.POST)) # 返回QueryDict对象,不允许修改 # from django.http.request import QueryDict print(name) # None # 在body体中,bytes格式 # django默认只处理两种格式数据urlencode和form-data,json格式需要自己处理 import json request.data=json.loads(request.body) # 反序列化,从前端获取数据 name=request.data.get('name') password=request.data.get('password') print(name) print(password) return HttpResponse('ok')django提供了一个模块可以将对象直接序列化,然后返回给前端,但是可扩展性低,字段不能控制,返回得是一个整体
from django.core import serializers def user_list(request): user_list = models.User.objects.all() # queryset对象 res = serializers.serialize('json', user_list) return HttpResponse(res)现在想要字段可控,可以采用for循环列表套字典得格式,然后序列化
def user_list(request): user_list = models.User.objects.all() # queryset对象 l = [] for user in user_list: l.append({'name':user.name,'password':user.password}) return JsonResponse(l,safe=False) # 返回给前端 # 如果使用json模块不需要加safe参数ps:可以通过json.cn将序列化的数据转成对象
【待续】