以 ReentrantLock 创建的非公平锁为基础,进行 AQS 全流程的分析。
一共有 A、B、C 三个线程。
public class AQSDemo { // 带入一个银行办理业务的案例 public static void main(String[] args) { // 创建一个非公平锁 ReentrantLock lock = new ReentrantLock(); // 三个线程模拟3个网点 // A 顾客就是第一个顾客,此时没有没有其他顾客 new Thread(() -> { lock.lock(); try { System.out.println(Thread.currentThread().getName() + "\t thread come in"); try { TimeUnit.MINUTES.sleep(20); } catch (InterruptedException e) { e.printStackTrace(); } } catch (Exception e) { e.printStackTrace(); } finally { lock.unlock(); } }, "A").start(); // 第二个线程 --> 由于受理窗口只有一个(只能一个线程持有锁),此时 B 只能等待 // 进入候客区 new Thread(() -> { lock.lock(); try { System.out.println(Thread.currentThread().getName() + "\t thread come in"); } catch (Exception e) { e.printStackTrace(); } finally { lock.unlock(); } }, "B").start(); // 第三个线程 --> 由于受理窗口只有一个(只能一个线程持有锁),此时 B 只能等待 // 进入候客区 new Thread(() -> { lock.lock(); try { System.out.println(Thread.currentThread().getName() + "\t thread come in"); } catch (Exception e) { e.printStackTrace(); } finally { lock.unlock(); } }, "C").start(); }}调用抽象类 sync 的抽象 lock() 方法
public void lock() { sync.lock();}static final class NonfairSync extends Sync { private static final long serialVersionUID = 7316153563782823691L; final void lock() { if (compareAndSetState(0, 1)) setExclusiveOwnerThread(Thread.currentThread()); else acquire(1); } protected final boolean tryAcquire(int acquires) { return nonfairTryAcquire(acquires); }}protected final boolean compareAndSetState(int expect, int update) { return unsafe.compareAndSwapInt(this, stateOffset, expect, update);}这个方法就是将 state 值进行比较修改,由于这个是第一个线程进来,所以通过比较修改,将 state 的值从默认的 0 改成了 1,然后返回 true。
protected final void setExclusiveOwnerThread(Thread thread) { exclusiveOwnerThread = thread;}设置当前拥有独占访问权限的线程,对应 Demo 中的 A 线程。
第一个线程的执行逻辑比较简单,直接修改 state 和将当前占有的线程改成自己就可以了。
和第一个线程执行的是一样的代码。
final void lock() { if (compareAndSetState(0, 1)) setExclusiveOwnerThread(Thread.currentThread()); else acquire(1);}// expect = 0 update = 1protected final boolean compareAndSetState(int expect, int update) { return unsafe.compareAndSwapInt(this, stateOffset, expect, update);}此时当线程二再次执行比较并修改方法,想修改 state 的值时,通过比较对比。此时 state 的值已经被线程一修改成了 1,所以此时修改失败。返回 false。
// arg = 1public final void acquire(int arg) { if (!tryAcquire(arg) && acquireQueued(addWaiter(Node.EXCLUSIVE), arg)) selfInterrupt();}通过抛出异常的方式,强制子类必需实现其钩子程序。
protected boolean tryAcquire(int arg) { throw new UnsupportedOperationException();}// acquires = 1protected final boolean tryAcquire(int acquires) { return nonfairTryAcquire(acquires);}// acquires = 1final boolean nonfairTryAcquire(int acquires) { // 此时 Thread = 第二个线程 final Thread current = Thread.currentThread(); // getState() 方法返回 1,因为 state 已经被第一个线程所修改了 int c = getState(); if (c == 0) { if (compareAndSetState(0, acquires)) { setExclusiveOwnerThread(current); return true; } } // getExclusiveOwnerThread:获取当前占用锁的线程,也就是线程一 // 此时如果线程一再次过来获取到锁,就可以直接进去也就是可重入锁 else if (current == getExclusiveOwnerThread()) { int nextc = c + acquires; if (nextc < 0) // overflow throw new Error("Maximum lock count exceeded"); setState(nextc); return true; } return false;}nonfairTryAcquire 方法首先校验了 state 的值是否等于 0,也就是看看上一个占用锁的线程是不是已经把资源给释放了。
后续又校验了当前线程是不是和占用锁的线程是同一个,也就是一个可重入锁。
线程 B 来判断的话都不满足条件,所以返回 false。
返回 false 后 [!tryAcquire(arg) = true](######2.3 执行 acquire(1) 方法),所以继续执行。
Node.EXCLUSIVE:static final Node EXCLUSIVE = null; 也就是排他的意思。
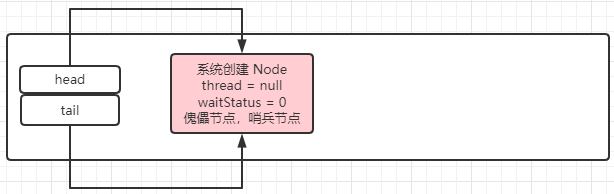
// mode = nullprivate Node addWaiter(Node mode) { // 创建一个 Node 节点 Node node = new Node(Thread.currentThread(), mode); // tail:尾节点,此时为 null Node pred = tail; if (pred != null) { node.prev = pred; if (compareAndSetTail(pred, node)) { pred.next = node; return node; } } enq(node); return node;}// thread = 线程二 mode = nullNode(Thread thread, Node mode) { // 将当前等待节点谁知为 null this.nextWaiter = mode; // 这个 Node 节点的线程设置为 线程二 this.thread = thread;}// node 等于 2.6.1 创建的 Node 节点private Node enq(final Node node) { // 自旋操作 for (;;) { // 此时尾结点 tail 为 null Node t = tail; // t is null 进行初始化操作,这一步也就是意味着此时 CLH 队列中还没有任何一个元素。 if (t == null) { // 成功将队列里面的头节点替换成新创建的 Node 节点 if (compareAndSetHead(new Node())) // 将尾结点也指向新创建 Node 节点 tail = head; } else { node.prev = t; if (compareAndSetTail(t, node)) { t.next = node; return t; } } }}private final boolean compareAndSetHead(Node update) { return unsafe.compareAndSwapObject(this, headOffset, null, update);}比较并替换掉头节点,如果是 null 的话,直接将头节点替换成新创建的 Node 节点。
这里需要注意的是:队列中的第一个节点并不是我们线程二这个节点,而是系统自动帮我们创建了一个新的 Node 节点。
替换成功返回 true 继续执行 if 语句里面的[代码](######2.6.2 enq(node));
经过第一轮循环,此时 CLH 中的情况:
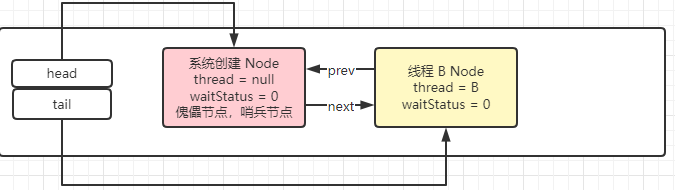
// node = 2.6.1 创建的 Node 节点,也就是线程二的 Node 节点private Node enq(final Node node) { // 自旋操作 for (;;) { // 此时尾结点 tail 为 新创建的 node 节点 Node t = tail; // t is not null 执行 else if (t == null) { if (compareAndSetHead(new Node())) tail = head; } else { // 将 node 节点的前指针指向新创建的头节点 node.prev = t; // 通过比较替换将队列的尾结点替换了线程 B 的 Node 节点 if (compareAndSetTail(t, node)) { // 将系统初始的 Node 的后指针指向线程 B 的 Node 节点 t.next = node; // 然后返回 B 线程的 Node 节点 return t; } } }}经过第二次循环后,此时的 CLH 队列的情况如下
// node:线程 B 对应的 Node 节点 arg = 1final boolean acquireQueued(final Node node, int arg) { boolean failed = true; try { boolean interrupted = false; // 自旋操作 for (;;) { // 获取现在队列中的第一个节点也就是系统创建的 Node 节点 final Node p = node.predecessor(); // P 现在是头节点,true。但是线程 B 尝试获取锁失败,false if (p == head && tryAcquire(arg)) { setHead(node); p.next = null; // help GC failed = false; return interrupted; } // 所以执行这一步,返回 false。所以进行下一次循环 if (shouldParkAfterFailedAcquire(p, node) && parkAndCheckInterrupt()) interrupted = true; } } finally { if (failed) cancelAcquire(node); }}final Node predecessor() throws NullPointerException { Node p = prev; if (p == null) throw new NullPointerException(); else return p;}再走一遍 2.5 执行了 [!nonfairTryAcquire(acquires) 方法](#####2.5 执行了 nonfairTryAcquire(acquires) 方法)
第一次循环
// pred 系统创建的 Node 节点,node 线程 B 对应的 Node 节点private static boolean shouldParkAfterFailedAcquire(Node pred, Node node) { // 此时头节点的 waitStatus = 0 int ws = pred.waitStatus; // Node.SIGNAL = -1 if (ws == Node.SIGNAL) return true; if (ws > 0) { do { node.prev = pred = pred.prev; } while (pred.waitStatus > 0); pred.next = node; } else { // 通过比较替换,将头节点的值从 0 调整为 -1 compareAndSetWaitStatus(pred, ws, Node.SIGNAL); } return false;}现在对应 CLH 队列中的情况:

该方法将头节点中 Node 的 waitStatus 的值改成了 -1,并且返回了 false。
然后再次重复 [2.7 acquireQueued(addWaiter(Node.EXCLUSIVE), arg)](######2.7 acquireQueued(addWaiter(Node.EXCLUSIVE), arg) 的操作,
第二次循环
// node:线程 B 对应的 Node 节点 arg = 1final boolean acquireQueued(final Node node, int arg) { boolean failed = true; try { boolean interrupted = false; // 自旋操作 for (;;) { // 获取现在队列中的第一个节点也就是系统创建的 Node 节点 final Node p = node.predecessor(); // P 现在是头节点,true。但是线程 B 尝试获取锁失败,false if (p == head && tryAcquire(arg)) { setHead(node); p.next = null; // help GC failed = false; return interrupted; } // 所以第二次循环后返回 ture,执行下一步 if (shouldParkAfterFailedAcquire(p, node) && parkAndCheckInterrupt()) interrupted = true; } } finally { if (failed) cancelAcquire(node); }}// pred 系统创建的 Node 节点,node 线程 B 对应的 Node 节点private static boolean shouldParkAfterFailedAcquire(Node pred, Node node) { // 经过第一次循环操作,此时头节点的 waitStatus = -1 int ws = pred.waitStatus; // Node.SIGNAL = -1 if (ws == Node.SIGNAL) return true; if (ws > 0) { do { node.prev = pred = pred.prev; } while (pred.waitStatus > 0); pred.next = node; } else { // 通过比较替换,将头节点的值从 0 调整为 -1 compareAndSetWaitStatus(pred, ws, Node.SIGNAL); } return false;}// this 当前 B 线程private final boolean parkAndCheckInterrupt() { // 将当前线程 B 进行挂起 LockSupport.park(this); return Thread.interrupted();}此时,线程B相当于已经完成了入队操作,进行了挂起。不会再尝试去获取锁了,安安心心在 CLH 队列中等待唤醒操作。
线程 B 在锁已经被占用的情况下,会先去尝试抢占锁。如果抢占失败,AQS 回将线程 B 进行入队操作。但是在入队之前会先进行初始化操作,也就是先创建一个傀儡节点,由其充当头节点和尾结节点。
队列初始化完成后,再将线程 B 对应的 Node 节点与傀儡节点进行连接,也就是傀儡节点的尾指针指向线程 B 的 Node 节点,线程 B 的 Node 节点的指针指向傀儡节点。最后将 CLH 队列的尾指针指向线程 B 的 Node 节点。
将acquire线程 B 的 Node 节点加入到 CLH 队列中后又调用了 acquireQueued 方法,这里通过自旋使得线程 B 又抢占了两次锁,抢占到了的就进行后面的操作,没有抢占到便执行 parkAndCheckInterrupt 方法,将自己挂起,等待前面的线程执行完释放锁后将自己唤醒。
线程 C 和线程 B 前面执行的逻辑是一样,直到执行 addWaiter(Node.EXCLUSIVE) 方法时才有所出入,所以就直接分析 addWaiter(Node.EXCLUSIVE) 方法的执行流程。
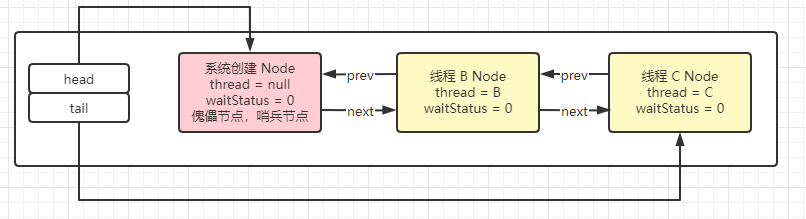
// mode 还是等于 null 排他private Node addWaiter(Node mode) { // 创建线程 C 的 Node 节点 Node node = new Node(Thread.currentThread(), mode); // 此时尾指针指向的是线程 B 的 Node 节点 Node pred = tail; if (pred != null) { // 将线程 C 的 Node 节点的前指针指向线程 B 的 Node 节点 node.prev = pred; // 通过比较替换将线程的尾指针指向线程 C 的 Node 节点 if (compareAndSetTail(pred, node)) { // 将线程 B 的 Node 节点的后指针指向线程 C 的 Node 节点 pred.next = node; // 返回线程 C 的 Node 节点 return node; } } enq(node); return node;}线程 C 执行完 addWaiter 方法后此时的 CLH 队列的情况如下:
// node 线程 c 对应的 Node arg = 1final boolean acquireQueued(final Node node, int arg) { boolean failed = true; try { boolean interrupted = false; for (;;) { // 获取线程 c 对应的 Node 节点的前指针对应的 Node(线程 B 的 Node 节点线程 B 的 Node 节点) final Node p = node.predecessor(); // 因为此时 head 头节点还是傀儡节点,所以不匹配,直接执行下面的代码 if (p == head && tryAcquire(arg)) { setHead(node); p.next = null; // help GC failed = false; return interrupted; } // if (shouldParkAfterFailedAcquire(p, node) && parkAndCheckInterrupt()) interrupted = true; } } finally { if (failed) cancelAcquire(node); }}// pred 线程 B 对应的 Node node 线程 c 对应的 Nodeprivate static boolean shouldParkAfterFailedAcquire(Node pred, Node node) { // 此时线程 B 的 waitStatus = 0 int ws = pred.waitStatus; if (ws == Node.SIGNAL) return true; if (ws > 0) { do { node.prev = pred = pred.prev; } while (pred.waitStatus > 0); pred.next = node; } else { // 通过比较替换将线程 B 的 waitStatus 改成 -1 compareAndSetWaitStatus(pred, ws, Node.SIGNAL); } return false;}// pred 线程 B 对应的 Node node 线程 c 对应的 Nodeprivate static boolean shouldParkAfterFailedAcquire(Node pred, Node node) { // 此时线程 B 的 waitStatus = -1 int ws = pred.waitStatus; if (ws == Node.SIGNAL) return true; if (ws > 0) { do { node.prev = pred = pred.prev; } while (pred.waitStatus > 0); pred.next = node; } else { compareAndSetWaitStatus(pred, ws, Node.SIGNAL); } return false;}private final boolean parkAndCheckInterrupt() { LockSupport.park(this); return Thread.interrupted();}线程 C 执行 parkAndCheckInterrupt 方法将自己挂起。
此时 CHL 队列的情况如下:
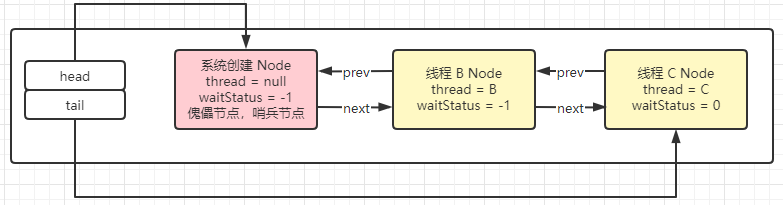
线程 C 执行的流程和线程 B 大致是差不太多的,但是线程 C 和线程与线程 B 最显著的区别就是少了两次锁的抢占 。在方法 acquireQueued 中,由于线程 C 的前指针指向的 Node 节点与头节点的 Node 不一样,所以就直接跳过了,不会执行后续的尝试抢占锁的方法。
后面线程 C 执行 shouldParkAfterFailedAcquire 方法将其前指针指向的 Node 节点中的 waitStatus 的值从 0 改成了 -1。最后就是执行 parkAndCheckInterrupt 方法,将自己挂起。