mkdir myprojectcd myprojectpython3 -m venv venv. venv/bin/activatepip install Flask将下列代码保存为 hello.py:
from flask import Flaskapp = Flask(__name__)@app.route("/")def hello_world(): return "<p>Hello, World!</p>"运行上述代码:
export FLASK_APP=helloflask run这样访问:http://127.0.0.1:5000 会看到 Hello, World!
这里有 flask 的基本知识(非常重要的基础,大家可以自己看:链接
HTML Escaping (利用 Jinja,参考:链接
Routing (下面几个例子)
@app.route('/')def index(): return 'Index Page'@app.route('/hello')def hello(): return 'Hello, World'@app.route('/user/<username>')def show_user_profile(username): # show the user profile for that user return f'User {escape(username)}'@app.route('/post/<int:post_id>')def show_post(post_id): # show the post with the given id, the id is an integer return f'Post {post_id}'@app.route('/path/<path:subpath>')def show_subpath(subpath): # show the subpath after /path/ return f'Subpath {escape(subpath)}'HTTP Methods
@app.route('/login', methods=['GET', 'POST'])def login(): if request.method == 'POST': else:Static Files (url_for('static', filename='style.css'))
Rendering Templates (这个参考之前的 Jinja)
File Uploads、Cookies、Redirects and Errors、About Responses、APIs with JSON、Sessions、Message Flashing、Logging 这些等我们实际用到时再过来看
第 1 节教大家如何利用 python 虚拟环境,快速构建 flask 环境;第 2 节带着大家简单熟悉了 flask 的编程规则(或风格)。
大家在着手本节时,务必将第 2 节中的基础的代码跟着官网敲一下!因为,这一节我们不是由简到难一步步搭建 flask 服务器,而是直接拿搭建好的反过来分析。
$ git clone https://github.com/pallets/flask$ cd flask$ cd examples/tutorial代码目录结构如下:
? tutorial git:(main) tree -L 4.├── flaskr│ ├── __init__.py│ ├── db.py│ ├── schema.sql│ ├── auth.py│ ├── blog.py│ ││ ├── templates│ │ ├── base.html│ │ ├── auth│ │ │ ├── login.html│ │ │ └── register.html│ │ └── blog│ │ ├── create.html│ │ ├── index.html│ │ └── update.html│ ││ └── static│ └── style.css│ ├── MANIFEST.in└── setup.pydef create_app(test_config=None): """Create and configure an instance of the Flask application.""" # 1-创建一个 Flask 实例 # 并设置一些 APP 需要用到的参数 app = Flask(__name__, instance_relative_config=True) app.config.from_mapping( # a default secret that should be overridden by instance config SECRET_KEY="dev", # store the database in the instance folder DATABASE=os.path.join(app.instance_path, "flaskr.sqlite"), ) # 2-测试用的 if test_config is None: # load the instance config, if it exists, when not testing app.config.from_pyfile("config.py", silent=True) else: # load the test config if passed in app.config.update(test_config) # 3-创建一个文件夹,用来存 DB 运行时的产生的文件 # ensure the instance folder exists try: os.makedirs(app.instance_path) except OSError: pass @app.route("/hello") def hello(): return "Hello, World!" # register the database commands # 3.3 数据库设置(为 flask 新增一个 init_db 命令,这样直接敲 flask init_db 就能生成表) from flaskr import db db.init_app(app) # apply the blueprints to the app # #### 3.4 蓝图和视图(基于蓝图来管理组织视图,视图注册到蓝图,蓝图注册到应用) from flaskr import auth, blog app.register_blueprint(auth.bp) app.register_blueprint(blog.bp) # make url_for('index') == url_for('blog.index') # in another app, you might define a separate main index here with # app.route, while giving the blog blueprint a url_prefix, but for # the tutorial the blog will be the main index app.add_url_rule("/", endpoint="index") return app该项目采用了 SQLite 作为数据库(Python 内置了,免去安装和配置工作)。
SQLite 的数据存储在表格中,在向表格增删改查数据前,需要先建表。该项目中的 schema.sql 编写了建表的 SQL 语句。分别创建了一个 user 表和 post 表。
DROP TABLE IF EXISTS user;DROP TABLE IF EXISTS post;CREATE TABLE user ( id INTEGER PRIMARY KEY AUTOINCREMENT, username TEXT UNIQUE NOT NULL, password TEXT NOT NULL);CREATE TABLE post ( id INTEGER PRIMARY KEY AUTOINCREMENT, author_id INTEGER NOT NULL, created TIMESTAMP NOT NULL DEFAULT CURRENT_TIMESTAMP, title TEXT NOT NULL, body TEXT NOT NULL, FOREIGN KEY (author_id) REFERENCES user (id));2)与数据库建立连接与断开
def get_db(): """Connect to the application's configured database. The connection is unique for each request and will be reused if this is called again. """ if "db" not in g: g.db = sqlite3.connect( current_app.config["DATABASE"], detect_types=sqlite3.PARSE_DECLTYPES ) g.db.row_factory = sqlite3.Row return g.dbdef close_db(e=None): """If this request connected to the database, close the connection. """ db = g.pop("db", None) if db is not None: db.close()g 是一个特殊结构,对于每次请求,会产生一个。
3)数据库初始化(生成表)
第 1 节的 schema.sql 用于建表,那么如何执行其中的建表命令呢? db.py 中的 init_db 就是干这个事情的。
def init_db(): """Clear existing data and create new tables.""" db = get_db() # 获取数据库(如果没有则创建) # 读取 schema.sql 中的 SQL 命令,并用 db.executescript 执行 SQL 命令 with current_app.open_resource("schema.sql") as f: db.executescript(f.read().decode("utf8")) 4)将 init_db 注册为 flask 命令
由于数据库初始化并不需要每次启动数据库时运行(不属于运行时需要执行的函数),我们需要将注册成 flask 一个指令,只要在命令行中敲 flask init-db 就能够执行 init_db,其实现方法如下:
@click.command("init-db")@with_appcontextdef init_db_command(): """Clear existing data and create new tables.""" init_db() click.echo("Initialized the database.") def init_app(app): """Register database functions with the Flask app. This is called by the application factory. """ app.teardown_appcontext(close_db) # 在返回响应后进行清理时调用该函数 app.cli.add_command(init_db_command) # 添加一个可以用flask命令调用的新命令这样,执行完之后,flask.sqlite 文件将会出现在 instance 文件夹。
蓝图是一种组织一组相关视图和其他代码的方法。它们不是直接向应用程序注册视图和其他代码,而是向蓝图注册。然后,当蓝图在factory函数中可用时,它将在应用程序中注册。
该项目中有两个蓝图:auth 和 blog
bp = Blueprint("auth", __name__, url_prefix="/auth") # in auth.pybp = Blueprint("blog", __name__) # in blog.py参数分别是:蓝图的名字,import_name(一般为 __name__),url 前缀
[1].官方 Demo Github 仓库
1)auth 视图
这里主要有三个路由:
@bp.route("/register", methods=("GET", "POST"))def register():...@bp.route("/login", methods=("GET", "POST"))def login():...@bp.route("/logout")def logout():2)blog 视图
这里主要有四个路由:
@bp.route("/")def index():...@bp.route("/create", methods=("GET", "POST"))@login_requireddef create():...@bp.route("/<int:id>/update", methods=("GET", "POST"))@login_requireddef update(id):...@bp.route("/<int:id>/delete", methods=("POST",))@login_requireddef delete(id):...3)注册视图中各个功能实现介绍
注册
注册逻辑为:首先从 POST 中获取 username 和 password,然后调用数据库插入操作:
username = request.form["username"]password = request.form["password"]db.execute("INSERT INTO user (username, password) VALUES (?, ?)", (username, generate_password_hash(password)),)登录
登录逻辑为:首先从 POST 中获取 username 和 password,然后调用数据库查询操作,获取该用户的密码,然后进行密码匹配:
user = db.execute("SELECT * FROM user WHERE username = ?",username,)).fetchone()check_password_hash(user["password"], password)密码匹配后,需要创建 session:
if error is None: # store the user id in a new session and return to the index session.clear() session["user_id"] = user["id"] return redirect(url_for("index"))注销
注销需要清空 session:
session.clear()Session
Session 逻辑如下:注册一个方法,让其在任何 URL 请求之前执行,在其中做 Session 管理:
@bp.before_app_requestdef load_logged_in_user(): user_id = session.get('user_id') if user_id is None: g.user = None else: g.user = get_db().execute( 'SELECT * FROM user WHERE id = ?', (user_id,) ).fetchone()其他 View 使用认证
其他 View 也想使用认证该如何做?在 auth.py 中实现 login_required 函数,判断 user 是否为空,如果为空,则跳转到登录页面:
def login_required(view):@functools.wraps(view)def wrapped_view(**kwargs): if g.user is None: return redirect(url_for('auth.login')) return view(**kwargs)return wrapped_view4)博客视图中各个功能实现介绍
展示所有博客
逻辑如下:执行数据库查询操作,获取所有博客,然后加载:
@bp.route("/")def index(): """Show all the posts, most recent first.""" db = get_db() posts = db.execute( "SELECT p.id, title, body, created, author_id, username" " FROM post p JOIN user u ON p.author_id = u.id" " ORDER BY created DESC" ).fetchall() return render_template("blog/index.html", posts=posts)创建博客
逻辑如下:函数前加上 @login_required 前缀,这样就能自动判断是否已经登录,否则跳到登录页面;创建博客就是获取标题和内容,然后调用插入命令,进行插入:
@bp.route("/create", methods=("GET", "POST"))@login_requireddef create(): """Create a new post for the current user.""" if request.method == "POST": title = request.form["title"] body = request.form["body"] error = None if not title: error = "Title is required." if error is not None: flash(error) else: db = get_db() db.execute( "INSERT INTO post (title, body, author_id) VALUES (?, ?, ?)", (title, body, g.user["id"]), ) db.commit() return redirect(url_for("blog.index")) return render_template("blog/create.html")更新和删除博客
更新和删除博客,需要传入一个 id,然后有一个内部函数用于判断该 id 是否存在:
def get_post(id, check_author=True): """Get a post and its author by id. Checks that the id exists and optionally that the current user is the author. :param id: id of post to get :param check_author: require the current user to be the author :return: the post with author information :raise 404: if a post with the given id doesn't exist :raise 403: if the current user isn't the author """ post = ( get_db() .execute( "SELECT p.id, title, body, created, author_id, username" " FROM post p JOIN user u ON p.author_id = u.id" " WHERE p.id = ?", (id,), ) .fetchone() ) if post is None: abort(404, f"Post id {id} doesn't exist.") if check_author and post["author_id"] != g.user["id"]: abort(403) return post因此,更新的逻辑如下:
@bp.route("/<int:id>/update", methods=("GET", "POST"))@login_requireddef update(id): """Update a post if the current user is the author.""" post = get_post(id) if request.method == "POST": title = request.form["title"] body = request.form["body"] error = None if not title: error = "Title is required." if error is not None: flash(error) else: db = get_db() db.execute( "UPDATE post SET title = ?, body = ? WHERE id = ?", (title, body, id) ) db.commit() return redirect(url_for("blog.index")) return render_template("blog/update.html", post=post)删除的逻辑如下:
@bp.route("/<int:id>/delete", methods=("POST",))@login_requireddef delete(id): """Delete a post. Ensures that the post exists and that the logged in user is the author of the post. """ get_post(id) db = get_db() db.execute("DELETE FROM post WHERE id = ?", (id,)) db.commit() return redirect(url_for("blog.index"))其他还有一些,是大家玩熟了之后才需要看的:
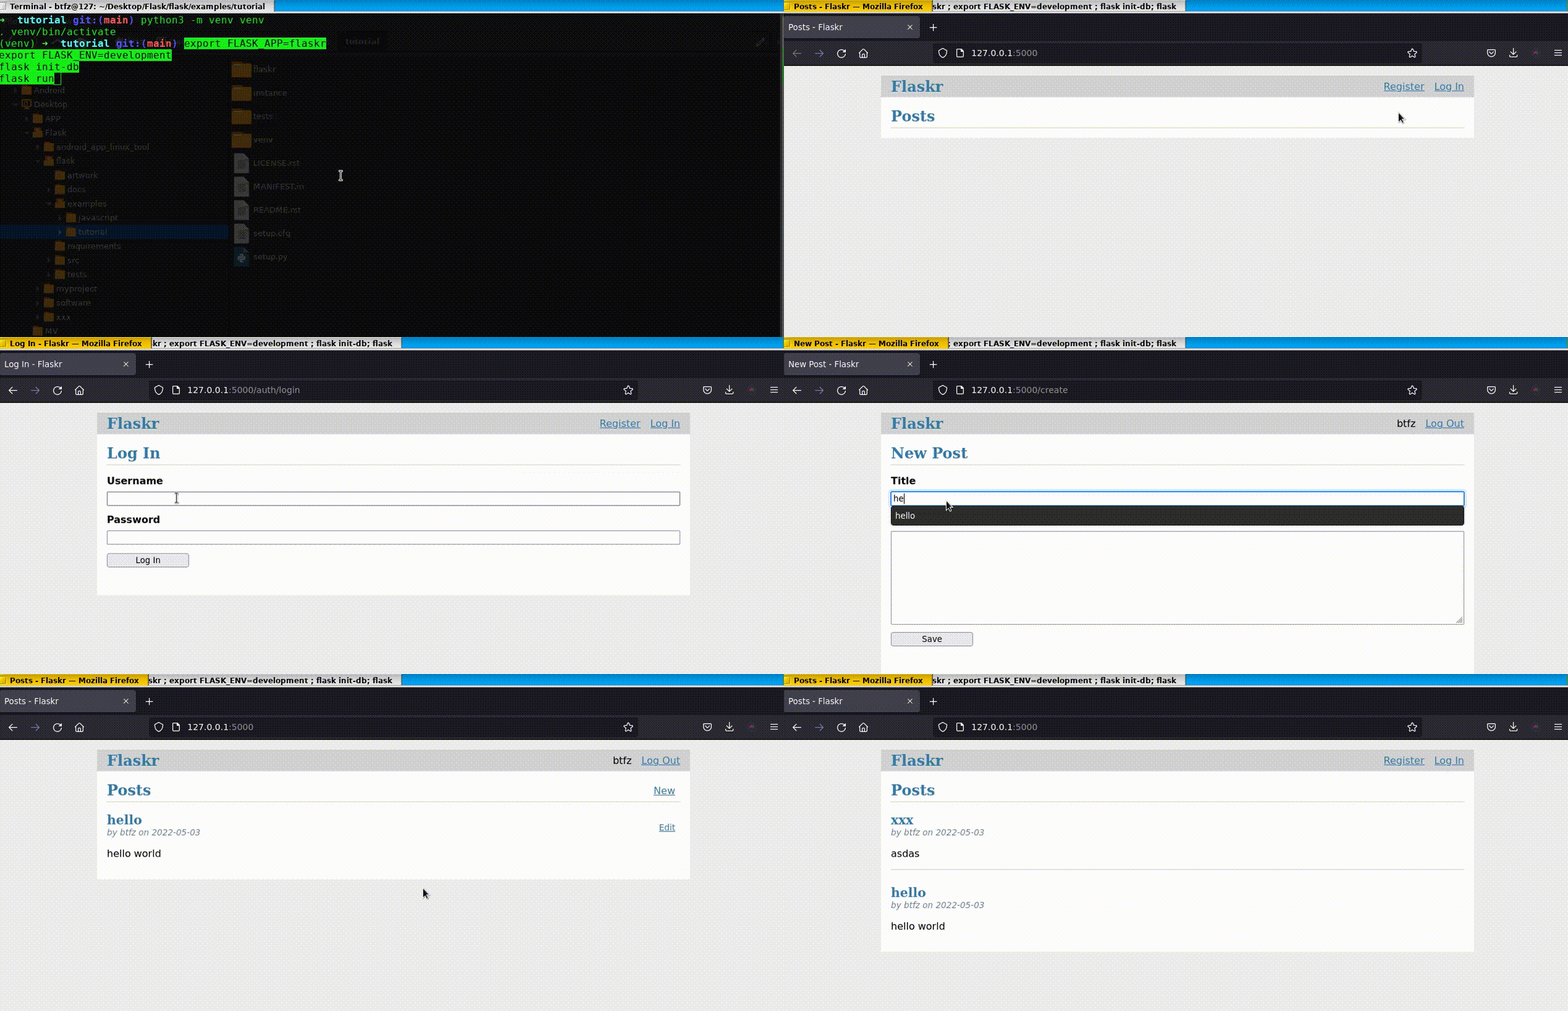
最后,我们跑起 Demo 看看效果:
1)在 tutorial 目录下,创建虚拟环境,并安装 Flask:
python3 -m venv venv. venv/bin/activatepip install Flask2)以开发者方式运行:
export FLASK_APP=flaskrexport FLASK_ENV=developmentflask init-dbflask run效果如下:
[1]. 本文源码
[2]. Flask 文档主页
[3]. tutorial 主页
[4]. Jinja 模板入门
[5]. python django web 开发
[6]. 真正搞明白Python中Django和Flask框架的区别
: 这篇是在大家熟悉基本的 flaskr 之后,进行稍微大一点的项目开发的指导,里面涉及到数据库、蓝图等...
如果觉得不错,帮忙点个支持哈~