官网文档:
https://docs.ansible.com/ansible/latest/
https://docs.ansible.com/ansible/latest/user_guide/index.html
配置yum源
$ cat /etc/yum.repos.d/ansible.repo[epel]name=epelbaseurl=http://mirrors.aliyun.com/epel/7Server/x86_64/enable=1gpgcheck=0安装ansible
$ yum -y install ansible如果有pip工具,也可以运行pip install ansible下载。使用pip下载的ansible不提供默认配置文件/etc/ansible/ansible.cfg。
安装完成检查
$ ansible --versionansible 2.9.25 config file = /etc/ansible/ansible.cfg configured module search path = [u'/home/test/.ansible/plugins/modules', u'/usr/share/ansible/plugins/modules'] ansible python module location = /usr/lib/python2.7/site-packages/ansible executable location = /bin/ansible python version = 2.7.5 (default, Oct 14 2020, 14:45:30) [GCC 4.8.5 20150623 (Red Hat 4.8.5-44)]从Ansible 2.9版本开始,ansible支持命令的选项补全功能,它依赖于python的argcomplete插件
$ yum -y install python-argcomplete # 安装$ activate-global-python-argcomplete # 激活激活后,就可以按两次tab补全命令和选项了。
在master节点的/etc/hosts文件中,添加上ip主机名对应关系
$ cat /etc/hosts127.0.0.1 localhost localhost.localdomain localhost4 localhost4.localdomain4::1 localhost localhost.localdomain localhost6 localhost6.localdomain6192.168.175.100 master192.168.175.101 node1192.168.175.102 node2ansible默认采用ssh连接,ssh连接要么使用密码认证,要么使用公钥认证。
这里采用公钥认证,实现免密登录,后续使用ansible方便一些。
$ ssh-keygen -t rsa -f ~/.ssh/id_rsa -N ''$ ssh-keyscan 192.168.175.101 >> ~/.ssh/known_hosts 2>/dev/null$ ssh-keyscan 192.168.175.102 >> ~/.ssh/known_hosts 2>/dev/null$ sshpass -p'hello123' ssh-copy-id root@192.168.175.101测试:
[root@master ~]# ssh 192.168.175.101Last login: Wed Jan 5 12:24:18 2022 from 192.168.175.1[root@node1 ~]# exitlogoutConnection to 192.168.175.101 closed.[root@master ~]#发现不用输入密码即可直接登录其它主机。
安装、环境配置完成后,ansible还只能控制本机,不能实现对其它节点的批量控制。
若想实现它的真正功能,必须对它进行配置。
下面开始了解ansible的几个重要的配置文件。
ansible默认的全局配置文件是/etc/ansible/ansible.cfg,可认为是全局配置的入口。
Ansible支持4种方式指定配置文件,它们的解析顺序从上到下
/etc/ansible/ansible.cfg 默认全局配置文件修改默认配置文件/etc/ansible/ansible.cfg:
$ cat /etc/ansible/ansible.cfg | grep -vE "^$|^#"[defaults]inventory = /etc/ansible/hosts # inventory文件:ansible管理的主机清单library = /usr/share/my_modules/forks = 5 # ansbile的并发连接数sudo_user = rootremote_port = 22host_key_checking = Falsetimeout = 10log_path = /var/log/ansible.log文件中其它的可配置项:
stdout_callback = debug # 可将输出变得人性化;默认输出会挤在一行,配置后会换行输出;inventory文件默认路径是/etc/ansible/hosts,在这里配置目标主机,ansible便可以对其进行控制。
在/etc/ansible/hosts文件里配置node主机名或ip:
$ cat hosts[default] # 主机分组node1 # 192.168.175.101node2 # 192.168.175.102可以通过/etc/ansible/ansible.cfg文件修改inventory的默认路径:inventory = /etc/ansible/hosts。如果将该配置指定为目录,便可以使用多个inventory文件来管理节点,一般很少动这个。
通常,不会修改默认的路径。如果有自定义的inventory文件,可以直接在ansible命令行中使用-i选项指定:
# ansible -i /tmp/my_inventory.ini ...# ansible-playbook -i /tmp/my_inventory.ini ...列出ansiblek可管理的所有主机
$ ansible-inventory --graph all # 指定文件:ansible-inventory -i /etc/ansible/hosts --graph all@all: # all是默认的主机组,包含所有主机 |--@default: | |--node1 | |--node2 |--@ungrouped:完成上述的基本配置后,即可以开始使用ansible来批量管理主机了,这里的管理方式为命令行方式(又称为Ad-hoc方式)。
Ad-hoc方式运行ansible的命令格式:ansible 主机组/主机 -m 模块 -a 参数
选项解析:
-m: 指定调用的模块-a: 向模块传递的参数,模块不需要则可省略;参数需要使用引号包围此外ansible命令还可以带上其它选项:
-i: 指定本次的inventory路径,指定该参数则后面不加主机组/主机-e: 设置变量,格式为'var1="aaa" var="bbb"'-v/vv/vvv: 命令输出的打印级别ansible的批量管理功能依靠各个模块来完成,ansible提供了几千个模块(其中ansible团队自己维护大约100多个核心模块),每个模块完成各自的作用。
下面用ping模块和debug模块来演示一下ansible的基础功能。
ping模块是ansible最基础模块之一,可用于检测远程主机是否在线。
命令:ansible 主机组/主机 -m ping
返回值:changed、ping
命令:ansible all -m ping
[root@master ansible]$ ansible all -m pingnode2 | SUCCESS => { "ansible_facts": { "discovered_interpreter_python": "/usr/bin/python" }, "changed": false, "ping": "pong"}node1 | SUCCESS => { "ansible_facts": { "discovered_interpreter_python": "/usr/bin/python" }, "changed": false, "ping": "pong"}官网说明:https://docs.ansible.com/ansible/latest/collections/ansible/builtin/debug_module.html
debug模块用于输出或调试一些变量或数据。该模块共有三个参数msg、var、verbosity。
msg:打印配置的信息var:打印变量值verbosity:运行级别,设置为3,则-vvv或更高才会打印输出命令:
ansible all -m debug -a 'msg="hello world"'
ansible all -e 'str="hello world"' -m debug -a 'var=str'
ansible all -v -m debug -a 'msg="hello world" verbosity=1'
示例:
[root@master ansible]$ ansible all -m debug -a 'msg="hello world"'node1 | SUCCESS => { "msg": "hello world"}node2 | SUCCESS => { "msg": "hello world"}[root@master ansible]$ ansible all -e 'str="hello world"' -m debug -a 'var=str'node1 | SUCCESS => { "str": "hello world"}node2 | SUCCESS => { "str": "hello world"}[root@master ansible]$ ansible all -m debug -a 'msg="hello world" verbosity=1'node1 | SKIPPEDnode2 | SKIPPED[root@master ansible]$ ansible all -v -m debug -a 'msg="hello world" verbosity=1'Using /etc/ansible/ansible.cfg as config filenode1 | SUCCESS => { "msg": "hello world"}node2 | SUCCESS => { "msg": "hello world"}
playbook使用yaml语法格式组织各种play和task规则。
下面使用ping模块和debug模块编写一个playbook文件如下:
# cat test.yaml---- name: play1 # play的名称,非必须 hosts: all # 指定目标主机 gather_facts: false # 收集目标主机信息,默认值true,非必须 tasks: # tasks声明任务列表 - name: task1 # task任务名称,非必须 ping: # 模块 data: "pong task1" # 模块参数 - name: task2 ping: data: "pong task2"- name: play2 hosts: all gather_facts: false tasks: - name: task1 debug: msg: "hello task1 in play2" - name: task2 debug: msg: "hello task2 in play2"注意所有的
-和:符号后面均需要接一个空格
执行playbook的命令是ansible-playbook test.yaml:
该命令同样支持像ansile命令一样的多个选项,如-e、-i、-v等
$ ansible-playbook -v test.yaml Using /etc/ansible/ansible.cfg as config filePLAY [play1] **********************************************************************************************************************TASK [task1] **********************************************************************************************************************ok: [node2] => {"ansible_facts": {"discovered_interpreter_python": "/usr/bin/python"}, "changed": false, "ping": "pong task1"}ok: [node1] => {"ansible_facts": {"discovered_interpreter_python": "/usr/bin/python"}, "changed": false, "ping": "pong task1"}TASK [task2] **********************************************************************************************************************ok: [node1] => {"changed": false, "ping": "pong task2"}ok: [node2] => {"changed": false, "ping": "pong task2"}PLAY [play2] **********************************************************************************************************************TASK [task1] **********************************************************************************************************************ok: [node1] => { "msg": "hello task1 in play2"}ok: [node2] => { "msg": "hello task1 in play2"}TASK [task2] **********************************************************************************************************************ok: [node1] => { "msg": "hello task2 in play2"}ok: [node2] => { "msg": "hello task2 in play2"}PLAY RECAP ************************************************************************************************************************node1 : ok=4 changed=0 unreachable=0 failed=0 skipped=0 rescued=0 ignored=0node2 : ok=4 changed=0 unreachable=0 failed=0 skipped=0 rescued=0 ignored=0yaml文件中,使用-表示一个列表元素,多个key:value表示一个字典。
每个playbook使用列表来组织多个play,play内同样使用列表来组织多个task;play和task自身则采用字典的方式组织,即多个键值对。
在playbook顶层使用- xxx:表示这是一个play;每个play中必须包含hosts和tasks指令。
hosts指令用来指定要执行该play的目标主机,可以是主机名、主机组或者其它多种方式。
tasks指令用来指定该play中包含的任务列表,每个任务使用- xxx:方式表示。
name指令用来设置play和task的名称,值具有唯一性。
gather_facts指令用来收集目标主机的信息,由setup模块提供。默认情况下,每个play都先执行这个特殊任务,收集完信息才开始其它任务。如果后续任务中用不到该信息,则可以禁止掉该任务,提升效率。
yaml中,向模块传递参数的方式总结为字符串和数组两种方式。
还是以debug模块为例。
数组方式如上面test.yaml文件里的传参,即key: value的形式:
......- name: task1 debug: msg: "hello task1 in play2" verbosity=1字符串方式,由于yaml的语法规则(字符串换行将自动转换为空格),又有不同的书写形式:
---- name: debug hosts: all gather_facts: false tasks: - name: task1 debug: msg="hello task1" verbosity=1 # 参数写成一行 - name: task2 debug: msg="hello task2" # 参数写成多行 verbosity=1 - name: task3 debug: | # 竖线|,将保留字符串的换行符,否则将自动转换成空格,在一些模块中很有用,如shell msg="hello task3" verbosity=1 - name: task4 debug: > # 符号>,效果和直接写成多行一样 msg="hello task4" verbosity=1还可以直接使用指令args指明参数:
......- name: task1 debug: args: msg: "hello task1 in play2"/etc/ansible/ansible.cfg文件的forks配置,决定ansible执行任务的并发连接数。
假如forks配置为5,那么ansible第一次将同时连接5个node节点执行任务。其中若有节点提前执行完任务, 则ansible会新建一个新进程,来连接下一个节点执行任务。
forks是保证最多有N个节点同时执行任务。
说明:
shell模块接收shell命令,命令后可跟空格分割的参数列;
必须传入自由格式的命令,或者cmd参数;
它十分类似command模块,但是它在远程主机上通过shell(比如/bin/bash)来运行命令;
shell模块相比command模块,支持解析特殊符号<、>、|、;、&等。
参数:
| Parameter | Choices/Defaults | 说明 |
|---|---|---|
chdir path | 运行脚本前,切换到相关目录 | |
cmd string | 需要运行的命令,后跟可选的参数 | |
creates path | 若一个文件或目录存在,则跳过该步骤 | |
removes path | 若一个文件或目录不存在,则跳过该步骤 | |
executable path | 改变执行命令的解释器,如/bin/bash、/usr/bin/expect、/usr/bin/python;绝对路径 | |
| free_form string | 自由格式的命令(即命令字符串,没有相关参数,直接写在shell模块后面即可) | |
| stdin string | Set the stdin of the command directly to the specified value. | |
| stdin_add_newline boolean | Choices:noyes ← | Whether to append a newline to stdin data. |
| warn boolean | Choices:noyes ← | Whether to enable task warnings. |
示例:
---- name: shell hosts: all gather_facts: no tasks: - name: task1 shell: hostname - name: task2 shell: cmd: date +"%F %T" - name: task3 shell: cmd: pwd chdir: /etc/sysconfig - name: task4 shell: cmd: ls /tmp creates: /tmp - name: task5 shell: cmd: print('hello world') executable: /usr/bin/python注意chdir参数只支持下面的方式:
- name: task3 shell: cmd: pwd chdir: /etc/sysconfig- name: task3 shell: pwd # free_from格式需要采用args参数,显式指定chdir参数 args: chdir: /etc/sysconfig# 下面的方式将发生错误- name: task3 shell: pwd chdir: /etc/sysconfigAd-hoc方式:
$ ansible all -m shell -a "ls -l | wc -l"$ ansible all -v -m shell -a "ls chdir=/tmp "https://docs.ansible.com/ansible/latest/collections/ansible/builtin/shell_module.html#ansible-collections-ansible-builtin-shell-module
说明:
script模块接受一个脚本名称,后面可跟空格分割的参数列;
支持自由格式的命令,或者cmd参数;
将本地脚本传输到远程主机上执行;
在远程主机上使用shell环境执行脚本;
该模块不需要python,类似raw模块。
参数:
| Parameter | Choices/Defaults | 说明 |
|---|---|---|
chdir path | 运行脚本前,切换到远程主机的相关目录 | |
cmd string | 需要运行的脚本路径,后跟可选的参数 | |
creates path | 若一个文件或目录存在,则跳过该步骤 | |
removes path | 若一个文件或目录不存在,则跳过该步骤 |
示例:
- name: Run a script with arguments (free form) ansible.builtin.script: /some/local/script.sh --some-argument 1234- name: Run a script with arguments (using 'cmd' parameter) ansible.builtin.script: cmd: /some/local/script.sh --some-argument 1234- name: Run a script only if file.txt does not exist on the remote node ansible.builtin.script: /some/local/create_file.sh --some-argument 1234 args: creates: /the/created/file.txt- name: Run a script only if file.txt exists on the remote node ansible.builtin.script: /some/local/remove_file.sh --some-argument 1234 args: removes: /the/removed/file.txt- name: Run a script using an executable in a non-system path ansible.builtin.script: /some/local/script args: executable: /some/remote/executable- name: Run a script using an executable in a system path ansible.builtin.script: /some/local/script.py args: executable: python3Ad-hoc:
$ ansible all -m script -a "/tmp/hello.sh world"$ ansible all -m script -a "/tmp/hello.sh world creates=/tmp"https://docs.ansible.com/ansible/latest/collections/ansible/builtin/script_module.html#ansible-collections-ansible-builtin-script-module
说明:
设置远程设备的主机名。
https://docs.ansible.com/ansible/latest/collections/ansible/builtin/hostname_module.html
vars指令可在play或task中设置变量,可以设置一个或多个。可以采用字典或列表的形式定义变量。
定义:
vars: foo1: a: hello b: world foo2: a: aaa b: bbb引用:
使用点号或方括号,在yaml文件使用jinja2语法引用,需要加单双引号,否则解析yaml的时候将报错
- name: task1 debug: msg: "{{ foo1.a }} {{ foo1['b'] }}" # 注意{{}}是jinja2的语法,在yaml文件中需要使用引号引起来,单双引号都行- name: task2 debug: var: foo1.a,foo1['b'] # debug模块的var参数,多个值使用逗号分隔,且无需花括号,前后加不加引号均可- name: task3 debug: msg: '{{ foo2.a }} {{ foo2.b }}'示例:
---- name: vars play hosts: all gather_facts: no vars: foo1: a: hello b: world foo2: a: aaa b: bbb tasks: - name: task1 debug: msg: "{{ foo1.a }} {{ foo1['b'] }}" - name: task2 debug: var: foo1.a,foo1['b'] - name: task3 debug: msg: '{{ foo2.a }} {{ foo2.b }}'定义:
vars: foo: - a: hello b: world - a: aaa b: bbb引用:
- name: task1 debug: msg: "{{ foo[0].a }} {{ foo[0].b }}"- name: task2 debug: msg: "{{foo[1]['a']}} {{foo[1]['b']}}"引用变量时,使用点号比较方便,但如果变量名本身带点,则尽量选择方括号的方式。
when指令是ansible提供的唯一一个通用条件指令。when指令后的变量引用不需要双花括号,当when指令的值为true时,执行任务。
yaml文件如下:
---- name: when hosts: all gather_facts: no vars: foo: test tasks: - name: task1 when: foo == "test" # when指令的变量可直接引用 debug: msg: "hello" - name: task2 when: foo == "dev" debug: msg: "world"示例:
从输出中可看出,任务task2由于条件不满足自动跳过
[root@master ansible]# ansible-playbook -v when.yamlUsing /etc/ansible/ansible.cfg as config filePLAY [when] ***********************************************************************************************************************TASK [task1] **********************************************************************************************************************ok: [node1] => { "msg": "hello"}ok: [node2] => { "msg": "hello"}TASK [task2] **********************************************************************************************************************skipping: [node1] => {}skipping: [node2] => {}PLAY RECAP ************************************************************************************************************************node1 : ok=1 changed=0 unreachable=0 failed=0 skipped=1 rescued=0 ignored=0node2 : ok=1 changed=0 unreachable=0 failed=0 skipped=1 rescued=0 ignored=0多个判断条件:
- name: task3 when: foo == "dev" or foo == "test" # 逻辑或 debug: msg: "hello world"- name: task4 when: (foo == "dev") or (foo == "test") # 支持括号括起来 debug: msg: "hello world"- name: task5 when: (foo == "dev") and (foo == "test") # 逻辑与 debug: msg: "hello world"- name: task6 when: - foo == "dev" # 逻辑与的另一种组织方式 - foo == "test" debug: msg: "hello world"- name: task7 when: foo != "dev" # 逻辑否 debug: msg: "hello world"loop指令中的各项元素将以item变量名进行迭代。
迭代简单列表:
列表元素为字符串
- name: task1 shell: "{{ item }}" loop: - hostname - "uptime -p"示例:
[root@master ansible]# cat loop.yaml---- name: loop hosts: all gather_facts: no tasks: - name: task1 shell: "{{ item }}" loop: - hostname - "uptime -p"[root@master ansible]# ansible-playbook -v loop.yamlUsing /etc/ansible/ansible.cfg as config filePLAY [loop] ***********************************************************************************************************************TASK [task1] **********************************************************************************************************************changed: [node2] => (item=hostname) => {"ansible_facts": {"discovered_interpreter_python": "/usr/bin/python"}, "ansible_loop_var": "item", "changed": true, "cmd": "hostname", "delta": "0:00:00.020436", "end": "2022-01-09 15:05:17.126971", "item": "hostname", "rc": 0, "start": "2022-01-09 15:05:17.106535", "stderr": "", "stderr_lines": [], "stdout": "node2", "stdout_lines": ["node2"]}changed: [node1] => (item=hostname) => {"ansible_facts": {"discovered_interpreter_python": "/usr/bin/python"}, "ansible_loop_var": "item", "changed": true, "cmd": "hostname", "delta": "0:00:00.361005", "end": "2022-01-09 15:05:17.409020", "item": "hostname", "rc": 0, "start": "2022-01-09 15:05:17.048015", "stderr": "", "stderr_lines": [], "stdout": "node1", "stdout_lines": ["node1"]}changed: [node2] => (item=uptime -p) => {"ansible_loop_var": "item", "changed": true, "cmd": "uptime -p", "delta": "0:00:00.006628", "end": "2022-01-09 15:05:17.610052", "item": "uptime -p", "rc": 0, "start": "2022-01-09 15:05:17.603424", "stderr": "", "stderr_lines": [], "stdout": "up 3 weeks, 2 days, 19 hours, 42 minutes", "stdout_lines": ["up 3 weeks, 2 days, 19 hours, 42 minutes"]}changed: [node1] => (item=uptime -p) => {"ansible_loop_var": "item", "changed": true, "cmd": "uptime -p", "delta": "0:00:00.074039", "end": "2022-01-09 15:05:18.006283", "item": "uptime -p", "rc": 0, "start": "2022-01-09 15:05:17.932244", "stderr": "", "stderr_lines": [], "stdout": "up 3 weeks, 2 days, 19 hours, 42 minutes", "stdout_lines": ["up 3 weeks, 2 days, 19 hours, 42 minutes"]}PLAY RECAP ************************************************************************************************************************node1 : ok=1 changed=1 unreachable=0 failed=0 skipped=0 rescued=0 ignored=0node2 : ok=1 changed=1 unreachable=0 failed=0 skipped=0 rescued=0 ignored=0迭代hash哈希列表:
列表元素为字典
- name: task1 shell: cmd: "{{ item.cmd }}" creates: "{{ item['condition'] }}" # 两种引用方式均可 loop: - { cmd: 'hostname', condition: '/tmp' } # 这个循环将被跳过 - { cmd: 'uptime', condition: '/aaa' } 示例:
[root@master ansible]# cat loop.yaml---- name: loop hosts: all gather_facts: no tasks: - name: task1 shell: cmd: "{{ item.cmd }}" creates: "{{ item.condition }}" loop: - { cmd: 'hostname', condition: '/tmp' } # 这个循环将被跳过,["skipped, since /tmp exists"],任务没有跳过 - { cmd: 'uptime', condition: '/aaa' } [root@master ansible]#[root@master ansible]# ansible-playbook -v loop.yamlUsing /etc/ansible/ansible.cfg as config filePLAY [loop] ***********************************************************************************************************************TASK [task1] **********************************************************************************************************************ok: [node2] => (item={u'cmd': u'hostname', u'condition': u'/tmp'}) => {"ansible_facts": {"discovered_interpreter_python": "/usr/bin/python"}, "ansible_loop_var": "item", "changed": false, "cmd": "hostname", "item": {"cmd": "hostname", "condition": "/tmp"}, "rc": 0, "stdout": "skipped, since /tmp exists", "stdout_lines": ["skipped, since /tmp exists"]}changed: [node2] => (item={u'cmd': u'uptime', u'condition': u'/aaa'}) => {"ansible_loop_var": "item", "changed": true, "cmd": "uptime", "delta": "0:00:00.024675", "end": "2022-01-09 15:21:23.286758", "item": {"cmd": "uptime", "condition": "/aaa"}, "rc": 0, "start": "2022-01-09 15:21:23.262083", "stderr": "", "stderr_lines": [], "stdout": " 15:21:23 up 23 days, 19:58, 2 users, load average: 0.13, 0.14, 0.20", "stdout_lines": [" 15:21:23 up 23 days, 19:58, 2 users, load average: 0.13, 0.14, 0.20"]}ok: [node1] => (item={u'cmd': u'hostname', u'condition': u'/tmp'}) => {"ansible_facts": {"discovered_interpreter_python": "/usr/bin/python"}, "ansible_loop_var": "item", "changed": false, "cmd": "hostname", "item": {"cmd": "hostname", "condition": "/tmp"}, "rc": 0, "stdout": "skipped, since /tmp exists", "stdout_lines": ["skipped, since /tmp exists"]}changed: [node1] => (item={u'cmd': u'uptime', u'condition': u'/aaa'}) => {"ansible_loop_var": "item", "changed": true, "cmd": "uptime", "delta": "0:00:00.386491", "end": "2022-01-09 15:21:30.029184", "item": {"cmd": "uptime", "condition": "/aaa"}, "rc": 0, "start": "2022-01-09 15:21:29.642693", "stderr": "", "stderr_lines": [], "stdout": " 15:21:30 up 23 days, 19:58, 2 users, load average: 0.90, 0.51, 0.35", "stdout_lines": [" 15:21:30 up 23 days, 19:58, 2 users, load average: 0.90, 0.51, 0.35"]}PLAY RECAP ************************************************************************************************************************node1 : ok=1 changed=1 unreachable=0 failed=0 skipped=0 rescued=0 ignored=0node2 : ok=1 changed=1 unreachable=0 failed=0 skipped=0 rescued=0 ignored=0loop指令无法直接迭代字典,需要使用过滤器dict2items进行转换,如下:
- name: Using dict2items ansible.builtin.debug: msg: "{{ item.key }} - {{ item.value }}" loop: "{{ tag_data | dict2items }}" vars: tag_data: Environment: dev Application: payment上例中,通过迭代tag_data来打印它的key和value。
when指令和loop指令同时使用时,先进行循环,再在每个循环中进行条件判断。
ansible中的一个重要概念changed,它表示目标状态是否发生改变,即本次任务是否执行、执行后是否影响结果。如果changed=1,则表示目标状态发生改变;如果changed=0,则表示目标状态未发生改变,或者任务没有执行。
ansible若监视到changed=1,就会触发notify指令所定义的handler。handler,也是一个task,只是定义在handlers中,需要notify来触发执行。
handlers的使用与tasks使用一样,notify和hanlders中任务名称必须一样。
当一个play中所有任务都执行完成后,handler才会执行。好处是可以多次触发notify,但最后只执行一次对应的handler。
示例:
---- name: notify and handlers hosts: all gather_facts: no tasks: - name: task1 shell: uptime notify: hello handlers: - name: hello debug: msg: "hello world"执行结果:
[root@master ansible]# ansible-playbook notify.yamlPLAY [notify and handlers] ********************************************************************************************************TASK [task1] **********************************************************************************************************************changed: [node2]changed: [node1]RUNNING HANDLER [hello] ***********************************************************************************************************ok: [node2] => {}MSG:hello worldok: [node1] => {}MSG:hello worldPLAY RECAP ************************************************************************************************************************node1 : ok=2 changed=1 unreachable=0 failed=0 skipped=0 rescued=0 ignored=0node2 : ok=2 changed=1 unreachable=0 failed=0 skipped=0 rescued=0 ignored=0将所有play全部写在一个yaml文件中,固然可行,但是可读性、维护性太差。
比较好的做法是,将同类任务的play放在一个文件中。多个任务,则写成多个文件,最后使用一个入口文件来引用这些任务文件。
假设入口文件名为main.yaml,在该文件中使用import_playbook指令引用其它playbook:
---- import_playbook: "init_server/aaa.yaml"- import_playbook: "init_server/bbb.yaml"- import_playbook: "init_server/ccc.yaml"- import_playbook: "init_server/ddd.yaml"执行方式不变:ansible-playbook main.yaml
上面介绍了使用playbook指令来引入多个playbook文件,从而提高可读性和维护性。
其实,ansible还提供了更加规范的方式,来组织更多的内容,即
role和colllection,collection这里暂不涉及。
ansible可组织的内容包括:
playbooktaskvariablehandler(handler也是一个task,只是编写在handlers内部)role可组织的意思是说,可将相同内容定义在同一个文件中,然后使用相关指令来引入指定文件内容。
palybook:import_playbooktask或handler:import_tasks、include_tasksvariable:vars_files、include_varsrole:import_role、include_role、rolesimport和include两种引入方式有所区别,前者为静态加载(在playbook解析的阶段,内容将写入到引入的位置),后者为动态加载(解析阶段不引入,而是在执行阶段才引入)。
可将task单独写在一个文件中,然后在play里使用import_tasks、include_tasks模块引入。
示例:
编写一个tasks文件tasks.yaml:
---- name: task1 debug: msg: "hello"- name: task2 debug: msg: "world"在playbook中引入:
---- name: play1 hosts: node1 gather_facts: no tasks: - name: task1 & task2 import_tasks: tasks.yaml # include_tasks模块也行在循环中引入tasks文件,必须使用include_tasks指令
---- name: play1 hosts: node1 gather_facts: no tasks: - name: loop tasks include_tasks: tasks.yaml loop: - one - two一般情况下playbook的handlers如下,在task中使用handler的任务名来触发
---- name: play1 hosts: node1 gather_facts: no tasks: - name: task1 shell: uptime notify: h1 - name: task2 shell: date notify: h2 handlers: - name: h1 debug: msg: "run h1" - name: h2 debug: msg: "run h2"可将handler单独编写在一个文件中,如下:
$ cat handler1.yaml---- name: handler1 debug: msg: "run handler1"$ cat handler2.yaml---- name: handler2 debug: msg: "run handler2"然后在playbook中使用import_tasks或include_tasks指令来引入,同时在notify中修改对应的handler名:
---- name: play1 hosts: node1 gather_facts: no tasks: - name: task1 shell: uptime notify: handler1 # handler1为静态引入,notify使用handler名 - name: task2 shell: date notify: h2 # handler2为动态引入,notify使用引入的任务名 handlers: - name: h1 import_tasks: handler1.yaml # import_tasks静态引入 - name: h2 include_tasks: handler2.yaml # include_tasks动态引入前面已经介绍了如何在playbook中使用var指令直接设置变量,除了这个方法,ansible还支持将变量单独放在一个文件中,然后在play中使用vars_files指令或include_vars模块来引入该变量文件。也可以在命令行中,使用-e选项(--extra_vars)来设置变量或引入变量文件。
vars_files是play级别的指令,用于play中,在playbook解析阶段引入变量文件;
include_vars是任务模块(类似模块一样),用在tasks中定义一个引入变量的任务,只有该任务执行之后,才会创建变量;
-e选项在命令行中,全局有效;
变量文件varfile.yaml,变量的定义一样,使用yaml或json格式,可采用字典或列表的形式。
---foo: a: hello b: worldplaybook文件如下,使用vars_files指令来引入:
---- name: play1 hosts: node1 gather_facts: no vars_files: - varfile.yaml # 多个变量文件,使用列表形式即可 tasks: - name: task1 debug: msg: "{{foo.a}} {{foo.b}}"include_vars是模块提供的功能,它是一个手动创建的任务,和shell、debug等模块一样。所以只有当任务执行完后,相关变量才会创建。
下面介绍几个用法。
引入一个文件:
---- name: play1 hosts: node1 gather_facts: no vars_files: - varfile.yaml tasks: - name: task1 include_vars: varfile.yaml # 引入之后,可在后续的任务中使用 - name: task2 debug: msg: "{{foo.a}} {{foo.b}}"引入多个文件,可采用循环:
- name: task1 include_vars: "{{ item }}" loop: - varfile1.yaml - varfile2.yaml还可以引入目录,使用条件和其它参数控制引入的变量文件。这里不展开了,该模块有很多参数和用法,具体可参考官网:
https://docs.ansible.com/ansible/latest/collections/ansible/builtin/include_vars_module.html#ansible-collections-ansible-builtin-include-vars-module
ansible-playbook命令的-e选项或--extra-vars选项也可以用来定义变量或引入变量文件:
# 定义单个变量$ ansible-playbook -e 'var1="value1"' xxx.yml# 定义多个变量$ ansible-playbook -e 'var1="value1" var2="value2"' xxx.yml# 引入单个变量文件$ ansible-playbook -e '@varfile1.yml' xxx.yml# 引入多个变量文件$ ansible-playbook -e '@varfile1.yml' -e '@varfile2.yml' xxx.yml上面将各类内容放在单独的文件中,然后使用相关指令或模块将其引入。ansible中,有一种更为规范的组织方式,即role。
使用role,即可无需手动使用这些指令或模块了。按照role指定的文件或目录存放对应的内容,ansible就会自动引入。
ansible-galaxy init role1命令,可以快速创建一个role框架。
$ cd /etc/ansible/roles$ ansible-galaxy init role01$ tree role01role01├── defaults│ └── main.yml├── files # 外部文件,放入此处的文件,在role的各种任务中直接无需使用全路径├── handlers│ └── main.yml # 存放handler├── meta│ └── main.yml # 该role依赖的先行role。定义在此处的role将在该role运行前执行├── README.md├── tasks│ └── main.yml # 存放任务├── templates # 模板文件,放入此处的文件,在role的各种任务中无需使用全路径 ├── tests│ ├── inventory│ └── test.yml└── vars └── main.yml # 存放变量在相应目录及文件下编写对应内容,然后还需要提供一个入口playbook文件。在入口playbook文件中,使用import_roles、include_role、roles指令来引入role。最后使用ansible-playbook命令执行入口文件,即可执行定义在role中的各种任务了。
enter.yml文件如下:
---- name: enter for all roles hosts: node1 gather_facts: no roles: - role01 # 多个role可使用列表一起列出etc/ansible/roles/role01/vars/main.yml文件是role定义变量或引入变量文件的地方。
etc/ansible/roles/role01/defaults/main.yml文件是role定义默认变量的地方,优先级较低,当然也可以引入文件。
---# vars file for role01foo1: a: hello b: world/etc/ansible/roles/role01/tasks/main.yml文件是role定义task或者引入task文件的地方。
---# tasks file for role01- name: task1 debug: msg: "{{ foo1.a }} {{ foo1.b }}" notify: handler1 changed_when: true # 该指令使得chenged=1,触发notify/etc/ansible/roles/role01/handles/main.yml文件是role定义handler或者引入handler文件的地方。
---# handlers file for role01- name: handler1 debug: msg: "run handler1"执行:
$ ansible-playbook enter.ymlPLAY [enter for all roles] **********************************************************************************************************TASK [role01 : task1] ***************************************************************************************************************changed: [node1] => {}MSG:hello worldRUNNING HANDLER [role01 : handler1] *************************************************************************************************ok: [node1] => {}MSG:run handler1PLAY RECAP **************************************************************************************************************************node1 : ok=2 changed=1 unreachable=0 failed=0 skipped=0 rescued=0 ignored=0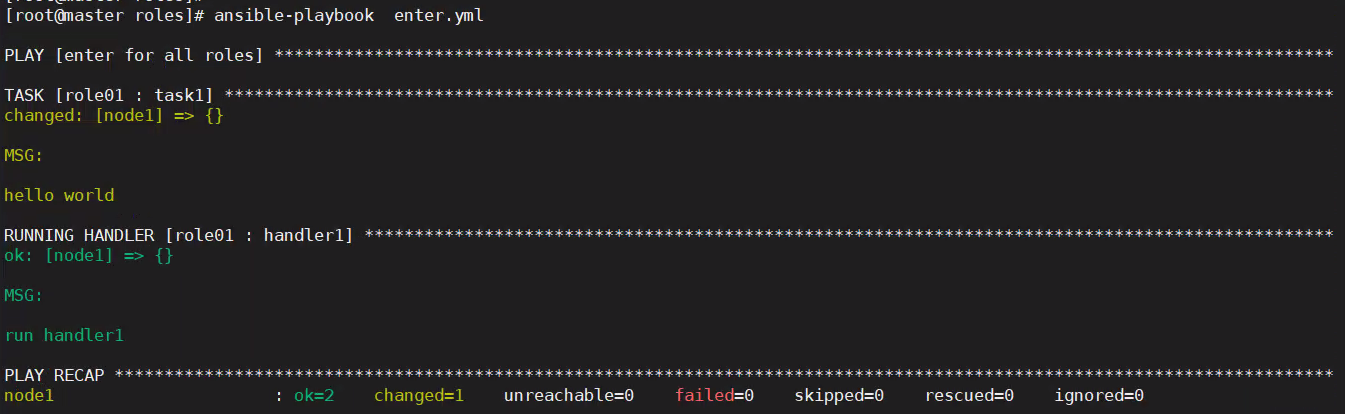
一个节点执行任务的顺序如下:
多个节点时,ansible在所有节点上执行完成前一个任务后,才进入下一个任务的执行流程。handlers是在所有节点上的所有任务执行完成后,开始执行。
- 从inventory中选择执行play的相关主机
- 连接到远程主机,通常使用ssh方式
- 拷贝相关模块到远程主机,并开始执行
委托是指将原本在一个节点上执行的任务,委托给另一个节点执行。
要想理解委托,需要先了解ansible任务的执行过程:默认情况下,ansible先选择执行任务的主机,后连接该主机,再拷贝相关模块,并在该远程主机上执行模块。
但是在任务中进行了委托后,实际连接主机和执行模块动作将发生改变。比如将node1主机的任务委托给node2,ansible会根据hosts指令选择远程主机node1后,然后根据delegate_to指令,连接到node2节点,并将相关模块拷贝到node2并在node2上执行。
以下使用dalegate_to指令做个演示
test.yaml文件:
---- name: play1 hosts: node1 gather_facts: no tasks: - name: task1 shell: hostname delegate_to: node2 # 委托node2执行shell模块执行ansible-playbook -vvv test.yaml,然后查看具体的执行日志。
再将delegate_to指令去除,执行ansible-playbook -vvv test.yaml命令查看不委托的执行过程,两者对比很容易发现ansible连接的主机为委托的主机。
$ ansible-playbook -vvv test.yaml打印输出日志如下,也可在/var/log/ansible.log中查看。
ansible-playbook 2.9.25 config file = /etc/ansible/ansible.cfg configured module search path = [u'/root/.ansible/plugins/modules', u'/usr/share/ansible/plugins/modules'] ansible python module location = /usr/lib/python2.7/site-packages/ansible executable location = /usr/bin/ansible-playbook python version = 2.7.5 (default, Oct 14 2020, 14:45:30) [GCC 4.8.5 20150623 (Red Hat 4.8.5-44)]Using /etc/ansible/ansible.cfg as config filehost_list declined parsing /etc/ansible/hosts as it did not pass its verify_file() methodscript declined parsing /etc/ansible/hosts as it did not pass its verify_file() methodauto declined parsing /etc/ansible/hosts as it did not pass its verify_file() methodParsed /etc/ansible/hosts inventory source with ini pluginSkipping callback 'actionable', as we already have a stdout callback.Skipping callback 'counter_enabled', as we already have a stdout callback.Skipping callback 'debug', as we already have a stdout callback.Skipping callback 'dense', as we already have a stdout callback.Skipping callback 'dense', as we already have a stdout callback.Skipping callback 'full_skip', as we already have a stdout callback.Skipping callback 'json', as we already have a stdout callback.Skipping callback 'minimal', as we already have a stdout callback.Skipping callback 'null', as we already have a stdout callback.Skipping callback 'oneline', as we already have a stdout callback.Skipping callback 'selective', as we already have a stdout callback.Skipping callback 'skippy', as we already have a stdout callback.Skipping callback 'stderr', as we already have a stdout callback.Skipping callback 'unixy', as we already have a stdout callback.Skipping callback 'yaml', as we already have a stdout callback.PLAYBOOK: test.yaml *****************************************************************************************************************1 plays in test.yamlPLAY [play1] ************************************************************************************************************************META: ran handlersTASK [task1] ************************************************************************************************************************task path: /etc/ansible/test.yaml:6<node2> ESTABLISH SSH CONNECTION FOR USER: None<node2> SSH: EXEC ssh -C -o ControlMaster=auto -o ControlPersist=60s -o Port=22 -o KbdInteractiveAuthentication=no -o PreferredAuthentications=gssapi-with-mic,gssapi-keyex,hostbased,publickey -o PasswordAuthentication=no -o ConnectTimeout=10 -o ControlPath=/root/.ansible/cp/0d67807d8c node2 '/bin/sh -c '"'"'echo ~ && sleep 0'"'"''<node2> (0, '/root\n', '')<node2> ESTABLISH SSH CONNECTION FOR USER: None<node2> SSH: EXEC ssh -C -o ControlMaster=auto -o ControlPersist=60s -o Port=22 -o KbdInteractiveAuthentication=no -o PreferredAuthentications=gssapi-with-mic,gssapi-keyex,hostbased,publickey -o PasswordAuthentication=no -o ConnectTimeout=10 -o ControlPath=/root/.ansible/cp/0d67807d8c node2 '/bin/sh -c '"'"'( umask 77 && mkdir -p "` echo /root/.ansible/tmp `"&& mkdir "` echo /root/.ansible/tmp/ansible-tmp-1642857067.57-71643-202799162287554 `" && echo ansible-tmp-1642857067.57-71643-202799162287554="` echo /root/.ansible/tmp/ansible-tmp-1642857067.57-71643-202799162287554 `" ) && sleep 0'"'"''<node2> (0, 'ansible-tmp-1642857067.57-71643-202799162287554=/root/.ansible/tmp/ansible-tmp-1642857067.57-71643-202799162287554\n', '')<node1> Attempting python interpreter discovery<node2> ESTABLISH SSH CONNECTION FOR USER: None<node2> SSH: EXEC ssh -C -o ControlMaster=auto -o ControlPersist=60s -o Port=22 -o KbdInteractiveAuthentication=no -o PreferredAuthentications=gssapi-with-mic,gssapi-keyex,hostbased,publickey -o PasswordAuthentication=no -o ConnectTimeout=10 -o ControlPath=/root/.ansible/cp/0d67807d8c node2 '/bin/sh -c '"'"'echo PLATFORM; uname; echo FOUND; command -v '"'"'"'"'"'"'"'"'/usr/bin/python'"'"'"'"'"'"'"'"'; command -v '"'"'"'"'"'"'"'"'python3.7'"'"'"'"'"'"'"'"'; command -v '"'"'"'"'"'"'"'"'python3.6'"'"'"'"'"'"'"'"'; command -v '"'"'"'"'"'"'"'"'python3.5'"'"'"'"'"'"'"'"'; command -v '"'"'"'"'"'"'"'"'python2.7'"'"'"'"'"'"'"'"'; command -v '"'"'"'"'"'"'"'"'python2.6'"'"'"'"'"'"'"'"'; command -v '"'"'"'"'"'"'"'"'/usr/libexec/platform-python'"'"'"'"'"'"'"'"'; command -v '"'"'"'"'"'"'"'"'/usr/bin/python3'"'"'"'"'"'"'"'"'; command -v '"'"'"'"'"'"'"'"'python'"'"'"'"'"'"'"'"'; echo ENDFOUND && sleep 0'"'"''<node2> (0, 'PLATFORM\nLinux\nFOUND\n/usr/bin/python\n/usr/bin/python2.7\n/usr/libexec/platform-python\n/usr/bin/python\nENDFOUND\n', '')<node2> ESTABLISH SSH CONNECTION FOR USER: None<node2> SSH: EXEC ssh -C -o ControlMaster=auto -o ControlPersist=60s -o Port=22 -o KbdInteractiveAuthentication=no -o PreferredAuthentications=gssapi-with-mic,gssapi-keyex,hostbased,publickey -o PasswordAuthentication=no -o ConnectTimeout=10 -o ControlPath=/root/.ansible/cp/0d67807d8c node2 '/bin/sh -c '"'"'/usr/bin/python && sleep 0'"'"''<node2> (0, '{"osrelease_content": "NAME=\\"CentOS Linux\\"\\nVERSION=\\"7 (Core)\\"\\nID=\\"centos\\"\\nID_LIKE=\\"rhel fedora\\"\\nVERSION_ID=\\"7\\"\\nPRETTY_NAME=\\"CentOS Linux 7 (Core)\\"\\nANSI_COLOR=\\"0;31\\"\\nCPE_NAME=\\"cpe:/o:centos:centos:7\\"\\nHOME_URL=\\"https://www.centos.org/\\"\\nBUG_REPORT_URL=\\"https://bugs.centos.org/\\"\\n\\nCENTOS_MANTISBT_PROJECT=\\"CentOS-7\\"\\nCENTOS_MANTISBT_PROJECT_VERSION=\\"7\\"\\nREDHAT_SUPPORT_PRODUCT=\\"centos\\"\\nREDHAT_SUPPORT_PRODUCT_VERSION=\\"7\\"\\n\\n", "platform_dist_result": ["centos", "7.9.2009", "Core"]}\n', '')Using module file /usr/lib/python2.7/site-packages/ansible/modules/commands/command.py<node2> PUT /root/.ansible/tmp/ansible-local-71634Zeeqqp/tmpWHppzz TO /root/.ansible/tmp/ansible-tmp-1642857067.57-71643-202799162287554/AnsiballZ_command.py<node2> SSH: EXEC sftp -b - -C -o ControlMaster=auto -o ControlPersist=60s -o Port=22 -o KbdInteractiveAuthentication=no -o PreferredAuthentications=gssapi-with-mic,gssapi-keyex,hostbased,publickey -o PasswordAuthentication=no -o ConnectTimeout=10 -o ControlPath=/root/.ansible/cp/0d67807d8c '[node2]'<node2> (0, 'sftp> put /root/.ansible/tmp/ansible-local-71634Zeeqqp/tmpWHppzz /root/.ansible/tmp/ansible-tmp-1642857067.57-71643-202799162287554/AnsiballZ_command.py\n', '')<node2> ESTABLISH SSH CONNECTION FOR USER: None<node2> SSH: EXEC ssh -C -o ControlMaster=auto -o ControlPersist=60s -o Port=22 -o KbdInteractiveAuthentication=no -o PreferredAuthentications=gssapi-with-mic,gssapi-keyex,hostbased,publickey -o PasswordAuthentication=no -o ConnectTimeout=10 -o ControlPath=/root/.ansible/cp/0d67807d8c node2 '/bin/sh -c '"'"'chmod u+x /root/.ansible/tmp/ansible-tmp-1642857067.57-71643-202799162287554/ /root/.ansible/tmp/ansible-tmp-1642857067.57-71643-202799162287554/AnsiballZ_command.py && sleep 0'"'"''<node2> (0, '', '')<node2> ESTABLISH SSH CONNECTION FOR USER: None<node2> SSH: EXEC ssh -C -o ControlMaster=auto -o ControlPersist=60s -o Port=22 -o KbdInteractiveAuthentication=no -o PreferredAuthentications=gssapi-with-mic,gssapi-keyex,hostbased,publickey -o PasswordAuthentication=no -o ConnectTimeout=10 -o ControlPath=/root/.ansible/cp/0d67807d8c -tt node2 '/bin/sh -c '"'"'/usr/bin/python /root/.ansible/tmp/ansible-tmp-1642857067.57-71643-202799162287554/AnsiballZ_command.py && sleep 0'"'"''<node2> (0, '\r\n{"changed": true, "end": "2022-01-22 21:11:09.433351", "stdout": "node2", "cmd": "hostname", "rc": 0, "start": "2022-01-22 21:11:09.333195", "stderr": "", "delta": "0:00:00.100156", "invocation": {"module_args": {"creates": null, "executable": null, "_uses_shell": true, "strip_empty_ends": true, "_raw_params": "hostname", "removes": null, "argv": null, "warn": true, "chdir": null, "stdin_add_newline": true, "stdin": null}}}\r\n', 'Shared connection to node2 closed.\r\n')<node2> ESTABLISH SSH CONNECTION FOR USER: None<node2> SSH: EXEC ssh -C -o ControlMaster=auto -o ControlPersist=60s -o Port=22 -o KbdInteractiveAuthentication=no -o PreferredAuthentications=gssapi-with-mic,gssapi-keyex,hostbased,publickey -o PasswordAuthentication=no -o ConnectTimeout=10 -o ControlPath=/root/.ansible/cp/0d67807d8c node2 '/bin/sh -c '"'"'rm -f -r /root/.ansible/tmp/ansible-tmp-1642857067.57-71643-202799162287554/ > /dev/null 2>&1 && sleep 0'"'"''<node2> (0, '', '')changed: [node1 -> node2] => { "changed": true, "cmd": "hostname", "delta": "0:00:00.100156", "end": "2022-01-22 21:11:09.433351", "invocation": { "module_args": { "_raw_params": "hostname", "_uses_shell": true, "argv": null, "chdir": null, "creates": null, "executable": null, "removes": null, "stdin": null, "stdin_add_newline": true, "strip_empty_ends": true, "warn": true } }, "rc": 0, "start": "2022-01-22 21:11:09.333195"}STDOUT:node2META: ran handlersMETA: ran handlersPLAY RECAP **************************************************************************************************************************node1 : ok=1 changed=1 unreachable=0 failed=0 skipped=0 rescued=0 ignored=0 到此为止,ansible的基础算是过了一遍,对ansible的基础概念、用法有了一个大概的了解。
但是ansible的内容和细节还有很多,包括不限于:
inventory更加复杂的定义方式
各种级别的指令
众多类型的变量和其作用
各种条件判断
各类循环,以及其它控制流程
文件如何加载解析、任务执行的顺序及方式
更多的模块、插件
role、vault、jinja2
二次开发
配置文件