Fastflow 是什么?用一句话来定义它:一个 基于golang协程、支持水平扩容的分布式高性能工作流框架。
它具有以下特点:
DAG 来定义,同时还提供开箱即用的 API,你可以随时通过 API 创建、运行、暂停工作流等,在开发新的原子能力时还提供了开箱即用的分布式锁功能fastflow 可以在单实例上并行执行数百、数千乃至数万个任务fastflow 基于 Prometheus 的 metrics 暴露了当前实例上的任务执行信息,比如并发任务数、任务分发时间等。fastflow 准备了部分开箱即用的任务操作,比如 http请求、执行脚本等,同时你也可以自行定义新的节点动作,同时你可以根据上下文来决定是否跳过节点(skip)组内有很多项目都涉及复杂的任务流场景,比如离线任务,集群上下架,容器迁移等,这些场景都有几个共同的特点:
- 流程耗时且步骤复杂,比如创建一个 k8s 集群,需要几十步操作,其中包含脚本执行、接口调用等,且相互存在依赖关系。
- 任务量巨大,比如容器平台每天都会有几十万的离线任务需要调度执行、再比如我们管理数百个K8S集群,几乎每天会有集群需要上下节点、迁移容器等。
我们尝试过各种解法:
进程 来运行的,虽然有更好的隔离性,但是显然因此而牺牲了性能和并发度。当然 Github 上也还有其他的任务流引擎,我们也都评估过,无法满足需求。比如 kubeflow 是基于 Pod 执行任务的,比起 进程 更为重量,还有一些项目,要么就是没有经过海量数据的考验,要么就是没有考虑可伸缩性,面对大量任务的执行无法水平扩容。
fastflow 的工作流模型基于 DAG(Directed acyclic graph),下图是一个简单的 DAG 示意图:

在这个图中,首先 A 节点所定义的任务会被执行,当 A 执行完毕后,B、C两个节点所定义的任务将同时被触发,而只有 B、C 两个节点都执行成功后,最后的 D 节点才会被触发,这就是 fastflow 的工作流模型。
fastflow 执行任务的过程会涉及到几个概念:Dag, Task, Action, DagInstance
描述了一个完整流程,它的每个节点被称为 Task,它定义了各个 Task 的执行顺序和依赖关系,你可以通过编程 or yaml 来定义它
一个编程式定义的DAG
dag := &entity.Dag{BaseInfo: entity.BaseInfo{ID: "test-dag",},Name: "test",Tasks: []entity.Task{{ID: "task1", ActionName: "PrintAction"},{ID: "task2", ActionName: "PrintAction", DependOn: []string{"task1"}},{ID: "task3", ActionName: "PrintAction", DependOn: []string{"task2"}},},}对应的yaml如下:
id: "test-dag"name: "test"tasks:- id: "task1"actionName: "PrintAction"- id: ["task2"]actionName: "PrintAction"dependOn: ["task1"]- id: "task3"actionName: "PrintAction"dependOn: ["task2"]同时 Dag 可以定义这个工作流所需要的参数,以便于在各个 Task 去消费它:
id: "test-dag"name: "test"vars:fileName:desc: "the file name"defaultValue: "file.txt"filePath:desc: "the file path"defaultValue: "/tmp/"tasks:- id: "task1"actionName: "PrintAction"params:writeName: "{{fileName}}"writePath: "{{filePath}}"它定义了这个节点的具体工作,比如是要发起一个 http 请求,或是执行一段脚本等,这些不同动作都通过选择不同的 Action 来实现,同时它也可以定义在何种条件下需要跳过 or 阻塞该节点。
下面这段yaml演示了 Task 如何根据某些条件来跳过运行该节点。
id: "test-dag"name: "test"vars:fileName:desc: "the file name"defaultValue: "file.txt"tasks:- id: "task1"actionName: "PrintAction"preCheck:- act: skip #you can set "skip" or "block"conditions:- source: vars # source could be "vars" or "share-data"key: "fileName"op: "in"values: ["warn.txt", "error.txt"]Task 的状态有以下几个:
Run 所定义的内容后,会进入到该状态Action 是工作流的核心,定义了该节点将执行什么操作,fastflow携带了一些开箱即用的Action,但是一般你都需要根据具体的业务场景自行编写,它有几个关键属性:
Required Action的名称,不可重复,它是与 Task 关联的核心Required 需要执行的动作,fastflow 将确保该动作仅会被执行 一次(ExactlyOnce)Optional 在执行 Run 之前运行,如果有一些前置动作,可以在这里执行,RunBefore 有可能会被执行多次。Optional 在执行 Run 之后运行,一些长时间执行的任务内容建议放在这里,只要 Task 尚未结束,节点发生故障重启时仍然会继续执行这部分内容,Optional 在重试失败的任务节点,可以提前执行一些清理的动作自行开发的 Action 在使用前都必须先注册到 fastflow,如下所示:
type PrintParams struct {Key stringValue string}type PrintAction struct {}// Name define the unique action identity, it will be used by Taskfunc (a *PrintAction) Name() string {return "PrintAction"}func (a *PrintAction) Run(ctx run.ExecuteContext, params interface{}) error {cinput := params.(*ActionParam)fmt.Println("action start: ", time.Now())fmt.Println(fmt.Sprintf("params: key[%s] value[%s]", cinput.Key, cinput.Value))return nil}func (a *PrintAction) ParameterNew() interface{} {return &PrintParams{}}func main() {...// Register actionfastflow.RegisterAction([]run.Action{&PrintAction{},})...}当你开始运行一个 Dag 后,则会为本次执行生成一个执行记录,它被称为 DagInstance,当它生成以后,会由 Leader 实例将其分发到一个健康的 Worker,再由其解析、执行。
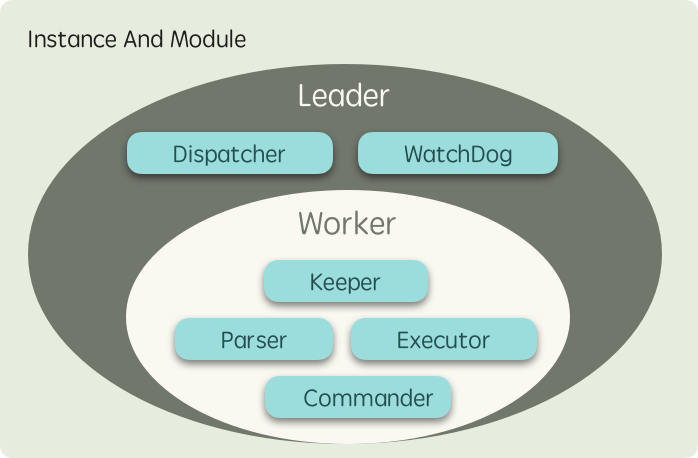
首先 fastflow 是一个分布式的框架,意味着你可以部署多个实例来分担负载,而实例被分为两类角色:
协程 执行其中的任务而不同节点能够承担不同的功能,其背后是不同的 模块 在各司其职,不同节点所运行的模块如下图所示:
NOTE
- Leader 实例本质上是一个承担了
仲裁者角色的 Worker,因此它也会分担工作负载。- 为了实现更均衡的负载,以及获得更好的可扩展性,fastflow 没有选择加锁竞争的方式来实现工作分发
从上面的图看,Leader 实例会比 Worker 实例多运行一些模块用于执行中仲裁者相关的任务,模块之间的协作关系如下图所示:
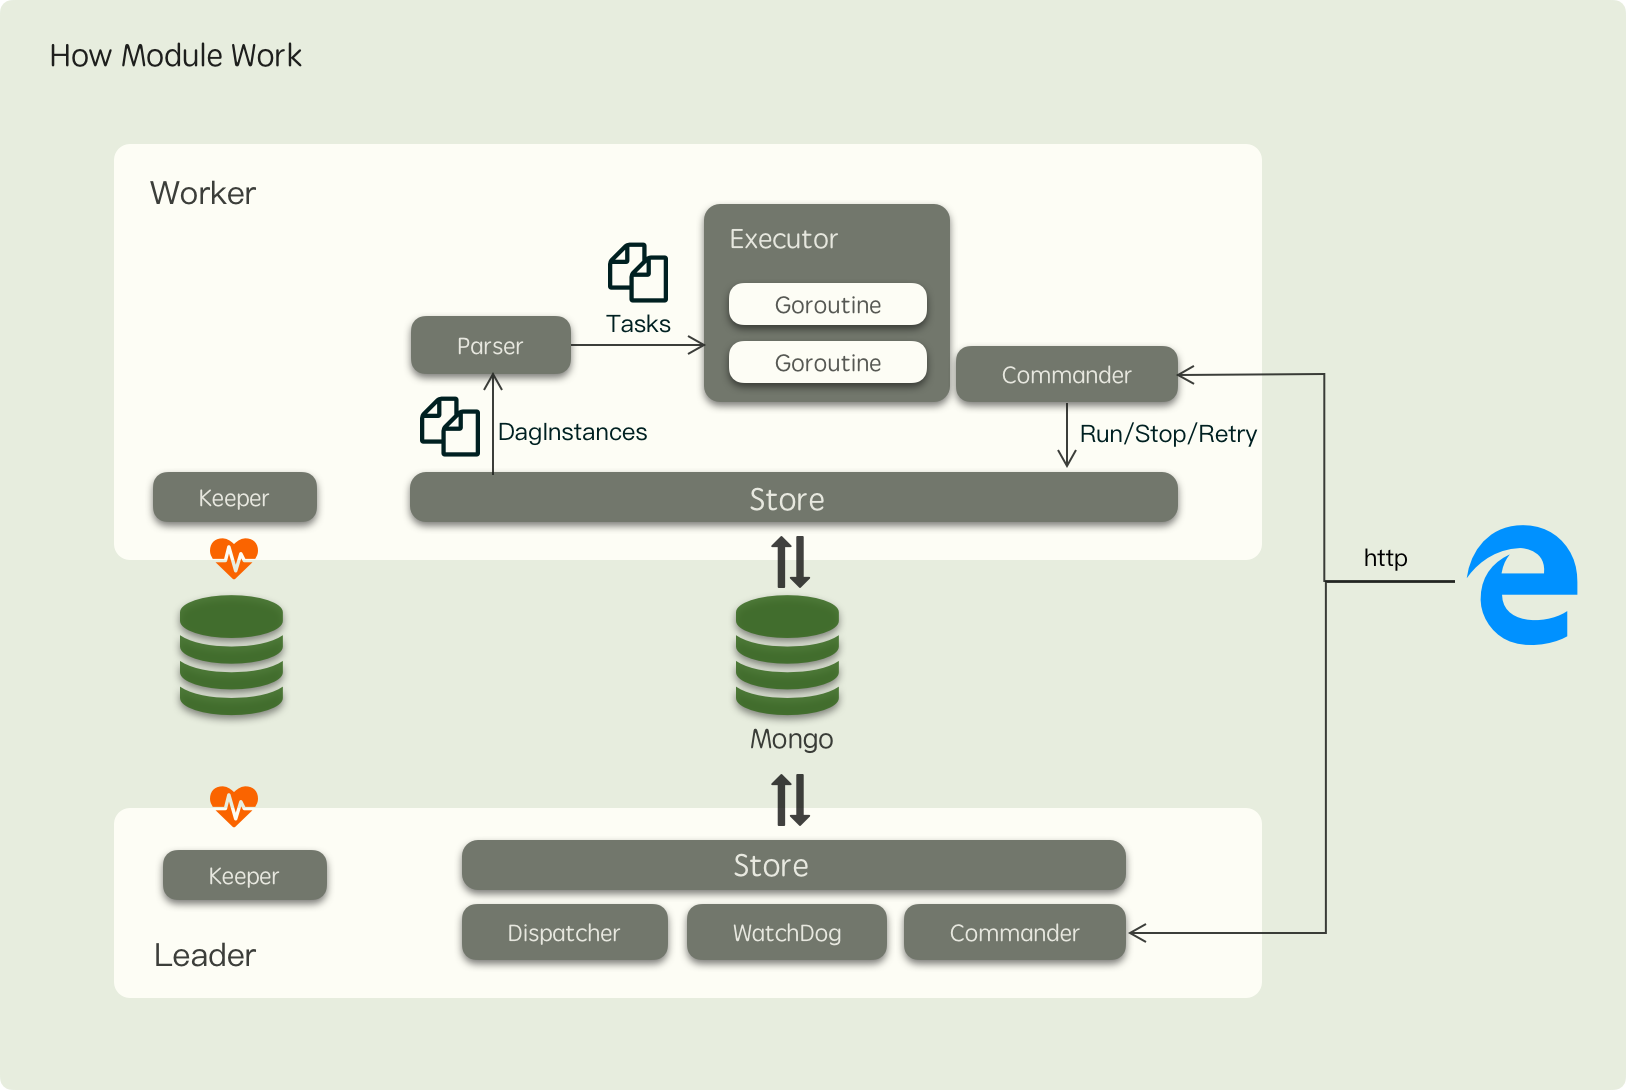
其中各个模块的职责如下:
每个节点都会运行 负责注册节点到存储中,保持心跳,同时也会周期性尝试竞选 Leader,防止上任 Leader 故障后阻塞系统,这个模块同时也提供了 分布式锁 功能,我们也可以实现不同存储的 Keeper 来满足特定的需求,比如 Etcd or Zookeepper,目前支持的 Keeper 实现只有 Mongo每个节点都会运行 负责解耦 Worker 对底层存储的依赖,通过这个组件,我们可以实现利用 Mongo, Mysql 等来作为 fastflow 的后端存储,目前仅实现了 MongoWorker 节点运行 负责监听分发到自己节点的任务,然后将其 DAG 结构重组为一颗 Task 树,并渲染好各个任务节点的输入,接下来通知 Executor 模块开始执行 Task每个节点都会运行 负责封装一些常见的指令,如停止、重试、继续等,下发到节点去运行Worker 节点运行 按照 Parser 解析好的 Task 树以 goroutine 运行单个的 TaskLeader节点才会运行 负责监听等待执行的 DAG,并根据 Worker 的健康状况均匀地分发任务Leader节点才会运行 负责监听执行超时的 Task 将其更新为失败,同时也会重新调度那些一直得不到执行的 DagInstance 到其他 WorkerTips
以上模块的分布机制仅仅只是 fastflow 的默认实现,你也可以自行决定实例运行的模块,比如在 Leader 上不再运行 Worker 的实例,让其专注于任务调度。
更多例子请参考项目下面的
examples目录
如果已经你已经有了可测试的实例,可以直接替换为你的实例,如果没有的话,可以使用Docker容器在本地跑一个,指令如下:
docker run -d --name fastflow-mongo --network host mongo运行以下示例
package mainimport ("fmt""log""time""github.com/shiningrush/fastflow"mongoKeeper "github.com/shiningrush/fastflow/keeper/mongo""github.com/shiningrush/fastflow/pkg/entity/run""github.com/shiningrush/fastflow/pkg/mod"mongoStore "github.com/shiningrush/fastflow/store/mongo")type PrintAction struct {}// Name define the unique action identity, it will be used by Taskfunc (a *PrintAction) Name() string {return "PrintAction"}func (a *PrintAction) Run(ctx run.ExecuteContext, params interface{}) error {fmt.Println("action start: ", time.Now())return nil}func main() {// Register actionfastflow.RegisterAction([]run.Action{&PrintAction{},})// init keeper, it used to ekeeper := mongoKeeper.NewKeeper(&mongoKeeper.KeeperOption{Key: "worker-1",// if your mongo does not set user/pwd, youshould remove itConnStr: "mongodb://root:pwd@127.0.0.1:27017/fastflow?authSource=admin",Database: "mongo-demo",Prefix: "test",})if err := keeper.Init(); err != nil {log.Fatal(fmt.Errorf("init keeper failed: %w", err))}// init storest := mongoStore.NewStore(&mongoStore.StoreOption{// if your mongo does not set user/pwd, youshould remove itConnStr: "mongodb://root:pwd@127.0.0.1:27017/fastflow?authSource=admin",Database: "mongo-demo",Prefix: "test",})if err := st.Init(); err != nil {log.Fatal(fmt.Errorf("init store failed: %w", err))}go createDagAndInstance()// start fastflowif err := fastflow.Start(&fastflow.InitialOption{Keeper: keeper,Store: st,// use yaml to define dagReadDagFromDir: "./",}); err != nil {panic(fmt.Sprintf("init fastflow failed: %s", err))}}func createDagAndInstance() {// wait fast start completedtime.Sleep(time.Second)// run some dag instancefor i := 0; i < 10; i++ {_, err := mod.GetCommander().RunDag("test-dag", nil)if err != nil {log.Fatal(err)}time.Sleep(time.Second * 10)}}程序运行目录下的test-dag.yaml
id: "test-dag"name: "test"tasks:- id: "task1"actionName: "PrintAction"- id: "task2"actionName: "PrintAction"dependOn: ["task1"]- id: "task3"actionName: "PrintAction"dependOn: ["task2"]由于任务都是基于 goroutine 来执行,因此任务之间的 context 是共享的,意味着你完全可以使用以下的代码:
func (a *UpAction) Run(ctx run.ExecuteContext, params interface{}) error {ctx.WithValue("key", "value")return nil}func (a *DownAction) Run(ctx run.ExecuteContext, params interface{}) error {val := ctx.Context().Value("key")return nil}但是注意这样做有个弊端:当节点重启时,如果任务尚未执行完毕,那么这部分内容会丢失。
如果不想因为故障or升级而丢失你的更改,可以使用 ShareData 来传递进行通信,ShareData 是整个 在整个 DagInstance 的生命周期都会共享的一块数据空间,每次对它的写入都会通过 Store 组件持久化,以确保数据不会丢失,用法如下:
func (a *UpAction) Run(ctx run.ExecuteContext, params interface{}) error {ctx.ShareData().Set("key", "value")return nil}func (a *DownAction) Run(ctx run.ExecuteContext, params interface{}) error {val := ctx.ShareData().Get("key")return nil}fastflow 还提供了 Task 粒度的日志记录,这些日志都会通过 Store 组件持久化,用法如下:
func (a *Action) Run(ctx run.ExecuteContext, params interface{}) error {ctx.Trace("some message")return nil}上面的文章中提到,我们可以在 Dag 中定义一些变量,在创建工作流时可以对这些变量进行赋值,比如以下的Dag,定义了一个名为 `fileName 的变量
id: "test-dag"name: "test"vars:fileName:desc: "the file name"defaultValue: "file.txt"随后我们可以使用 Commander 组件来启动一个具体的工作流:
mod.GetCommander().RunDag("test-id", map[string]string{"fileName": "demo.txt",})这样本次启动的工作流的变量则被赋值为 demo.txt,接下来我们有两种方式去消费它
id: "test-dag"name: "test"vars:fileName:desc: "the file name"defaultValue: "file.txt"tasks:- id: "task1"action: "PrintAction"params:# using {{var}} to consume dag's variablefileName: "{{fileName}}"PrintAction.go:
type PrintParams struct {FileName string `json:"fileName"`}type PrintAction struct {}// Name define the unique action identity, it will be used by Taskfunc (a *PrintAction) Name() string {return "PrintAction"}func (a *PrintAction) Run(ctx run.ExecuteContext, params interface{}) error {cinput := params.(*ActionParam)fmt.Println(fmt.Sprintf("params: file[%s]", cinput.FileName, cinput.Value))return nil}func (a *PrintAction) ParameterNew() interface{} {return &PrintParams{}}func (a *Action) Run(ctx run.ExecuteContext, params interface{}) error {// get variable by namectx.GetVar("fileName")// iterate variablesctx.IterateVars(func(key, val string) (stop bool) {...})return nil}如前所述,你可以在直接使用 Keeper 模块提供的分布式锁,如下所示:
...mod.GetKeeper().NewMutex("mutex key").Lock(ctx.Context(),mod.LockTTL(time.Second),mod.Reentrant("worker-key1"))...其中:
LockTTL 表示你持有该锁的TTL,到期之后会自动释放,默认 30sReentrant 用于需要实现可重入的分布式锁的场景,作为持有场景的标识,默认为空,表示该锁不可重入