首先我们知道,Seata也是一个SpringBoot项目,如果对Seata源码无从下手,那么不妨从Spring切入:
在Seata中有一个重要的bean组件:GlobalTranscationScanner:

全局事务扫描器,它继承了AbstractAutoProxyCreator, InitializingBean, ApplicationContextAware, DisposableBean接口。这四个都是spring的类,所以想要知道这个GlobalTransactionScanner做了什么工作,我们首先得介绍一下spring知识:
AbstractAutoProxyCreator: 是spring的AOP的一个核心类。
InitializingBean:此接口为Bean提供了初始化方法的方式,只包含afterPropertiesSet方法
DisposableBean:这个接口和InitializingBean是一组的.它只包含destroy方法,作用是为Bean生命周期结束前做一些收尾工作。
ApplicationContextAware:实现了这个接口的类可以方便地获得ApplicationContext中的Bean。 可以简单理解为它就是一个spring容器
可以看出来,GlobalTransactionScanner继承了AOP,可以对Bean进行增强,同时还相当于一个spring容器。接下我们来看它做了实现这些接口都做了什么事。
实现AOP后,我们重点来看下被重写的wrapIfNecessary, 它是AOP中核心的方法
1.wrapIfNecessary()
@Override protected Object wrapIfNecessary(Object bean, String beanName, Object cacheKey) { // do checkers try { synchronized (PROXYED_SET) { if (PROXYED_SET.contains(beanName)) { return bean; } interceptor = null; //check TCC proxy:检查是否为TCC(这里我们研究AT,就不看TCC了) if (TCCBeanParserUtils.isTccAutoProxy(bean, beanName, applicationContext)) { //... } else { // 不是TCC模式: Class<?> serviceInterface = SpringProxyUtils.findTargetClass(bean); Class<?>[] interfacesIfJdk = SpringProxyUtils.findInterfaces(bean); //判断是否有相关事务的注解,如GlobalTransactional,如果没有就不会代理,直接返回bean if (!existsAnnotation(new Class[]{serviceInterface}) && !existsAnnotation(interfacesIfJdk)) { return bean; } //发现存在事务相关注解的bean,则添加拦截器———GlobalTransactionalInterceptor if (globalTransactionalInterceptor == null) { globalTransactionalInterceptor = new GlobalTransactionalInterceptor(failureHandlerHook); ConfigurationCache.addConfigListener( ConfigurationKeys.DISABLE_GLOBAL_TRANSACTION, (ConfigurationChangeListener)globalTransactionalInterceptor); } interceptor = globalTransactionalInterceptor; } // ... PROXYED_SET.add(beanName); return bean; } } }说明: 此方法对被全局事务注解的方法Bean进行了增强。具体实现是将拦截器织入代理对象。
2.invoke()
globalTransactionalInterceptor实现了MethodInterceptor这个接口,此接口只有一个方法#invoke():
@Override public Object invoke(final MethodInvocation methodInvocation) throws Throwable { // 获取注解标注的执行方法 Class<?> targetClass = methodInvocation.getThis() != null ? AopUtils.getTargetClass(methodInvocation.getThis()) : null; Method specificMethod = ClassUtils.getMostSpecificMethod(methodInvocation.getMethod(), targetClass); if (specificMethod != null && !specificMethod.getDeclaringClass().equals(Object.class)) { final Method method = BridgeMethodResolver.findBridgedMethod(specificMethod); // 获取全局事务GlobalTransactional的元数据 final GlobalTransactional globalTransactionalAnnotation = getAnnotation(method, targetClass, GlobalTransactional.class); // 获取全局锁GlobalLock的元数据.全局锁会将本地事务的执行纳入到seata的管理,一起竞争全局锁, //保证全局事务在执行时,不会收到本地其他事务的影响。(隔离性) final GlobalLock globalLockAnnotation = getAnnotation(method, targetClass, GlobalLock.class); boolean localDisable = disable || (degradeCheck && degradeNum >= degradeCheckAllowTimes); if (globalTransactionalAnnotation != null) { //执行全局事务 return handleGlobalTransaction(methodInvocation, transactional); } else if (globalLockAnnotation != null) { //执行全局锁 return handleGlobalLock(methodInvocation, globalLockAnnotation); } } } return methodInvocation.proceed(); }说明:
3.handleGlobalTransaction()
我们重点关注执行全局事务的方法handleGlobalTransaction().它的作用是获取事务信息并且执行全局事务:
Object handleGlobalTransaction(final MethodInvocation methodInvocation, final AspectTransactional aspectTransactional) throws Throwable { boolean succeed = true; try { // 调用execute方法,执行全局事务 return transactionalTemplate.execute(new TransactionalExecutor() { @Override public Object execute() throws Throwable { return methodInvocation.proceed(); } // 获取事务名称 public String name() { String name = aspectTransactional.getName(); if (!StringUtils.isNullOrEmpty(name)) { return name; } return formatMethod(methodInvocation.getMethod()); } //获取事务信息,并封装成TransactionInfo对象 @Override public TransactionInfo getTransactionInfo() { // reset the value of timeout int timeout = aspectTransactional.getTimeoutMills(); if (timeout <= 0 || timeout == DEFAULT_GLOBAL_TRANSACTION_TIMEOUT) { timeout = defaultGlobalTransactionTimeout; } TransactionInfo transactionInfo = new TransactionInfo(); transactionInfo.setTimeOut(timeout); transactionInfo.setName(name()); transactionInfo.setPropagation(aspectTransactional.getPropagation()); transactionInfo.setLockRetryInterval(aspectTransactional.getLockRetryInterval()); transactionInfo.setLockRetryTimes(aspectTransactional.getLockRetryTimes()); Set<RollbackRule> rollbackRules = new LinkedHashSet<>(); for (Class<?> rbRule : aspectTransactional.getRollbackFor()) { rollbackRules.add(new RollbackRule(rbRule)); } for (String rbRule : aspectTransactional.getRollbackForClassName()) { rollbackRules.add(new RollbackRule(rbRule)); } for (Class<?> rbRule : aspectTransactional.getNoRollbackFor()) { rollbackRules.add(new NoRollbackRule(rbRule)); } for (String rbRule : aspectTransactional.getNoRollbackForClassName()) { rollbackRules.add(new NoRollbackRule(rbRule)); } transactionInfo.setRollbackRules(rollbackRules); return transactionInfo; } }); } catch (TransactionalExecutor.ExecutionException e) { //... } } finally { //... } }说明:
4.execute()
public Object execute(TransactionalExecutor business) throws Throwable { // 1. Get transactionInfo 获取事务信息 TransactionInfo txInfo = business.getTransactionInfo(); // 1.1 Get current transaction, if not null, the tx role is 'GlobalTransactionRole.Participant'. // 获取当前事务,主要获取XId GlobalTransaction tx = GlobalTransactionContext.getCurrent(); // 1.2 Handle the transaction propagation. 配置不同事务的传播行为,执行不同逻辑. Propagation propagation = txInfo.getPropagation(); SuspendedResourcesHolder suspendedResourcesHolder = null; try { //Spring事务的7种传播行为 switch (propagation) { case NOT_SUPPORTED: // If transaction is existing, suspend it. if (existingTransaction(tx)) { suspendedResourcesHolder = tx.suspend(); } // Execute without transaction and return. return business.execute(); case REQUIRES_NEW: // If transaction is existing, suspend it, and then begin new transaction. if (existingTransaction(tx)) { suspendedResourcesHolder = tx.suspend(); tx = GlobalTransactionContext.createNew(); } // Continue and execute with new transaction break; case SUPPORTS: // If transaction is not existing, execute without transaction. if (notExistingTransaction(tx)) { return business.execute(); } // Continue and execute with new transaction break; case REQUIRED: // If current transaction is existing, execute with current transaction, // else continue and execute with new transaction. break; case NEVER: // If transaction is existing, throw exception. if (existingTransaction(tx)) { throw new TransactionException( String.format("Existing transaction found for transaction marked with propagation 'never', xid = %s" , tx.getXid())); } else { // Execute without transaction and return. return business.execute(); } case MANDATORY: // If transaction is not existing, throw exception. if (notExistingTransaction(tx)) { throw new TransactionException("No existing transaction found for transaction marked with propagation 'mandatory'"); } // Continue and execute with current transaction. break; default: throw new TransactionException("Not Supported Propagation:" + propagation); } // 1.3 如果当前事务未空,则新创建一个. if (tx == null) { tx = GlobalTransactionContext.createNew(); } try { // 2. If the tx role is 'GlobalTransactionRole.Launcher', send the request of beginTransaction to TC, // else do nothing. Of course, the hooks will still be triggered. // 开启全局事务. beginTransaction(txInfo, tx); Object rs; try { // Do Your Business rs = business.execute(); } catch (Throwable ex) { // 3. The needed business exception to rollback. // 发生异常,全局回滚.各个数据根据undo_log进行补偿. completeTransactionAfterThrowing(txInfo, tx, ex); throw ex; } // 如果没有异常发生,则提交全局事务 // 4. everything is fine, commit. commitTransaction(tx); return rs; } finally { //5. clear resumeGlobalLockConfig(previousConfig); triggerAfterCompletion(); cleanUp(); } }}说明:
看到这里可能有些似曾相似,这个流程下来不就是AT模式的2个阶段嘛.我们探究到了AT模式的具体实现!
在此方法中,我们终于看到了开启全局事务的关键方法: beginTransaction(). 不过,我们知道TM要开启全局事务,首先得向TC发起请求. 说明我们还得进入beginTransaction()方法中一探究竟,这里面还调用了不少方法,大家看的时候可以只看注释的一行往下推进:
4.1 beginTransaction()
private void beginTransaction(TransactionInfo txInfo, GlobalTransaction tx) throws TransactionalExecutor.ExecutionException { try { triggerBeforeBegin(); //对TC发起请求 tx.begin(txInfo.getTimeOut(), txInfo.getName()); triggerAfterBegin(); } //... } @Override public void begin(int timeout, String name) throws TransactionException { // 判断事务的发起者是不是TM,如果不是抛异常 if (role != GlobalTransactionRole.Launcher) { assertXIDNotNull(); if (LOGGER.isDebugEnabled()) { LOGGER.debug("Ignore Begin(): just involved in global transaction [{}]", xid); } return; } assertXIDNull(); String currentXid = RootContext.getXID(); //获取Xid if (currentXid != null) { throw new IllegalStateException("Global transaction already exists," + " can't begin a new global transaction, currentXid = " + currentXid); } //调用transactionManager.begin() xid = transactionManager.begin(null, null, name, timeout); status = GlobalStatus.Begin; RootContext.bind(xid); if (LOGGER.isInfoEnabled()) { LOGGER.info("Begin new global transaction [{}]", xid); } } @Override public String begin(String applicationId, String transactionServiceGroup, String name, int timeout) throws TransactionException { GlobalBeginRequest request = new GlobalBeginRequest(); request.setTransactionName(name); request.setTimeout(timeout); // 关键:syncCall 同步请求 GlobalBeginResponse response = (GlobalBeginResponse) syncCall(request); if (response.getResultCode() == ResultCode.Failed) { throw new TmTransactionException(TransactionExceptionCode.BeginFailed, response.getMsg()); } return response.getXid(); } private AbstractTransactionResponse syncCall(AbstractTransactionRequest request) throws TransactionException { try { // 通过Netty发起请求 return (AbstractTransactionResponse) TmNettyRemotingClient.getInstance().sendSyncRequest(request); } catch (TimeoutException toe) { throw new TmTransactionException(TransactionExceptionCode.IO, "RPC timeout", toe); } }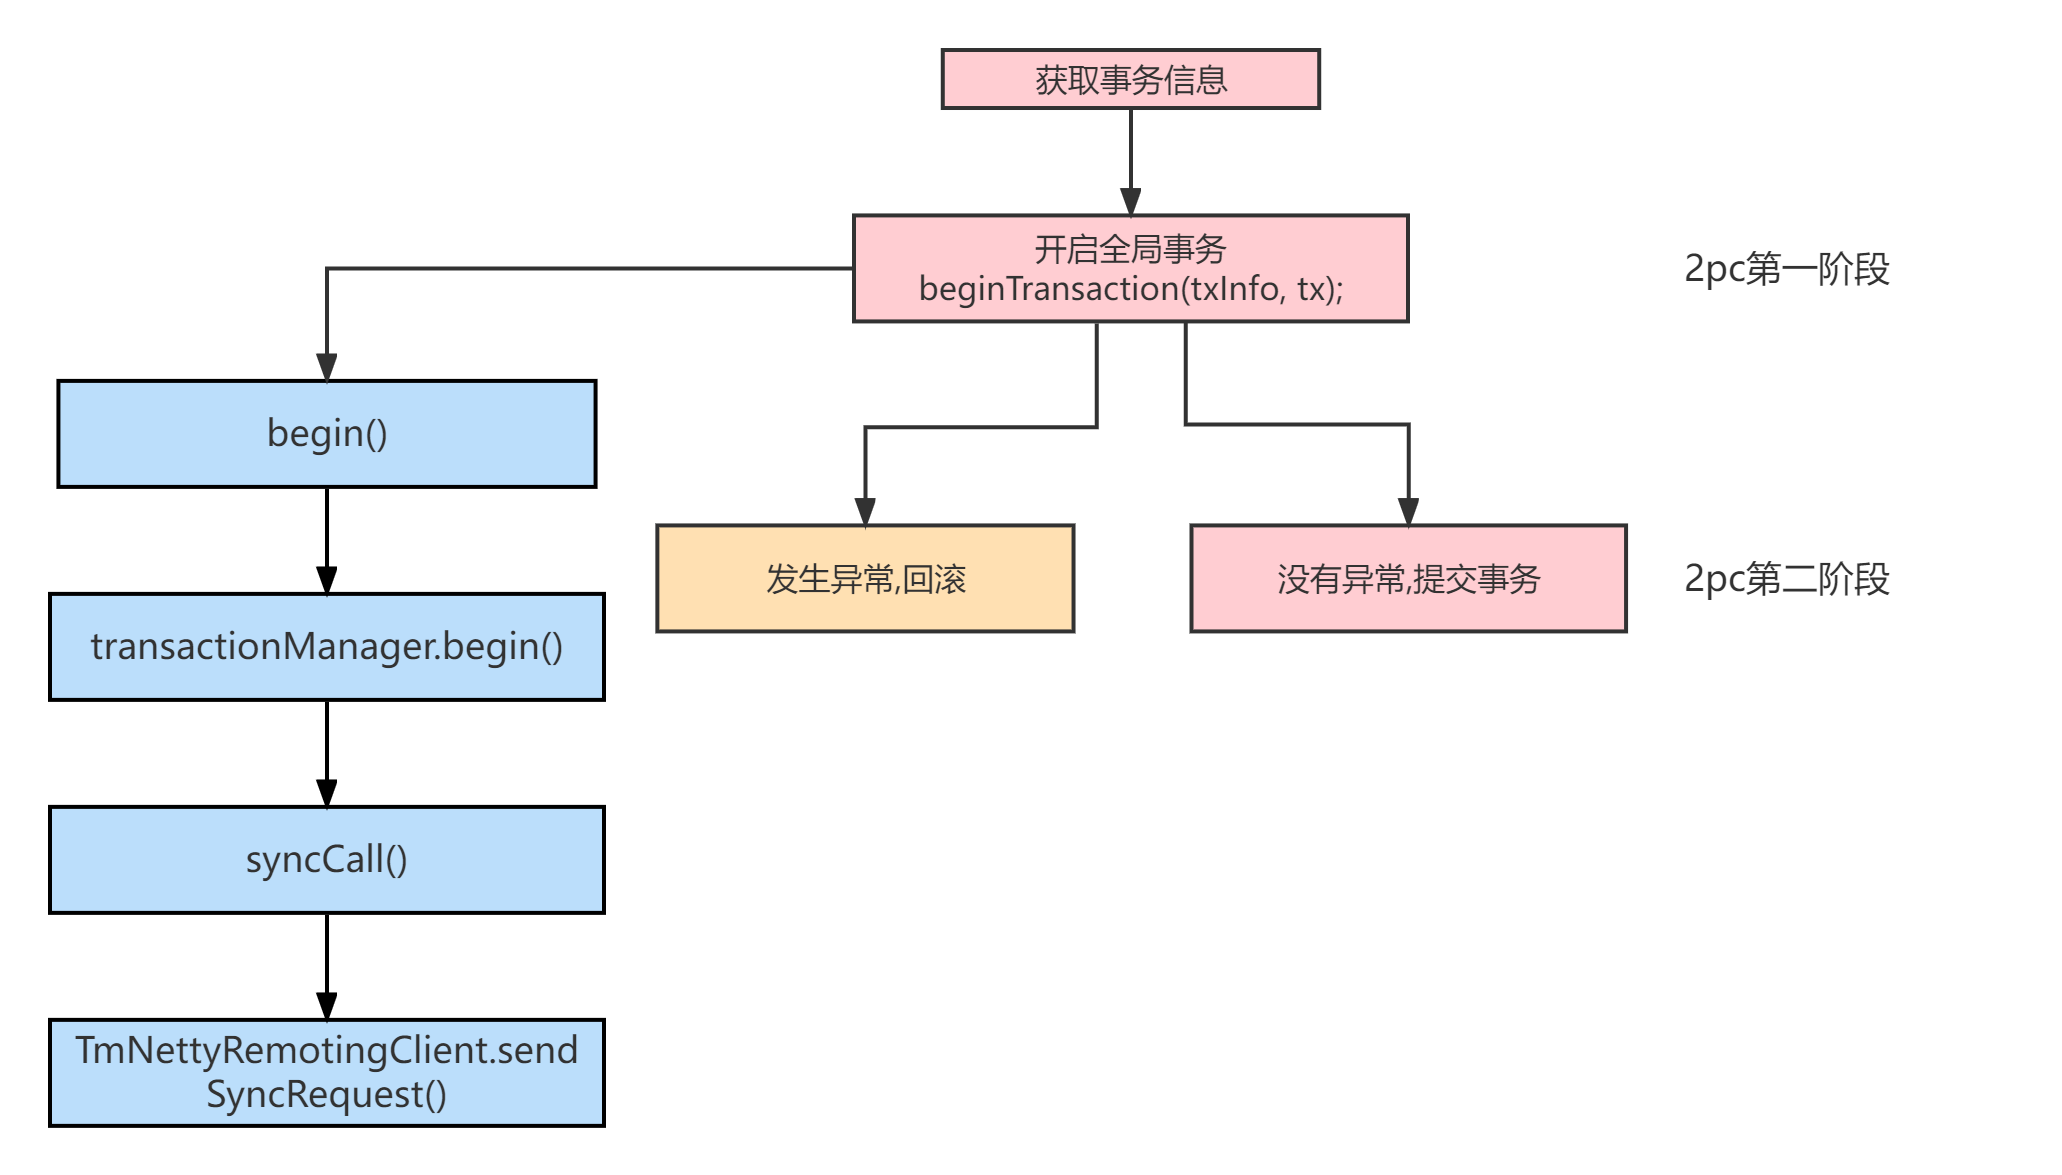
InitializingBean接口只有一个方法afterPropertiesSet(),GlobalTransactionScanner对它进行了重写:
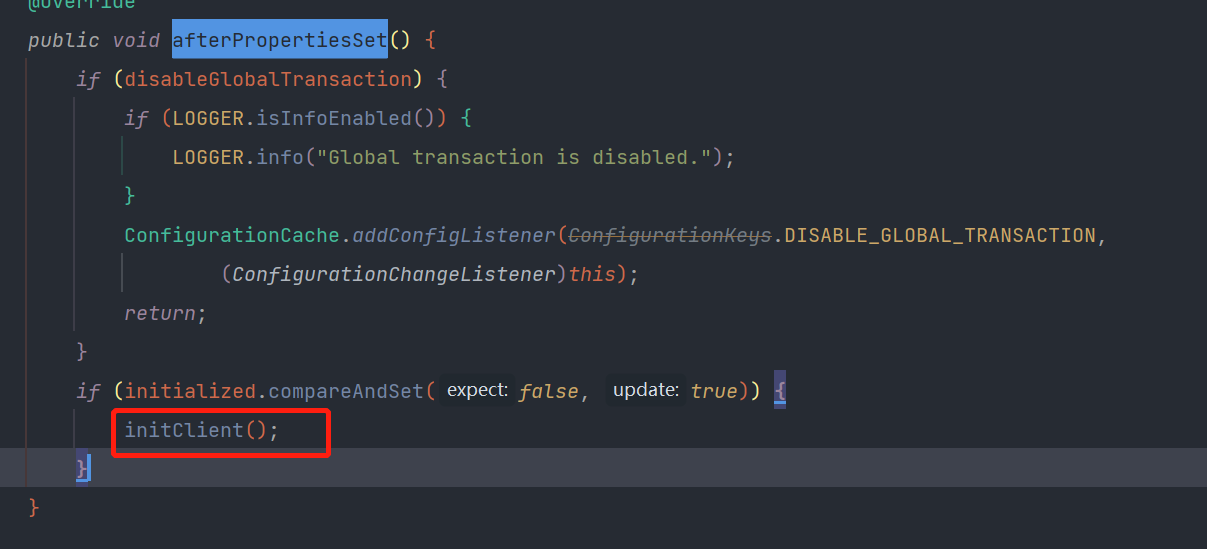
说明: 调用了initCLient方法:初始化了TM和RM
private void initClient() { // .... //init TM TMClient.init(applicationId, txServiceGroup, accessKey, secretKey); // 日志 //init RM RMClient.init(applicationId, txServiceGroup); // 日志 registerSpringShutdownHook(); }初始化TM:
public static void init(String applicationId, String transactionServiceGroup, String accessKey, String secretKey) { // 获取TMRpc客户端实例 TmNettyRemotingClient tmNettyRemotingClient = TmNettyRemotingClient.getInstance(applicationId, transactionServiceGroup, accessKey, secretKey); //初始化 TM Client tmNettyRemotingClient.init(); }调用 TmRpcClient.getInstance() 方法会获取一个 TM 客户端实例.
在获取过程中,会创建 Netty 客户端配置文件对象,以及创建 messageExecutor 线程池,该线程池用于在处理各种与服务端的消息交互,在创建 TmRpcClient 实例时,创建 ClientBootstrap,用于管理 Netty 服务的启停,以及 ClientChannelManager,它是专门用于管理 Netty 客户端对象池.
初始化TM客户端:
To Be Continue...
博主也是刚开始学习Seata,编程功力不太深,很多代码的精妙之处也看不出来.
参考链接:
Seata AT 模式启动源码分析
视频,本文很多都是从这里整理的