Eureka 是 Netflix 公司开源的一个服务注册与发现的组件。
? Eureka 和其他 Netflix 公司的服务组件(例如负载均衡、熔断器、网关等) 一起,被 SpringCloud 社区整合为 Spring-Cloud-Netflix 模块。
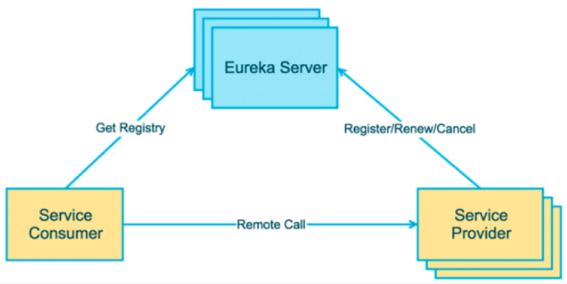
? Eureka 包含两个组件:Eureka Server(注册中心)和 Eureka Client(服务提供者、服务消费者)。

搭建步骤:
<?xml version="1.0" encoding="UTF-8"?><project xmlns="http://maven.apache.org/POM/4.0.0" xmlns:xsi="http://www.w3.org/2001/XMLSchema-instance" xsi:schemaLocation="http://maven.apache.org/POM/4.0.0 http://maven.apache.org/xsd/maven-4.0.0.xsd"> <modelVersion>4.0.0</modelVersion> <groupId>org.example</groupId> <artifactId>eureka-parent</artifactId> <packaging>pom</packaging> <version>1.0-SNAPSHOT</version> <modules> <module>eureka-provider</module> <module>eureka-consumer</module> <module>eureka-server</module> </modules> <parent> <!-- spring boot 环境 --> <groupId>org.springframework.boot</groupId> <artifactId>spring-boot-starter-parent</artifactId> <version>2.1.0.RELEASE</version> </parent> <dependencies> <!-- 简化POJO --> <dependency> <groupId>org.projectlombok</groupId> <artifactId>lombok</artifactId> <optional>true</optional> </dependency> </dependencies> <!-- Spring Cloud 依赖管理 --> <dependencyManagement> <dependencies> <dependency> <groupId>org.springframework.cloud</groupId> <artifactId>spring-cloud-dependencies</artifactId> <version>${spring-cloud.version}</version> <type>pom</type> <scope>import</scope> </dependency> </dependencies> </dependencyManagement> <properties> <project.build.sourceEncoding>UTF-8</project.build.sourceEncoding> <project.reporting.outputEncoding>UTF-8</project.reporting.outputEncoding> <java.version>1.8</java.version> <!--spring cloud 版本--> <spring-cloud.version>Greenwich.RELEASE</spring-cloud.version> </properties></project><?xml version="1.0" encoding="UTF-8"?><project xmlns="http://maven.apache.org/POM/4.0.0" xmlns:xsi="http://www.w3.org/2001/XMLSchema-instance" xsi:schemaLocation="http://maven.apache.org/POM/4.0.0 http://maven.apache.org/xsd/maven-4.0.0.xsd"> <parent> <artifactId>eureka-parent</artifactId> <groupId>org.example</groupId> <version>1.0-SNAPSHOT</version> </parent> <modelVersion>4.0.0</modelVersion> <artifactId>eureka-server</artifactId> <dependencies> <dependency> <groupId>org.springframework.boot</groupId> <artifactId>spring-boot-starter-web</artifactId> </dependency> <!-- eureka-server --> <dependency> <groupId>org.springframework.cloud</groupId> <artifactId>spring-cloud-starter-netflix-eureka-server</artifactId> </dependency> </dependencies> <properties> <maven.compiler.source>8</maven.compiler.source> <maven.compiler.target>8</maven.compiler.target> </properties></project>package com;import org.springframework.boot.SpringApplication;import org.springframework.boot.autoconfigure.SpringBootApplication;import org.springframework.cloud.netflix.eureka.server.EnableEurekaServer;@SpringBootApplication@EnableEurekaServer // 启用 EurekaServer(不声明也是默认启动)public class EurekaApp { public static void main(String[] args) { SpringApplication.run(EurekaApp.class, args); }}server: port: 8761# eureka 配置:共分为四部分配置# 1. dashboard: eureka 的 web 控制台配置# 2. server: eureka 的服务端配置# 3. client: eureka 的客户端配置# 4. instance: eureka 的实例配置eureka: instance: hostname: localhost # 主机名 client: service-url: defaultZone: http://${eureka.instance.hostname}:${server.port}/eureka # eureka 服务端地址,将来客户端使用该地址和 eureka 进行通信 register-with-eureka: false # 是否将自己的路径注册到 eureka 上(eureka server 需要;eureka provider client 不需要)。默认:true fetch-registry: false # 是否需要从 eureka 中抓取路径(eureka server 不需要;eureka consumer client 需要)。默认:true运行启动类后,访问 localhost:8761 即可进入Eureka 控制台:

<?xml version="1.0" encoding="UTF-8"?><project xmlns="http://maven.apache.org/POM/4.0.0" xmlns:xsi="http://www.w3.org/2001/XMLSchema-instance" xsi:schemaLocation="http://maven.apache.org/POM/4.0.0 http://maven.apache.org/xsd/maven-4.0.0.xsd"> <parent> <artifactId>eureka-parent</artifactId> <groupId>org.example</groupId> <version>1.0-SNAPSHOT</version> </parent> <modelVersion>4.0.0</modelVersion> <artifactId>eureka-provider</artifactId> <dependencies> <!-- spring boot web --> <dependency> <groupId>org.springframework.boot</groupId> <artifactId>spring-boot-starter-web</artifactId> </dependency> <!-- eureka-client --> <dependency> <groupId>org.springframework.cloud</groupId> <artifactId>spring-cloud-starter-netflix-eureka-client</artifactId> </dependency> </dependencies></project>package com;import org.springframework.boot.SpringApplication;import org.springframework.boot.autoconfigure.SpringBootApplication;import org.springframework.cloud.netflix.eureka.EnableEurekaClient;/** * 启动类 */@EnableEurekaClient // 该注解在SpringCloud新版本中可以省略@SpringBootApplicationpublic class ProviderApp { public static void main(String[] args) { SpringApplication.run(ProviderApp.class, args); }}server: port: 8000eureka: instance: hostname: localhost # 主机名 client: service-url: defaultZone: http://localhost:8761/eureka # eureka服务端地址,将来客户端使用该地址和eureka进行通信spring: application: name: eureka-provider # 设置当前应用的名称。这会在eureka中Application显示,且需要使用该名称来获取路径package com.domain;import lombok.AllArgsConstructor;import lombok.Data;import lombok.NoArgsConstructor;@Data@AllArgsConstructor@NoArgsConstructorpublic class Goods { private int id; private String name; private double price; private int skuNum; @Override public String toString() { return "Goods{" + "id=" + id + ", name='" + name + '\'' + ", price=" + price + ", skuNum=" + skuNum + '}'; }}package com.controller;import com.domain.Goods;import com.service.GoodsService;import org.springframework.beans.factory.annotation.Autowired;import org.springframework.web.bind.annotation.GetMapping;import org.springframework.web.bind.annotation.PathVariable;import org.springframework.web.bind.annotation.RequestMapping;import org.springframework.web.bind.annotation.RestController;@RestController@RequestMapping("/goods")public class GoodsController { @Autowired private GoodsService goodsService; @GetMapping("findOne/{id}") public Goods findGoods(@PathVariable("id") int id){ return goodsService.findOne(id); }}package com.service;import com.dao.GoodsDao;import com.domain.Goods;import org.springframework.beans.factory.annotation.Autowired;import org.springframework.stereotype.Service;@Servicepublic class GoodsService { @Autowired private GoodsDao goodsDao; public Goods findOne(int id){ return goodsDao.findOne(id); }}package com.dao;import com.domain.Goods;import org.springframework.stereotype.Repository;@Repositorypublic class GoodsDao { public static Goods findOne(int id){ Goods phone = new Goods(1, "华为P10", 6999.00, 20); return phone; }}<?xml version="1.0" encoding="UTF-8"?><project xmlns="http://maven.apache.org/POM/4.0.0" xmlns:xsi="http://www.w3.org/2001/XMLSchema-instance" xsi:schemaLocation="http://maven.apache.org/POM/4.0.0 http://maven.apache.org/xsd/maven-4.0.0.xsd"> <parent> <artifactId>eureka-parent</artifactId> <groupId>org.example</groupId> <version>1.0-SNAPSHOT</version> </parent> <modelVersion>4.0.0</modelVersion> <artifactId>eureka-consumer</artifactId> <dependencies> <!-- spring boot web --> <dependency> <groupId>org.springframework.boot</groupId> <artifactId>spring-boot-starter-web</artifactId> </dependency> <!-- eureka-client --> <dependency> <groupId>org.springframework.cloud</groupId> <artifactId>spring-cloud-starter-netflix-eureka-client</artifactId> </dependency> </dependencies></project>package com;import org.springframework.boot.SpringApplication;import org.springframework.boot.autoconfigure.SpringBootApplication;import org.springframework.cloud.client.discovery.EnableDiscoveryClient;import org.springframework.cloud.netflix.eureka.EnableEurekaClient;@EnableDiscoveryClient // 激活DiscoveryClient@EnableEurekaClient@SpringBootApplicationpublic class ConsumerApp { public static void main(String[] args) { SpringApplication.run(ConsumerApp.class, args); }}server: port: 8001eureka: instance: hostname: localhost # 主机名 client: service-url: defaultZone: http://localhost:8761/eureka # eureka服务端地址,将来客户端使用该地址和eureka进行通信spring: application: name: eureka-consumer # 设置当前应用的名称。这会在eureka中Application显示,且需要使用该名称来获取路径package com.config;import org.springframework.context.annotation.Bean;import org.springframework.context.annotation.Configuration;import org.springframework.web.client.RestTemplate;@Configurationpublic class RestTemplateConfig { @Bean public RestTemplate restTemplate() { return new RestTemplate(); }}package com.domain;import lombok.AllArgsConstructor;import lombok.Data;import lombok.NoArgsConstructor;@Data@AllArgsConstructor@NoArgsConstructorpublic class Goods { private int id; private String name; private double price; private int skuNum; @Override public String toString() { return "Goods{" + "id=" + id + ", name='" + name + '\'' + ", price=" + price + ", skuNum=" + skuNum + '}'; }}package com.controller;import com.domain.Goods;import org.springframework.beans.factory.annotation.Autowired;import org.springframework.cloud.client.ServiceInstance;import org.springframework.cloud.client.discovery.DiscoveryClient;import org.springframework.web.bind.annotation.GetMapping;import org.springframework.web.bind.annotation.PathVariable;import org.springframework.web.bind.annotation.RequestMapping;import org.springframework.web.bind.annotation.RestController;import org.springframework.web.client.RestTemplate;import java.util.List;/** * 服务调用方 */@RestController@RequestMapping("/order")public class OrderController { @Autowired private RestTemplate restTemplate; @Autowired private DiscoveryClient discoveryClient; @GetMapping("/goods/{id}") public Goods findOrderByGoodsId(@PathVariable("id") int id) { /* 动态从 Eureka Server 中获取 provider 的 ip 和端口 1. 注入 DiscoveryClient 对象.激活 2. 调用方法 */ // 演示 discoveryClient 使用 List<ServiceInstance> instances = discoveryClient.getInstances("EUREKA-PROVIDER"); // 服务提供者所配置的实例名称(不区分大小写) // 判断集合是否有数据 if(instances == null || instances.size() == 0){ // 集合没有数据 return null; } ServiceInstance instance = instances.get(0); String host = instance.getHost(); // 获取ip int port = instance.getPort(); // 获取端口 /* 远程调用Goods服务中的findOne接口:使用RestTemplate 1. 定义Bean restTemplate 2. 注入Bean 3. 调用方法 */ String url = String.format("http://%s:%d/goods/findOne/%d", host, port, id); Goods goods = restTemplate.getForObject(url, Goods.class); return goods; }}运行效果:
访问 http://localhost:8001/order/goods/1 ,返回:{"id":1,"name":"华为P10","price":6999.0,"skuNum":20}
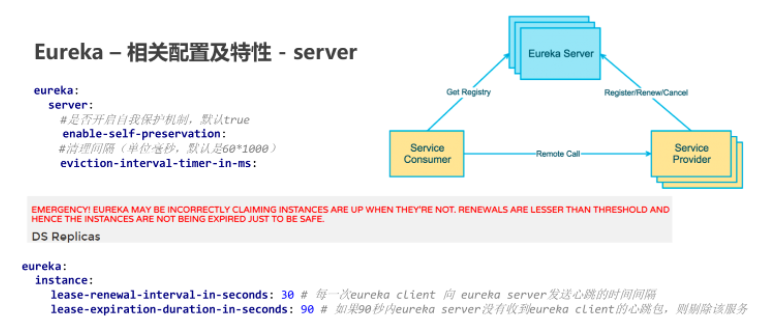
Eureka Instance 的配置信息全部保存在org.springframework.cloud.netflix.eureka.EurekaInstanceConfigBean 配置类里,实际上它是 com.netflix.appinfo.EurekaInstanceConfig 的实现类,替代了 netflix 的 com.netflix.appinfo.CloudInstanceConfig 的默认实现。
Eureka Instance 的配置信息全部以eureka.instance.xxx的格式配置。
常用配置:

Eureka Server 注册中心端的配置是对注册中心的特性配置。Eureka Server 的配置全部在 org.springframework.cloud.netflix.eureka.server.EurekaServerConfigBean 里,实际上它是 com.netflix.eureka.EurekaServerConfig 的实现类,替代了 netflix 的默认实现。
Eureka Server 的配置全部以eureka.server.xxx的格式进行配置。
常用配置:
注意:上述配置一般在生产环境保持默认即可(生产环境配置原则是尽量减少环境变化),在开发或测试则可以为了方便而修改配置。
搭建示例:
修改本地 host 文件:
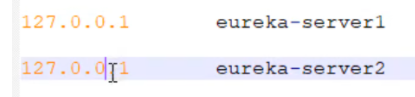
application.yml:
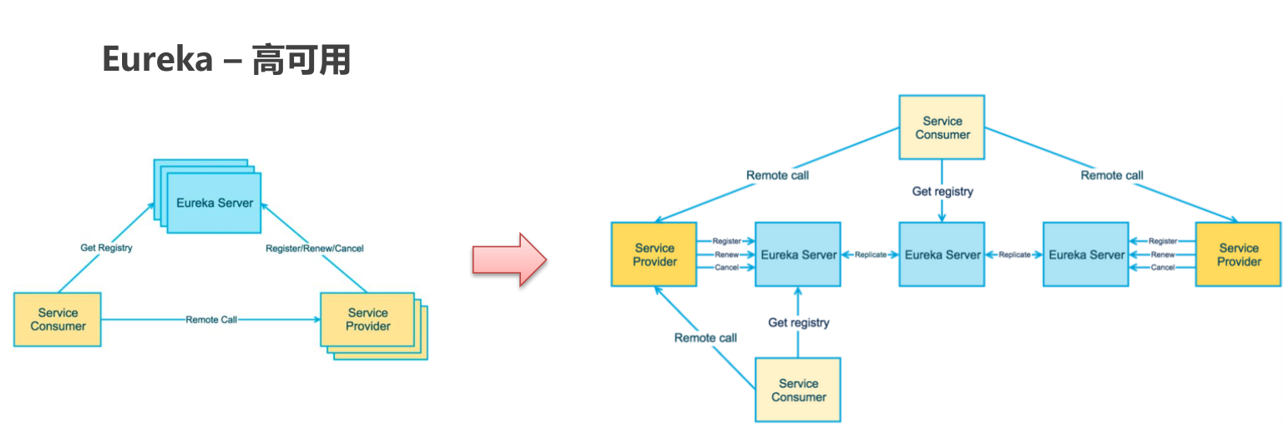
server: port: 8761eureka: instance: hostname: eureka-server1 # 主机名 client: service-url: defaultZone: http://eureka-server2:8762/eureka register-with-eureka: true # 是否将自己的路径 注册到eureka上。eureka server 不需要的,eureka provider client 需要 fetch-registry: true # 是否需要从eureka中抓取路径。eureka server 不需要的,eureka consumer client 需要spring: application: name: eureka-server-haapplication.yml:
server: port: 8762eureka: instance: hostname: eureka-server2 # 主机名 client: service-url: defaultZone: http://eureka-server1:8761/eureka register-with-eureka: true # 是否将自己的路径 注册到eureka上。eureka server 不需要的,eureka provider client 需要 fetch-registry: true # 是否需要从eureka中抓取路径。eureka server 不需要的,eureka consumer client 需要spring: application: name: eureka-server-ha分别修改服务提供者和服务消费者配置文件中的注册服务地址:
...eureka: client: service-url: defaultZone: http://eureka-server1:8761/eureka,http://eureka-server2:8762/eureka # eureka 服务端地址...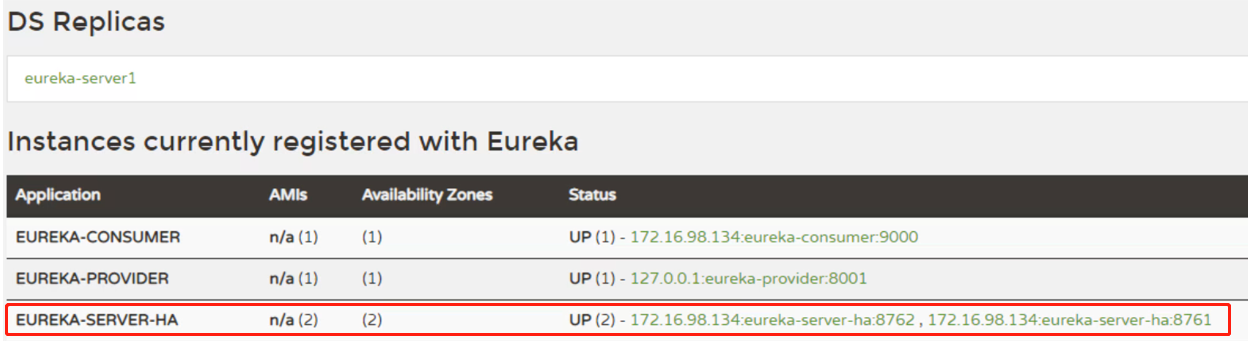
干掉其中一台 server,验证 client 仍能正常访问。
Consul 是由 HashiCorp 基于 Go 语言开发的,支持多数据中心、分布式、高可用的服务发布和注册服务软件。
启动 consul:
启动命令: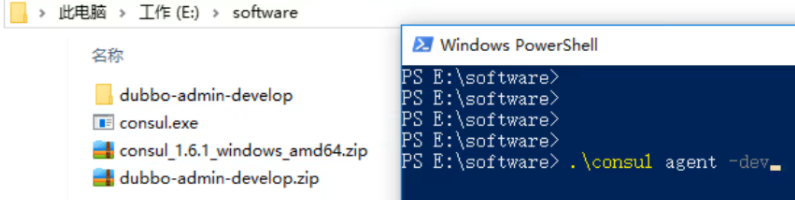
dev 模式:不会持久化数据
控制台: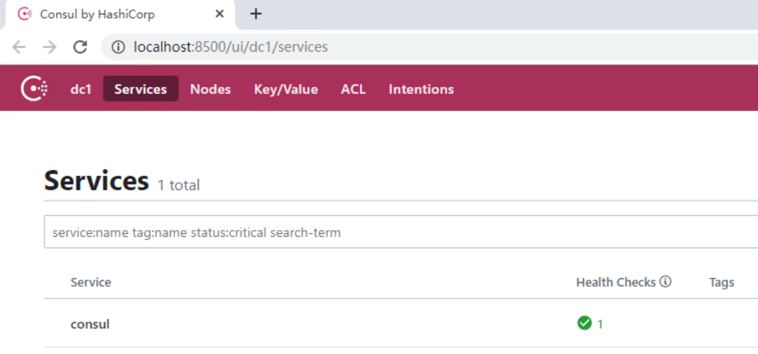
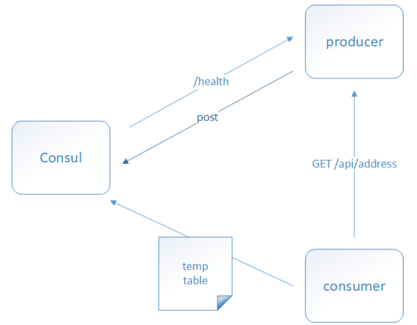
<dependencies> <!--consul 客户端--> <dependency> <groupId>org.springframework.cloud</groupId> <artifactId>spring-cloud-starter-consul-discovery</artifactId> </dependency> <dependency> <groupId>org.springframework.boot</groupId> <artifactId>spring-boot-starter-web</artifactId> </dependency> <dependency> <groupId>org.springframework.boot</groupId> <artifactId>spring-boot-starter-test</artifactId> <scope>test</scope> </dependency> <dependency> <groupId>org.springframework.boot</groupId> <artifactId>spring-boot-starter-actuator</artifactId> </dependency> </dependencies>server: port: 8000spring: cloud: consul: host: localhost # consul 服务端的 ip port: 8500 # consul 服务端的端口 默认8500 discovery: service-name: ${spring.application.name} # 当前应用注册到consul的名称 prefer-ip-address: true # 注册ip application: name: consul-provider # 应用名称<dependencies> <!--consul 客户端--> <dependency> <groupId>org.springframework.cloud</groupId> <artifactId>spring-cloud-starter-consul-discovery</artifactId> </dependency> <dependency> <groupId>org.springframework.boot</groupId> <artifactId>spring-boot-starter-web</artifactId> </dependency> <dependency> <groupId>org.springframework.boot</groupId> <artifactId>spring-boot-starter-test</artifactId> <scope>test</scope> </dependency> <dependency> <groupId>org.springframework.boot</groupId> <artifactId>spring-boot-starter-actuator</artifactId> </dependency> </dependencies>server: port: 9000spring: cloud: consul: host: localhost # consul 服务端的 ip port: 8500 # consul 服务端的端口 默认8500 discovery: service-name: ${spring.application.name} # 当前应用注册到consul的名称 prefer-ip-address: true # 注册ip application: name: consul-consumer # 应用名称package com.consul.controller;import com.consul.domain.Goods;import org.springframework.beans.factory.annotation.Autowired;import org.springframework.cloud.client.ServiceInstance;import org.springframework.cloud.client.discovery.DiscoveryClient;import org.springframework.web.bind.annotation.GetMapping;import org.springframework.web.bind.annotation.PathVariable;import org.springframework.web.bind.annotation.RequestMapping;import org.springframework.web.bind.annotation.RestController;import org.springframework.web.client.RestTemplate;import java.util.List;/** * 服务的调用方 */@RestController@RequestMapping("/order")public class OrderController { @Autowired private RestTemplate restTemplate; @Autowired private DiscoveryClient discoveryClient; @GetMapping("/goods/{id}") public Goods findGoodsById(@PathVariable("id") int id){ // 演示discoveryClient 使用 List<ServiceInstance> instances = discoveryClient.getInstances("consul-PROVIDER"); // 判断集合是否有数据 if(instances == null || instances.size() == 0){ // 集合没有数据 return null; } ServiceInstance instance = instances.get(0); String host = instance.getHost(); // 获取ip int port = instance.getPort(); // 获取端口 System.out.println(host); System.out.println(port); String url = "http://"+host+":"+port+"/goods/findOne/"+id; // 3. 调用方法 Goods goods = restTemplate.getForObject(url, Goods.class); return goods; }}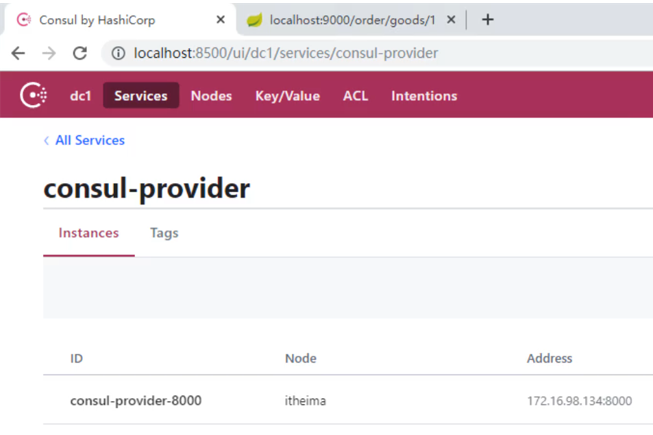
Nacos(Dynamic Naming and Configuration Service) 是阿里巴巴 2018 年 7 月开源的项目。
它专注于服务发现和配置管理领域,致力于帮你发现、配置和管理微服务。Nacos 支持几乎所有主流类型的“服务”的发现、配置和管理。
一句话概括就是 Nacos = SpringCloud 注册中心 + SpringCloud 配置中心。
官网:https://nacos.io/
下载地址:https://github.com/alibaba/nacos/releases
启动: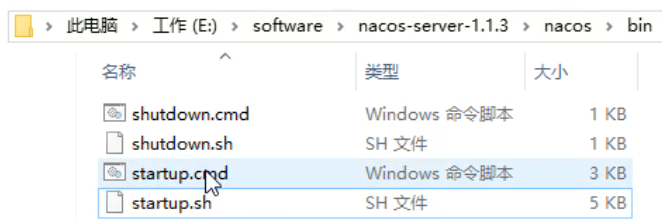
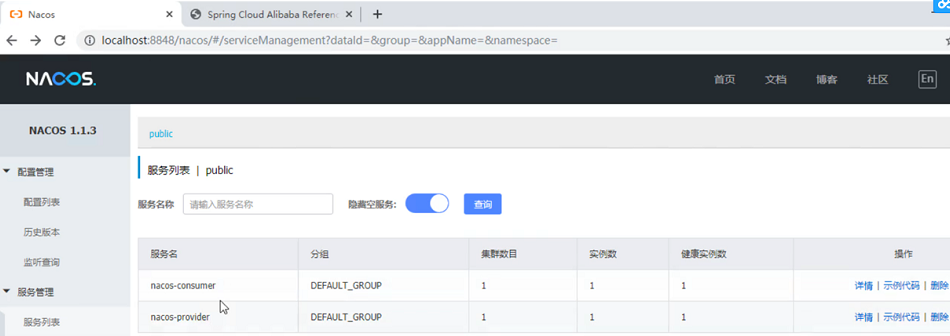
控制台登录:账号/密码均为:nacos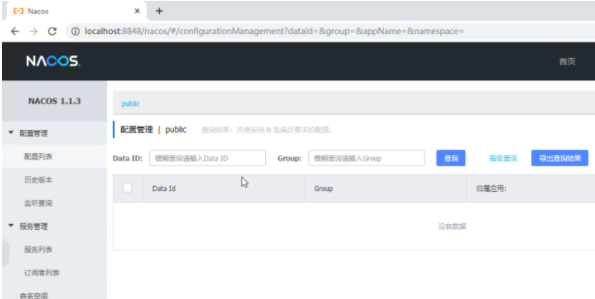
Spring cloud Alibaba 组件: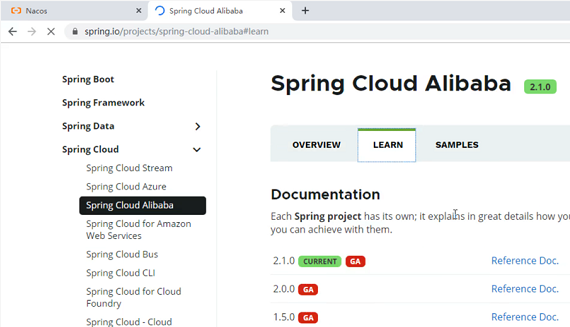
<dependencies> <!-- nacos --> <dependency> <groupId>org.springframework.cloud</groupId> <artifactId>spring-cloud-starter-alibaba-nacos-discovery</artifactId> <version>0.2.2.RELEASE</version> </dependency> <dependency> <groupId>com.alibaba.nacos</groupId> <artifactId>nacos-client</artifactId> <version>1.1.0</version> </dependency> <dependency> <groupId>org.springframework.boot</groupId> <artifactId>spring-boot-starter-web</artifactId> </dependency> <dependency> <groupId>org.springframework.boot</groupId> <artifactId>spring-boot-starter-test</artifactId> <scope>test</scope> </dependency> <dependency> <groupId>org.springframework.boot</groupId> <artifactId>spring-boot-starter-actuator</artifactId> </dependency> </dependencies>server: port: 8000spring: cloud: nacos: discovery: server-addr: 127.0.0.1:8848 # 配置nacos 服务端地址 application: name: nacos-provider # 服务名称<dependencies> <!-- nacos --> <dependency> <groupId>org.springframework.cloud</groupId> <artifactId>spring-cloud-starter-alibaba-nacos-discovery</artifactId> <version>0.2.2.RELEASE</version> </dependency> <dependency> <groupId>com.alibaba.nacos</groupId> <artifactId>nacos-client</artifactId> <version>1.1.0</version> </dependency> <dependency> <groupId>org.springframework.boot</groupId> <artifactId>spring-boot-starter-web</artifactId> </dependency> <dependency> <groupId>org.springframework.boot</groupId> <artifactId>spring-boot-starter-test</artifactId> <scope>test</scope> </dependency> <dependency> <groupId>org.springframework.boot</groupId> <artifactId>spring-boot-starter-actuator</artifactId> </dependency> </dependencies>server: port: 9000spring: cloud: nacos: discovery: server-addr: 127.0.0.1:8848 # 配置 nacos 服务端地址 application: name: nacos-consumer # 服务名称