使用 shell 脚本自动申请进京证 (六环外) —— debug 过程
问题现象
用 shell 脚本写了一个自动办理六环外进京证的工具 《使用 shell 脚本自动申请进京证 (六环外)》,然而运行这个脚本总是返回以下错误信息:
{
  "msg": "目前办理业务人数较多,请稍后再试。",
  "code": 500
}
咨询 woodheader/jjz 项目的作者,了解到问题就是出在请求头或参数上。仔细的检查了传入的各种参数,没有发现任何问题;修改 http 头的格式 (key 与 value 间增加空格),也没有丝毫改善。
写脚本花了两天,调试脚本花了三天却还没摸到门径,真是见了鬼了。有时候怀疑是自己被拉进反作弊名单了,切换另外一台设备的 source 和 authorization 后,结果还是出错,真是离了大谱。
思路
目前在 android 设备的 App 上进行请求用同样的参数是可以办理成功的,并且有 VNET/Charles 的抓包数据。如果能对脚本的请求进行抓包,再将两者对比起来看,问题就容易暴露了。
Charles 抓包 curl
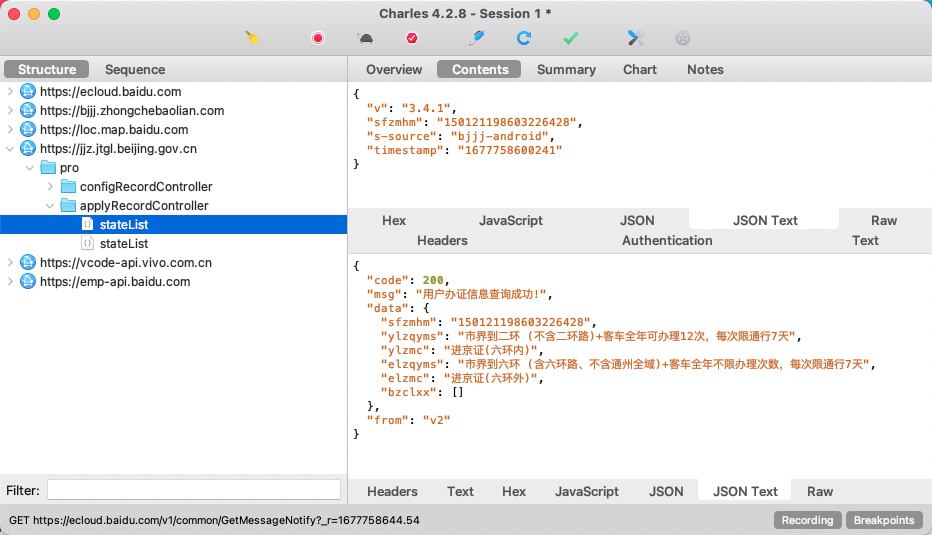
Charles 抓包的教程网上比较多,这里就不赘述了,需要注意的是和 VNET 一样,App 登录阶段不能抓包,否则登录界面调不出来。
Charles 可以抓 App 的报文,如果也能抓脚本的报文,两个一对比问题就水落石出啦~
经过一番百度,发现要让 Charles 抓命令行的报文还比较麻烦,需要配置两个环境变量:
export http_proxy=172.21.222.149:8888
export https_proxy=172.21.222.149:8888
其中 172.21.222.149:8888 就是 Charles 开启代理的 IP 和端口:
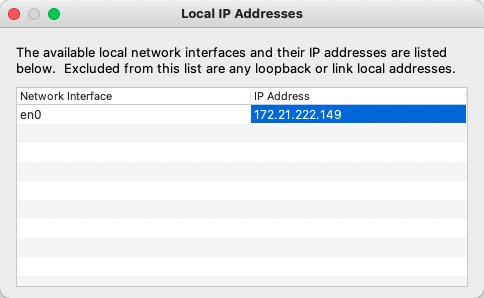
然而开启抓包后,curl 要么失败,要么卡住,总是抓不到包:
> sh jinjing.sh
check jq ok
check curl ok
check head ok
check cat ok
check awk ok
check grep ok
check date ok
state req: {"v":"3.4.1","sfzmhm":"150121198603226428","s-source":"bjjj-android","timestamp":"1677810190000"}
state headers:  -H Accept-Language:zh-CN,zh;q=0.8 -H User-Agent:okhttp-okgo/jeasonlzy -H source:8724a2428c3f47358741f978fd082810 -H authorization:xxxxxxxx-xxxx-xxxx-xxxx-xxxxxxxxxxxx -H Content-Type:application/json;charset=utf-8 -H Host:jjz.jtgl.beijing.gov.cn -H Connection:Keep-Alive -H Accept-Encoding:gzip -H Content-Length:0
jinjing.sh: line 99: [: too many arguments
query permits status ok:
id [] from user token does not match given [150121198603226428], fatal error!
VNET 抓包 curl
Charles 不行就想到了 VNET,不过它只能在 android 设备上抓包,如何让它抓 pc 上运行的 curl 呢?其实不难,把脚本放在设备上运行就好了。
adb shell 运行脚本
这个脚本只要有 shell 环境就能用,可移植性比较好,立马用 adb shell 发送到设备上试试:
> adb push jinjing.sh /sdcard/
jinjing.sh: 1 file pushed, 0 skipped. 9.9 MB/s (11790 bytes in 0.001s)
> adb push config.ini /sdcard/
config.ini: 1 file pushed, 0 skipped. 0.2 MB/s (428 bytes in 0.002s)
> adb shell
PD1981:/ > cd /sdcard
PD1981:/sdcard > mkdir jjz
PD1981:/sdcard > mv jinjing.sh config.ini jjz/
PD1981:/sdcard > cd jjz
PD1981:/sdcard/jjz > ls -lh
total 16K
-rw-rw---- 1 root everybody 428 2023-02-10 16:01 config.ini
-rw-rw---- 1 root everybody 12K 2023-03-03 10:34 jinjing.sh
PD1981:/sdcard/jjz > sh jinjing.sh
jinjing.sh[1]:  !: inaccessible or not found
please install jq before run this script, fatal error!
提示没有检测到 jq,这命令确实不是 android 标配,在 pc 上都需要安装,更不要说这种移动设备了。
arm jq
翻开 jq 官网下载页,各种预编译版本中没有 arm 平台的:
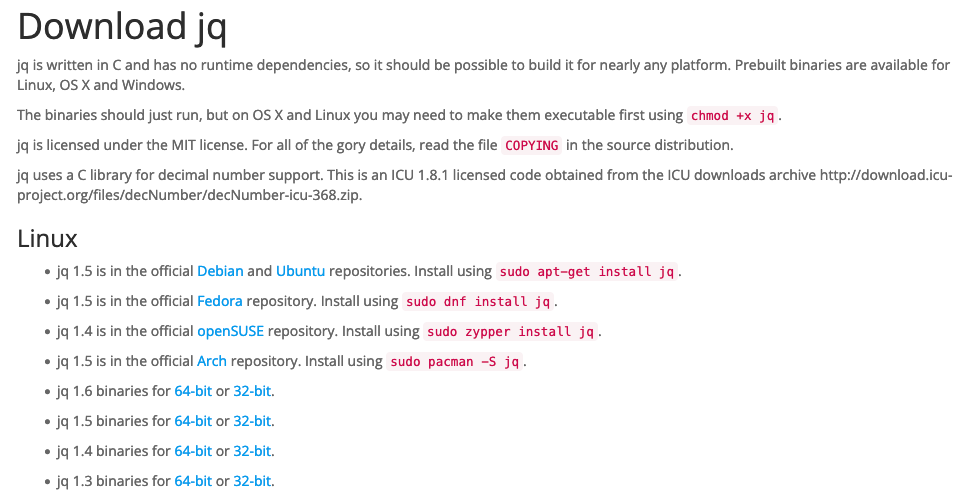
通过包管理器直接安装更是想都不要想。直接下载 linux 通用版本,无论是 32 位还是 64 位都不能执行:
> ./jq
/system/bin/sh: ./jq: not executable: 32-bit ELF file
> ./jq
/system/bin/sh: ./jq: not executable: 64-bit ELF file
网上搜索了一下,找到一个 aarch64 平台的 rpm 包:jq-1.5-1.el7.aarch64.rpm
aarch64 应该就是 arm64 没错了,经过 cpio 解压后得到了里面的 jq 可执行文件:
> wget  https://download-ib01.fedoraproject.org/pub/epel/7/aarch64/Packages/j/jq-1.5-1.el7.aarch64.rpm
> rpm2cpio jq-1.5-1.el7.aarch64.rpm | cpio -div
./usr/bin/jq
./usr/lib64/libjq.so.1
./usr/lib64/libjq.so.1.0.4
./usr/share/doc/jq/AUTHORS
./usr/share/doc/jq/COPYING
./usr/share/doc/jq/README
./usr/share/doc/jq/README.md
./usr/share/man/man1/jq.1.gz
873 blocks
将 ./usr/bin/jq push 到设备执行,还是不行:
PD1981:/data/local/tmp/jjz > file jq
jq: ELF executable, 64-bit LSB arm64, dynamic (/lib/ld-linux-aarch64.so.1), BuildID=77ce7804044f5185df2d25650051ced0ea6bed94, stripped
PD1981:/data/local/tmp/jjz > ./jq --versoin
/system/bin/sh: ./jq: No such file or directory
这里还有一个小插曲,在默认的 /sdcard 目录执行可执行文件时失败:
> ./jq
/system/bin/sh: ./jq: can't execute: Permission denied
即使给了 jq 可执行权限也不行 (chmod),经过一番百度,发现需要放在另一个目录才可以:/data/local/tmp
交叉编译 jq
好在 jq 是开源的,可以直接基于源码编译,不过 android 设备上可没有编译环境,所以还得借助 linux 进行交叉编译。
! /bin/sh
git clone  https://github.com/stedolan/jq.git

cd jq
 git submodule update --init
 autoreconf will fail with following error:
 ...
 configure.ac:6: error: require Automake 1.14, but have 1.13.4
 autoreconf: automake failed with exit status: 1


mkdir build
cd build

autoreconf -i ..
CPATH="${ANDROID_NDK_HOME}/toolchains/llvm/prebuilt/linux-x86_64/bin/"
../configure --without-oniguruma --disable-maintainer-mode  CFLAGS='-std=c99' --prefix=$PWD/install/ --host='armv7a-linux-androideabi21' CC="$CPATH/armv7a-linux-androideabi21-clang"  LD="$CPATH/arm-linux-androideabi-ld"  AR="$CPATH/arm-linux-androideabi-ar"

make
make install
参考网上的一篇文章改了改,用上面这个脚本可以编译,前提是要有 android ndk 并将根目录设置到环境变量 ANDROID_NDK_HOME。
另外有两个小点需要注意:
- 不要下载 jq 库中的模块 (submodule),否则 autoreconf 需要更高的版本,在我的环境中会报错退出。下载模块主要目的是为了编译 oniguruma 正则匹配库,而我们是忽略这个库的,所以没必要
- 个人习惯创建临时目录 (build) 进行编译,方便后期清理编译产物,然而在 jq 这里却遇到了麻烦,需要稍微做一点工作
第一个问题的报错信息:
> autoreconf -i .
libtoolize: putting auxiliary files in `.'.
libtoolize: copying file `./ltmain.sh'
libtoolize: putting macros in AC_CONFIG_MACRO_DIR, `m4'.
libtoolize: copying file `m4/libtool.m4'
libtoolize: copying file `m4/ltoptions.m4'
libtoolize: copying file `m4/ltsugar.m4'
libtoolize: copying file `m4/ltversion.m4'
libtoolize: copying file `m4/lt~obsolete.m4'
configure.ac:6: error: require Automake 1.14, but have 1.13.4
autoreconf: automake failed with exit status: 1
这里我的 automake 刚好是 1.13.4 < 1.14,如果你的机器上版本大于等于 1.14,随便造。。
第二个问题的报错信息:
> make
...
  CC       src/lexer.lo
  YACC     src/parser.c
NOT building parser.c!
  CC       src/parser.lo
clang: error: no such file or directory: 'src/parser.c'
clang: error: no input files
make[2]: *** [src/parser.lo] Error 1
make[2]: Leaving directory `/home/users/yunhai01/test/jq/build'
make[1]: *** [all-recursive] Error 1
make[1]: Leaving directory `/home/users/yunhai01/test/jq/build'
make: *** [all] Error 2
make  install-recursive
make[1]: Entering directory `/home/users/yunhai01/test/jq/build'
make[2]: Entering directory `/home/users/yunhai01/test/jq/build'
  YACC     src/parser.c
NOT building parser.c!
  CC       src/parser.lo
clang: error: no such file or directory: 'src/parser.c'
clang: error: no input files
make[2]: *** [src/parser.lo] Error 1
make[2]: Leaving directory `/home/users/yunhai01/test/jq/build'
make[1]: *** [install-recursive] Error 1
make[1]: Leaving directory `/home/users/yunhai01/test/jq/build'
make: *** [install] Error 2
这里报 src/parser.c 找不到,然而在上一级目录中对应的位置却是有的,应该是 yacc 生成 .c 文件时放在了上一级目录,而使用 build 目录后 make 没有找到该文件,手动复制一下即可:
> cp ../src/parser.c src/
> make
make  all-recursive
make[1]: Entering directory `/home/users/yunhai01/test/jq/build'
make[2]: Entering directory `/home/users/yunhai01/test/jq/build'
  CC       src/parser.lo
  CCLD     libjq.la
  CC       src/main.o
  CCLD     jq
make[2]: Leaving directory `/home/users/yunhai01/test/jq/build'
make[1]: Leaving directory `/home/users/yunhai01/test/jq/build'
应该是 jq 的一个小 bug,已提交 issue。
> file install/bin/jq
jq: ELF 32-bit LSB shared object, ARM, version 1 (SYSV), dynamically linked (uses shared libs), not stripped

> adb push install/bin/jq /data/local/tmp/jjz/
> adb shell
PD1981:/ > cd /data/local/tmp/jjz
PD1981:/data/local/tmp/jjz > chmod u+x jq
PD1981:/data/local/tmp/jjz > export PATH="$PATH:$PWD"
PD1981:/data/local/tmp/jjz > jq --version
jq-1.6-159-gcff5336-dirty
push 到设备就能用啦,这里为了脚本调用方便设置了 PATH 环境变量,断开 adb 后就失效了,需要每次登录都设置一下。
shell 数组初始化
有了 jq 就可以继续开开心心地跑脚本了,然而得到当头一棒:
> sh jinjing.sh
check jq ok
check curl ok
check head ok
check cat ok
check awk ok
check grep ok
check date ok
jinjing.sh[71]: syntax error: unexpected '('
看看 71 行的内容:
local stateheader=()再普通不过的 shell 数组初始化语法,看起来非 bash 的 shell 不认,只好把它改成更通用的形式:
local stateheader这丝毫不影响数组的初始化。
硬编码日期
继续运行脚本,这回跑通了,然而申请结果不正确:
{
  "code": 500,
  "msg": "进京日期不能为空!",
  "data": null,
  "from": "v2"
}
再看设置的申请日期:
in effect from 2023-02-25 to 2023-03-03
date: bad date +1 days
new permit will start from
居然是空。原来是 adb shell 中的 date 不支持 "+1 days" 这种 unix date 语法:
PD1981:/data/local/tmp/jjz > date '+%Y-%m-%d' -d "+1 days"
date: bad date +1 days
PD1981:/data/local/tmp/jjz > date -v+1d "+%Y-%m-%d"
date: Unknown option 'v+1d' (see "date --help")
mac date 那种 "-v+1d" 也不支持,看 adb date 的说明:
$ date --help
Toybox 0.8.4-android multicall binary: https://landley.net/toybox (see toybox --help)

usage: date [-u] [-I RES] [-r FILE] [-d DATE] [+DISPLAY_FORMAT] [-D SET_FORMAT] [SET]

Set/get the current date/time. With no SET shows the current date.

-d	Show DATE instead of current time (convert date format)
-D	+FORMAT for SET or -d (instead of MMDDhhmm[[CC]YY][.ss])
-I RES	ISO 8601 with RESolution d=date/h=hours/m=minutes/s=seconds/n=ns
-r	Use modification time of FILE instead of current date
-u	Use UTC instead of current timezone

Supported input formats:

MMDDhhmm[[CC]YY][.ss]     POSIX
@UNIXTIME[.FRACTION]      seconds since midnight 1970-01-01
YYYY-MM-DD [hh:mm[:ss]]   ISO 8601
hh:mm[:ss]                24-hour time today

All input formats can be followed by fractional seconds, and/or a UTC
offset such as -0800.

All input formats can be preceded by TZ="id" to set the input time zone
separately from the output time zone. Otherwise $TZ sets both.

+FORMAT specifies display format string using strftime(3) syntax:

%% literal %             %n newline              %t tab
%S seconds (00-60)       %M minute (00-59)       %m month (01-12)
%H hour (0-23)           %I hour (01-12)         %p AM/PM
%y short year (00-99)    %Y year                 %C century
%a short weekday name    %A weekday name         %u day of week (1-7, 1=mon)
%b short month name      %B month name           %Z timezone name
%j day of year (001-366) %d day of month (01-31) %e day of month ( 1-31)
%N nanosec (output only)

%U Week of year (0-53 start Sunday)   %W Week of year (0-53 start Monday)
%V Week of year (1-53 start Monday, week < 4 days not part of this year)

%F "%Y-%m-%d"   %R "%H:%M"        %T "%H:%M:%S"        %z  timezone (-0800)
%D "%m/%d/%y"   %r "%I:%M:%S %p"  %h "%b"              %:z timezone (-08:00)
%x locale date  %X locale time    %c locale date/time  %s  unix epoch time
也没看出来个所以然。搞不懂这个 adb date 了,好在只是调试,可以直接硬编码日期为一个合法值:
 mac date performs differs with other unix..
if [ ${IS_MAC} -eq 1 ]; then
    issuedate=$(date "-v+${expire}d" '+%Y-%m-%d')
else
    issuedate=$(date '+%Y-%m-%d' -d "+${expire} days")
fi

issuedate="2023-03-04"
然后就成功了!
{
  "code": 200,
  "msg": "信息已提交,正在审核!",
  "data": [
    "温馨提示",
    "1、请务必在进京之前,查看进京通行证是否审核通过;",
    "2、若审核未通过,请按提示信息调整并重新申请;",
    "3、若审核通过,可在证件生效之前申请取消,每位注册用户每天仅有1次取消机会;",
    "4、在进京通行证未生效的情况下,外埠机动车禁止在限行区域内行驶;"
  ],
  "from": "v2"
}
VNET
本来要抓出错的报文进行对比,没想到 adb shell 上居然歪打正着跑通了,这下 VNET 抓包也没什么用了,虽然通过指定 shell 可以实现抓包:

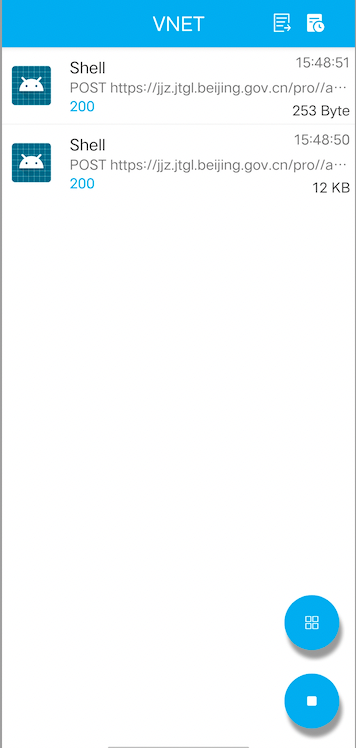
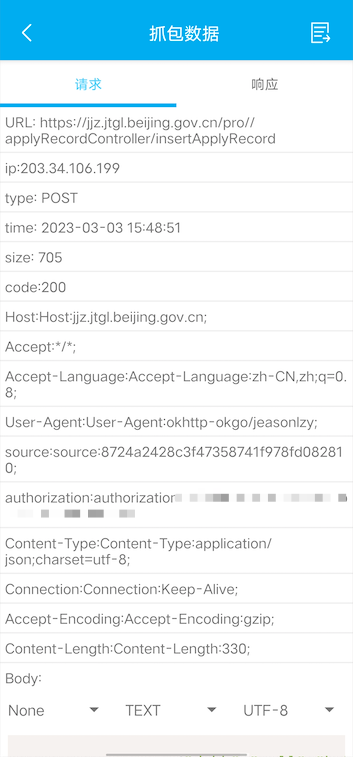
可以看到,http 头中的 Key 名称重复了,应该是 VNET 显示的问题。另外对比 Charles 与 VNET 的抓包结果,发现以下字段是 VNET 自己加的:
- ip: 203.34.106.199
- type: POST
- time: 2023-03-03 15:48:51
- size: 705
- code: 200
可能是为了显示方便,在脚本里加这些参数纯粹是画蛇添足,所以我都删掉了。
这里有一个小插曲,如果不打开 curl 的 -k 参数,VNET 抓包会导致 curl 请求卡死,且 VNET 也抓不到包,这是通过 -v 选项发现的:
curl: (60) SSL certificate problem: self signed certificate in certificate chain
More details here: https://curl.haxx.se/docs/sslcerts.html

curl failed to verify the legitimacy of the server and therefore could not
establish a secure connection to it. To learn more about this situation and
how to fix it, please visit the web page mentioned above.
升级 curl
走到这一步就很有意思了:pc 上 curl 失败、android 上成功;pc 上能抓 App 包、抓不到 curl 包;android 上能抓两者的包但是都成功没有对比意义。
现在能直接对比的只有 pc 上的 curl 和 android 的上 curl,于是对比了一下两者的版本:
macOS:
> curl -V
curl 7.64.1 (x86_64-apple-darwin20.0) libcurl/7.64.1 (SecureTransport) LibreSSL/2.8.3 zlib/1.2.11 nghttp2/1.41.0
Release-Date: 2019-03-27
Protocols: dict file ftp ftps gopher http https imap imaps ldap ldaps pop3 pop3s rtsp smb smbs smtp smtps telnet tftp
Features: AsynchDNS GSS-API HTTP2 HTTPS-proxy IPv6 Kerberos Largefile libz MultiSSL NTLM NTLM_WB SPNEGO SSL UnixSockets

CentOS:
> curl -V
curl 7.29.0 (x86_64-redhat-linux-gnu) libcurl/7.29.0 NSS/3.53.1 zlib/1.2.7 libidn/1.28 libssh2/1.8.0
Protocols: dict file ftp ftps gopher http https imap imaps ldap ldaps pop3 pop3s rtsp scp sftp smtp smtps telnet tftp
Features: AsynchDNS GSS-Negotiate IDN IPv6 Largefile NTLM NTLM_WB SSL libz unix-sockets

android:
> curl -V
curl 7.73.0 (Android) libcurl/7.73.0 BoringSSL zlib/1.2.11
Release-Date: 2020-10-14
Protocols: file http https mqtt
Features: AsynchDNS HTTPS-proxy IPv6 libz NTLM SSL UnixSockets
其实是三者,pc 有两个:一个 linux,一个 mac。发现它们版本都不尽相同,不过 android 上的版本比 pc 的都大,可以考虑升级 linux 的版本到 7.87 尝试。
这里没有再用源码编译安装的方式,直接下载一个 linux x86 版本完事:
> bin/curl -V
curl 7.87.0 (x86_64-pc-linux-muslx32) libcurl/7.87.0 OpenSSL/1.1.1s zlib/1.2.12 libssh2/1.9.0 nghttp2/1.43.0
Release-Date: 2022-12-21
Protocols: dict file ftp ftps gopher gophers http https imap imaps mqtt pop3 pop3s rtsp scp sftp smb smbs smtp smtps telnet tftp
Features: alt-svc AsynchDNS HSTS HTTP2 HTTPS-proxy IPv6 Largefile libz NTLM NTLM_WB SSL threadsafe TLS-SRP UnixSockets
> pwd
/home/users/yunhai01/tools
> echo $PATH
/home/yunh/.BCloud/bin:/home/users/yunhai01/.local/bin:/home/users/yunhai01/bin:/home/users/yunhai01/tools/bin:/home/users/yunhai01/project/android-ndk-r20:/usr/lib64/qt-3.3/bin:/usr/local/bin:/usr/bin:/opt/bin:/home/opt/bin:/home/users/yunhai01/tools/node-v14.17.0-linux-x64/bin
> curl -V
curl 7.29.0 (x86_64-redhat-linux-gnu) libcurl/7.29.0 NSS/3.53.1 zlib/1.2.7 libidn/1.28 libssh2/1.8.0
Protocols: dict file ftp ftps gopher http https imap imaps ldap ldaps pop3 pop3s rtsp scp sftp smtp smtps telnet tftp
Features: AsynchDNS GSS-Negotiate IDN IPv6 Largefile NTLM NTLM_WB SSL libz unix-sockets
> type curl
curl is hashed (/usr/bin/curl)
> whereis curl
curl: /usr/bin/curl /home/users/yunhai01/tools/bin/curl /usr/share/man/man1/curl.1.gz
这里有一个小插曲,即使我将新下载的 curl 所在的路径 (tools/bin) 放在了 PATH 环境变量当中,访问 curl 时仍是访问系统自带的那个,只得将脚本中所有 curl 通过指定全路径的方式来切换为新版。
最后在 linux 上执行脚本仍失败。
对比 curl 输出
走到这儿我是真的郁闷了。既然不能抓包,那就对比 curl -v 输出吧!索性脚本已经能在 android 上跑通了,有个可以对比的基准了:
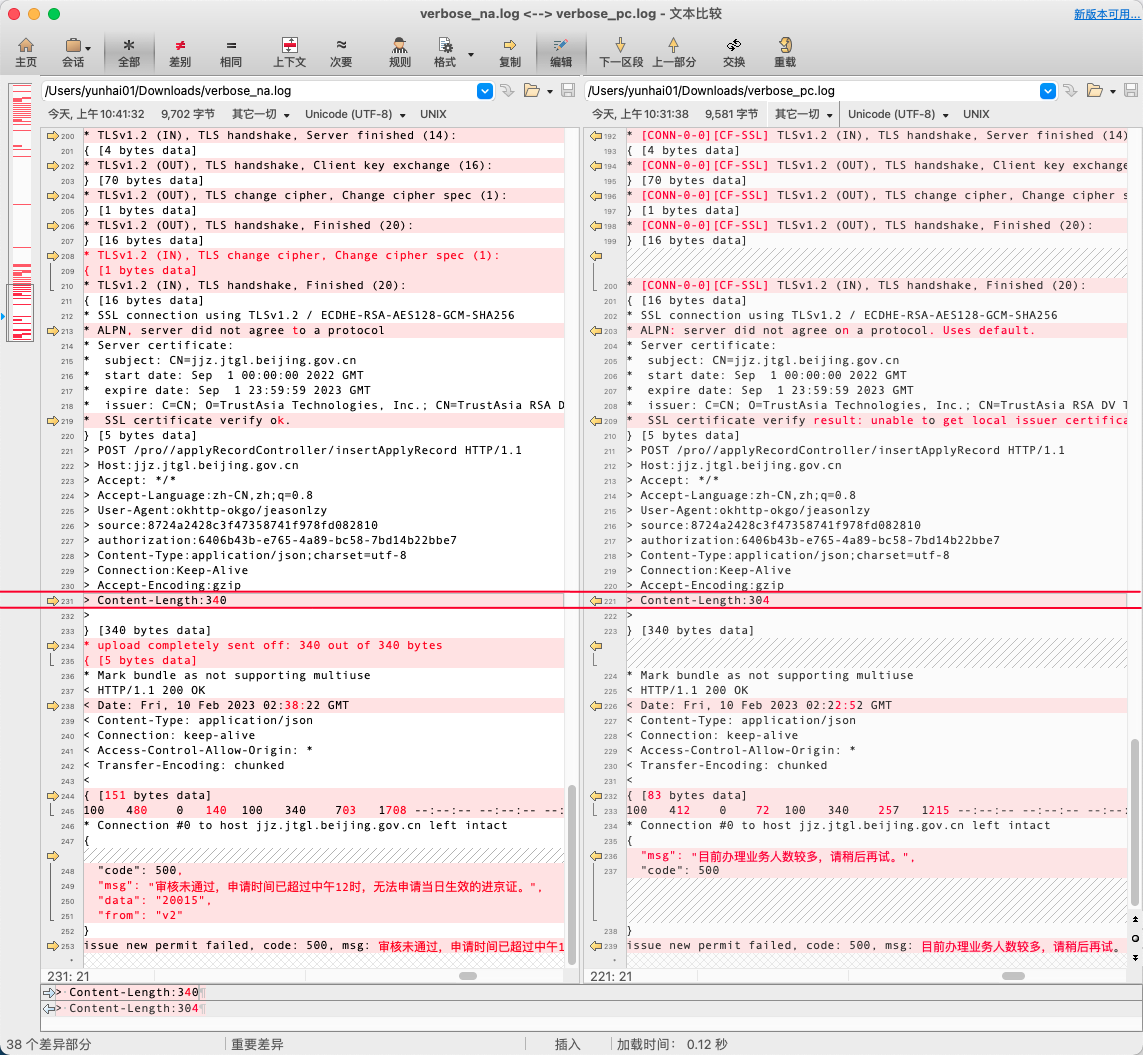
过滤掉一些版本的差异,发现了最重要的区别:Content-Length,android 上的长度是 340,而 pc 上只有 304。长度不足会导致 post 数据被截断,服务器返回 500,这就说通了。
那为何相同的请求数据会得到不同的长度呢?先看看请求数据到底是多长:
> echo ${issue_req}
{"dabh":"null","hphm":"津ADY1951","hpzl":"52","vId":"1479816562371952600","jjdq":"海淀区","jjlk":"00401","jjlkmc":"京藏高速","jjmd":"01","jjmdmc":"自驾旅游","jjrq":"2023-03-04","jjzzl":"02","jsrxm":"云海","jszh":"150121198603226428","sfzmhm":"150121198603226428","xxdz":"百度大厦","sqdzbdjd":116.307393,"sqdzbdwd":40.057771}
$ echo ${issue_req} | wc -c
     341
$ echo ${issue_req}
304
果然是请求成功的 340,其中多了个 1 是结尾换行。而脚本中指定的 Content-Length 是通过 shell 字符串长度获取的 (${issue_req}),这个在 pc 上果然是 304。
所以问题的根因就清楚了,是错误的将 shell 字符串长度做为了数据长度,当数据内容中不包含汉字时,它俩是一致的,这也是为什么 stateList 可以请求成功的原因;而当数据中包含 utf-8 汉字后,一个汉字占用 3 个字节,在 shell 字符串中却只统计了一次,所以导致长度偏小。
这正是 —— 踏破铁鞋无觅处,得来全不费功夫啊!明明感觉只隔了一层窗户纸,没想到捅破它却用尽了浑身的力气,哈哈~
痛定思痛,不要使用 shell 字符串长度作为数据长度就是这个 bug 的经验教训。
复盘
最后来复盘一下,为何 adb shell 中包含汉字的字符串长度就能等于数据长度呢?下面做个小实验:
> data='{"dabh":"null" "hphm":"津ADY1951" "hpzl":"52" "vId":"1479816562371952600" "jjdq":"海淀区" "jjlk":"00401" "jjlkmc":"京藏高速" "jjmd":"01" "jjmdmc":"自驾旅游" "jjrq":"2023-03-04" "jjzzl":"02" "jsrxm":"云海" "jszh":"150121198603226428" "sfzmhm":"150121198603226428" "xxdz":"百度大厦" "sqdzbdjd":116.307393 "sqdzbdwd":40.057771}'
> echo "${data}"
{"dabh":"null" "hphm":"津ADY1951" "hpzl":"52" "vId":"1479816562371952600" "jjdq":"海淀区" "jjlk":"00401" "jjlkmc":"京藏高速" "jjmd":"01" "jjmdmc":"自驾旅游" "jjrq":"2023-03-04" "jjzzl":"02" "jsrxm":"云海" "jszh":"150121198603226428" "sfzmhm":"150121198603226428" "xxdz":"百度大厦" "sqdzbdjd":116.307393 "sqdzbdwd":40.057771}
> echo ${data}
304

> cat test.sh
! /bin/sh
data='{"dabh":"null" "hphm":"津ADY1951" "hpzl":"52" "vId":"1479816562371952600" "jjdq":"海淀区" "jjlk":"00401" "jjlkmc":"京藏高速" "jjmd":"01" "jjmdmc":"自驾旅游" "jjrq":"2023-03-04" "jjzzl":"02" "jsrxm":"云海" "jszh":"150121198603226428" "sfzmhm":"150121198603226428" "xxdz":"百度大厦" "sqdzbdjd":116.307393 "sqdzbdwd":40.057771}'
echo ${data}
echo "${data}" | wc -c
> sh test.sh
340
341
发现两个有趣的现象:
- 直接将数据赋给 adb shell 变量时,长度是 304 短缺 (注意如果不将 data 用双引号括住,json 数据的外花括号将缺失,不清楚为何)
- 调用 shell 脚本赋值给 shell 变量时,长度为 340 正常,与 wc 的输出仅差了一个换行,可以看作是一致的
adb shell 在交互执行和脚本执行时行为还不一样,这真是离大谱。感兴趣的读者可以进一步探究,我是查不动了。。
结语
本文记录了一个脚本不工作的排查过程,在尝试抓包进行报文对比思路的引导下,分别探索了 Charles pc 抓 curl -> VNET android 抓 curl -> jq arm 交叉编译 -> 去除 shell 数组初始化 -> 去除 date +1 -> 升级 curl -> 对比 pc 和 android 上的 curl -v 输出,最终定位到了问题根因:使用 shell 字符串长度作为数据长度、在操作 utf-8 汉字数据时计算了错误的 Content-Length、从而引发了服务端返回错误响应的过程。
bug 没什么神奇的,甚至有点低级,说出来还有点不好意思。不过探索问题的过程就是这样,不到最后一刻,永远不知道自己被多么小的错误绊倒了。虽然错误低级,排查的过程还是蛮高大上的,总体思路也是正确的,只是在具体的摸索过程中走了不少弯路,回头来看看,也蛮有意思,特别是 android adb shell,真的对它产生了新的认知。
adb shell 拓展了 shell 脚本运行的平台,之前写的好多脚本,其实都可以称到 android 设备上跑。这方面有一个 Termux 可用,如果再和定时执行联系起来,大有可为,一机在手走遍天下,这样看 linux 服务器都可以省了,哈哈~
后记
在写这篇文章的时候,又对上述流程做了个梳理,补充两个新的情况。
arm jq
正文使用的是 rpm 包,我在搜索时又找到一个 deb 包:jq_1.6-1ubuntu0.20.04.1_arm64.deb
> wget  http://ports.ubuntu.com/pool/universe/j/jq/jq_1.6-1ubuntu0.20.04.1_arm64.deb
> ar -vx jq_1.6-1ubuntu0.20.04.1_arm64.deb
x - debian-binary
x - control.tar.xz
x - data.tar.xz
> tar xvf data.tar.xz
x ./
x ./usr/
x ./usr/bin/
x ./usr/bin/jq
x ./usr/share/
x ./usr/share/doc/
x ./usr/share/doc/jq/
x ./usr/share/doc/jq/AUTHORS.gz
x ./usr/share/doc/jq/copyright
x ./usr/share/man/
x ./usr/share/man/man1/
x ./usr/share/man/man1/jq.1.gz
x ./usr/share/doc/jq/README
x ./usr/share/doc/jq/changelog.Debian.gz
将它解压并推送到设备上,还是没效果,看来还必需走交叉编译这步了。
Charles 抓包 curl
设置 http_proxy/https_proxy 环境变量后,启动脚本,Charles 抓到 curl 的包了:

curl 也正常返回了,之前卡死或失败的场景不再复现了,神奇。
如果当时这一步走通的话,就可以直接对比 curl 的报文与 App 的报文找到原因了!而不用绕这么大一圈,Charles 坑我~
后来回想一下,可能是为 curl 增加了 -k 选项的缘故。
参考
[1]. Linux bash终端设置代理(proxy)访问
[2]. Download jq
[3]. rpm文件解压
[4]. .deb文件的解压与压缩
[5]. how-to-set-executable-permissions-on-a-file-in-android-to-execute-using-runtime
[6]. jq的交叉编译
[7]. Shell curl 命令报错:(60) SSL certificate problem: self signed certificate
[8]. curl download
本文来自博客园,作者:goodcitizen,转载请注明原文链接:https://www.cnblogs.com/goodcitizen/p/debugging_500_problem_for_shell_script_of_enter_permits_of_beijing_sixth_ring.html
