 Spring笔记
property注入constructor-arg注入总结:Spring是一个轻量级的控制反转(IOC)和面向切面编程(AOP)的框架!
Spring Boot
Spring Cloud
很多公司都在使用SpringBoot进行快速开发,学习SpringBoot的前提是完全掌握Spring以及SpringMVC!
控制反转,把对象创建和对象之间的调用过程交给Spring进行管理。
使用IOC的目的:为了降低耦合。
IOC的底层原理:xml解析、工厂模式、反射。
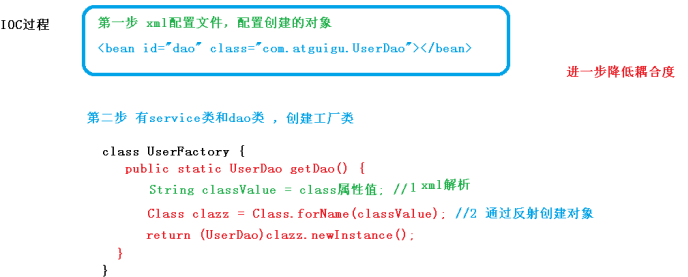
IOC 思想基于 IOC 容器完成,IOC 容器底层就是对象工厂。
Spring 提供 IOC 容器实现两种方式:(两个接口)
BeanFactory:IOC 容器基本实现,是 Spring 内部使用 接口,不提供开发人员进行使用 。加载配置文件时候不会创建对象,在获取对象(使用)才去创建对象。ApplicationContext:BeanFactory 接口的子接口,提供更多更强大的功能,一般由开发人 员进行使用。加载配置文件时候就会把在配置文件对象进行创建。FileSystemXmlApplicationContext和ClassPathXmlApplicationContext。xml配置
alias:用于设置别名
<!--别名的设置,不常用,可以用name代替--><alias name="user" alias="uu"/>import:用于将多个配置文件导入合并为一个,多用于团队开发,applicationContext.xml
<?xml version="1.0" encoding="UTF-8"?><beans xmlns="http://www.springframework.org/schema/beans" xmlns:xsi="http://www.w3.org/2001/XMLSchema-instance" xsi:schemaLocation="http://www.springframework.org/schema/beans https://www.springframework.org/schema/beans/spring-beans.xsd"> <import resource="beans.xml"/> <import resource="beans2.xml"/></beans>创建对象 使用
bean标签
<bean id="helloSpring" name="u1 u2,u3;u4"> <property name="str" value="HelloSpring"/></bean>在 spring 配置文件中,使用 bean 标签,并对应属性,实现对象创建。
在 bean 标签有很多属性,介绍常用的属性 :
id : bean的唯一标识 。class :类全路径(包类路径) 。name: 早期版本使用,可以用于别名设置,可以取多个别名,用逗号或者分号分开即可。scope:prototype、request、session、singleton创建对象时候,默认使用无参构造方法完成对象创建。所以存在有参构造时最好把无参构造显示的写出来。
注入属性
DI:依赖注入,就是注入属性。
方式:
Spring可以根据这两种方式分别使用property和constructor-arg标签进行配置,从而注入属性。
property注入<bean id="helloSpring" > <property name="str" value="HelloSpring"/></bean>name: 类里面属性名称
value:向属性注入的值
ref:标识引用Spring容器中已经创建好的的对象
各种数据类型的注入
https://docs.spring.io/spring-framework/docs/current/reference/html/core.html#beans-factory-properties-detailed
<bean id="student" > <!--第一种:普通值注入,用value--> <property name="name" value="ThreePure"/> <!--第二种:Bean注入,用ref--> <property name="address" ref="address"/> <!--第三种:数组--> <property name="books"> <array> <value>红楼梦</value> <value>水浒传</value> <value>西游记</value> <value>三国演义</value> </array> </property> <!--第四种:List--> <property name="hobbys"> <list> <value>篮球</value> <value>书法</value> <value>跑步</value> </list> </property> <!--第五种:Map--> <property name="card"> <map> <entry key="身份证" value="13512626346"/> <entry key="银行卡" value="13512624327236346"/> </map> </property> <!--第六种:Set--> <property name="games"> <set> <value>LOL</value> <value>COC</value> <value>BOB</value> </set> </property> <!--第七种:空指针--> <property name="wife"> <null/> </property> <!--第八种:Properties--> <property name="info"> <props> <prop key="学号">13891</prop> <prop key="性别">男</prop> <prop key="年龄">21</prop> </props> </property></bean>引入外部属性文件 以druid连接数据库为例
创建外部文件,properties 格式文件,写数据库信息
prop.driverClass=com.mysql.jdbc.Driverprop.url=jdbc:mysql://localhost:3306/mybatisprop.userName=rootprop.password=mysqlpw把外部 properties 属性文件引入到 spring 配置文件中
<!--引入外部属性文件--><context:property-placeholder location="druid.properties"/>注意:使用这个标签时必须在配置文件中导入context约束。
获取外部文件的值 (使用 ${} 获取properties的值)
<bean id="dataSource" > <property name="driverClassName" value="${prop.driverClass}"/> <property name="url" value="${prop.url}"/> <property name="username" value="${prop.userName}"/> <property name="password" value="${prop.password}"/></bean>获取使用DruidDataSource对象
public void testOne(){ ApplicationContext context = new ClassPathXmlApplicationContext("applicationContext.xml"); DruidDataSource dataSource = context.getBean("dataSource", DruidDataSource.class); //jdbc:mysql://localhost:3306/mybatis System.out.println(dataSource.getUrl());}p 名称空间注入(了解):如果对于一个属性很多的实体类,那么property使用过于繁琐,p名称空间是一种简化的方法。
第一步:添加p名称空间到配置文件xmlns:p="http://www.springframework.org/schema/p"
<beans xmlns="http://www.springframework.org/schema/beans" xmlns:xsi="http://www.w3.org/2001/XMLSchema-instance" xmlns:p="http://www.springframework.org/schema/p" xsi:schemaLocation="http://www.springframework.org/schema/beans https://www.springframework.org/schema/beans/spring-beans.xsd"></beans>第二步:进行属性注入,在 bean 标签里面进行操作
<bean id="user1" p:age="20" p:name="TH"/>注意:p命名空间依赖于getter和setter方法注入,所以需要设置getter和setter方法。
constructor-arg注入<!--方式一:使用下标的方式--><bean id="user" > <constructor-arg index="0" value="狂神"/></bean><!--方式二:通过参数类型--><bean id="user" > <constructor-arg type="java.lang.String" value="kunagshen"/></bean><!--方式三:通过属性名--> <!--name:可以设置别名,可以同时设置多个别名,空格、逗号,分号分隔--><bean id="user" name="u1 u2,u3;u4"> <constructor-arg name="name" value="KS"/></bean>name: 类里面属性名称。
value:向属性注入的值。
type: 类属性的类型。
index:类属性的下标(0表示第一个属性)。
ref:标识引用Spring容器中已经创建好的的对象。
c 名称空间注入(了解):
第一步:添加c名称空间到配置文件xmlns:c="http://www.springframework.org/schema/c""
<beans xmlns="http://www.springframework.org/schema/beans" xmlns:xsi="http://www.w3.org/2001/XMLSchema-instance" xmlns:c="http://www.springframework.org/schema/c" xsi:schemaLocation="http://www.springframework.org/schema/beans https://www.springframework.org/schema/beans/spring-beans.xsd"></beans>第二步:进行属性注入,在 bean 标签里面进行操作
<bean id="user2" c:age="18" c:name="三淳" scope="prototype"/>注意:c命名空间依赖于构造器注入,所以需要设置有参构造方法。
https://docs.spring.io/spring-framework/docs/current/reference/html/core.html#beans-factory-scopes

singleton:单例模式,Spring默认使用单例模式。加载 spring 配置文件时候就会创建单实例对象
<bean id="accountService" scope="singleton"/>prototype:原型模式,每次从容器中get的时候,都会产生新的对象。
<bean id="accountService" scope="prototype"/>request、session、application、websocket在Web开发种使用。 在调用 getBean 方法时候创建多实例对象。
Spring种有3种装配方式:
byName自动装配。 会自动在容器上下文中查找和自己对象set方法后面的值对应的bean的id!
<!--这个id必须小写,否则报异常--><bean id="cat" /><bean id="dog" /><bean id="man" autowire="byName"> <property name="name" value="ThreePure1"/> <!--其他对象属性在配置后可以自动装配--></bean>注意: 使用byName需要保证所有的bean的id唯一,并且这个bean需要跟自动注入的类属性名称一样!
byType自动装配。 会自动在容器上下文中查找,和自己对象属性类型相同的bean。
<!--因为是按照类型装配,所以id可以省略--><bean /><bean id="dog" /><bean id="man" autowire="byType"> <property name="name" value="ThreePure2"/></bean>注意: 使用byType需要保证所有的bean的class唯一,并且这个bean需要跟自动注入的属性的类型一致!
使用注解实现自动装配 (见下一节)
在Spring4之后,使用注解开发必须要导入AOP包。导入spring-webmvc后包含了AOP的包。

导入约束
xmlns:context="http://www.springframework.org/schema/context"
http://www.springframework.org/schema/context
https://www.springframework.org/schema/context/spring-context.xsd
配置注解的支持 <context:annotation-config/>
<?xml version="1.0" encoding="UTF-8"?><beans xmlns="http://www.springframework.org/schema/beans" xmlns:xsi="http://www.w3.org/2001/XMLSchema-instance" xmlns:context="http://www.springframework.org/schema/context" xsi:schemaLocation="http://www.springframework.org/schema/beans https://www.springframework.org/schema/beans/spring-beans.xsd http://www.springframework.org/schema/context https://www.springframework.org/schema/context/spring-context.xsd"> <context:annotation-config/> <!--扫描指定的包,这个包下所有使用的注解就会生效--> <context:component-scan base-package="com.th"/></beans>开启组件扫描,配置扫描指定的包,使注解完全生效 ,多个包使用逗号隔开。
<context:component-scan base-package="com.th"/>.
当然也可以对扫描进行更加细致的配置:
use-default-filters="false" :不使用默认的过滤器,可以自定义配置。
context:include-filter标签: 设置扫描哪些内容,可以定义类型以及表达式。
<!--扫描com.th包下的Controller注解--><context:component-scan base-package="com.th" use-default-filters="false"> <context:include-filter type="annotation" expression="org.springframework.stereotype.Controller"/></context:component-scan>context:exclude-filter标签: 设置哪些内容不进行扫描,可以定义类型以及表达式。
<!--扫描com.th包下的除Controller以外的注解--><context:component-scan base-package="com.th"> <context:exclude-filter type="annotation" expression="org.springframework.stereotype.Controller"/></context:component-scan>使用注解
创建对象
@Component: 组件、放于类上,表示创建这个类的对象,相当于<bean id="user" />。
import org.springframework.beans.factory.annotation.Value;import org.springframework.context.annotation.Scope;import org.springframework.stereotype.Component;@Componentpublic class User { //相当于:<property name="name" value="TH"/> 也可以放在setter方法前 //@Value("TH") public String name; @Value("sanchun") public void setName(String name) { this.name = name; }}在注解里面@component的 value 属性值可以省略不写,默认值是类名称,首字母小写。比如User类的user。
注入属性
public class User { //相当于:<property name="name" value="TH"/> 也可以放在setter方法前 @Value("TH") public String name;}public String name;@Value("sanchun")public void setName(String name) { this.name = name;}对于复杂的数据注入到属性中,建议使用xml方式进行注入。
Component的衍生的注解
@Repository@Service@Controller这四个注解的功能一致,都是代表将某个类注册到Spring中,装配bean,只是后三者在Web开发中按照MVC架构分层特定使用。
注解实现自动装配 (@Autowired、@Qualifier、Resource) 一般时对象注入或者引用注入,而注入普通类型属性使用
@Value
在导入注解约束以及对注解支持的情况下使用@Autowired
作用范围:属性前、setter方法前。
Autowired 我们可以不用编写Setter方法了,前提是你这个自动装配的属性在IOC(Spring)容器中存在,且符合byType类型。
public @interface Autowired { boolean required() default true;}根绝以上源码,可以知道@Autowired注解可以传递参数,required用于设定装配属性是否允许为空。如果定义了@Autowired的required属性为false,说明这个属性可以为空,否则不能为空。
@Nullable :有相似作用,字段标记了这个注解,说明这个字段可以为null。
@Qualifier:当一个Spring容器中含有多个相同类的对象时,自动装配的环境较为复杂,可以结合使用@Qualifier注解来实现选取具体的某一个对象。其value值为确定的其中bean的id值。典型案例就是一个接口含有多个实现类。
Resource:java原生对自动装配的支持。默认使用byName实现,其次才是对byType的支持,若二则都不存在则会报错。Resource的name属性可以实现与@Qualifier类似的功能。
<bean id="cat11" /><!-- <bean id="cat22" />--><bean id="dog11" /><bean id="dog22" /><bean id="man" > <property name="name" value="ThreePure2"/></bean>import org.springframework.beans.factory.annotation.Autowired;import org.springframework.beans.factory.annotation.Qualifier;import org.springframework.lang.Nullable;import javax.annotation.Resource;public class People { @Nullable private String name; @Resource(name = "cat11") private Cat cat; @Autowired @Qualifier(value = "dog22") private Dog dog; public String getName() { return name; } public void setName(String name) { this.name = name; } public Cat getCat() { return cat; } public Dog getDog() { return dog; }}作用域 (
@Scope)
使用@Scope注解实现对作用域范围的控制,括号内直接输入具体的作用域并用""包起来。
@Component@Scope("prototype")public class User { ……} 以上即便是使用注解方式也并没有完全脱离xml文件,而JavaConfig就是完全使用注解来实现。
实体类中同样可以通过@Component注解来进行创建对象,通过@Value实现属性注入。
需要一个配置类来替代applicationContext.xml的功能
@Configuration注解标识的类表示一个配置类@Configuration注解标识的类也会被Spring容器托管,注册到容器中,因为他本来就是一个@Component。需要配置类中的方法代替applicationContext.xml中bean标签进行bean的注册。
通过Annotationconfig 上下文来获收容器,通过配置类的class对象加载!AnnotationConfigApplicationContext
ApplicationContext context = new AnnotationConfigApplicationContext(UserConfig.class);其他注解
@ComponentScan : 用于自动扫描包@Import : 用于导入其他配置类实体类
import org.springframework.beans.factory.annotation.Value;import org.springframework.stereotype.Component;@Componentpublic class User { private String name; public String getName() { return name; } @Value("THREEPURE") public void setName(String name) { this.name = name; } @Override public String toString() { return "User{" + "name='" + name + '\'' + '}'; }}配置类
import org.springframework.context.annotation.Bean;import org.springframework.context.annotation.ComponentScan;import org.springframework.context.annotation.Configuration;import org.springframework.context.annotation.Import;import org.springframework.stereotype.Component;//这个也会被Spring容器托管,注册到容器中,因为他本来就是一个@Component//@Configuration代表这是一个配置类,相当于beans.xml/ applicationContext.xml@Configuration@ComponentScan("com.th.pojo")@Import(UserConfig2.class)public class UserConfig { //注册一个bean,就相当于我们之前写的一个bean标签 //这个方法的名字,就相当于bean标签的id属性 // 这个方法的返间值,就相当bean标签中的class属性 @Bean public User getUser(){ //就是返回要注入到bean的对象! return new User(); }}测试类
public class MyTest { public static void main(String[] args) { //如果完全使用了配置类方式去做,我们就只能通过Annotationconfig 上下文来获收容器,通过配置类的class对象加载! ApplicationContext context = new AnnotationConfigApplicationContext(UserConfig.class); User getUser = context.getBean("getUser", User.class); System.out.println(getUser); }}测试
public class Orders { private String name; /**无参构造方法*/ public Orders() { System.out.println("第一步 执行无参数构造创建 bean 实例"); } public void setName(String name) { this.name = name; System.out.println("第二步 调用 set 方法设置属性值"); } /**创建执行的初始化方法*/ public void initMethod(){ System.out.println("第三步,执行初始化方法"); } /**创建执行的销毁的方法*/ public void destroyMethod(){ System.out.println("第五步 执行销毁的方法"); }}<?xml version="1.0" encoding="UTF-8"?><beans xmlns="http://www.springframework.org/schema/beans" xmlns:xsi="http://www.w3.org/2001/XMLSchema-instance" xsi:schemaLocation="http://www.springframework.org/schema/beans http://www.springframework.org/schema/beans/spring-beans.xsd"> <bean id="orders" init-method="initMethod" destroy-method="destroyMethod" > <property name="name" value="Phone"></property> </bean></beans>import com.th.pojo.Orders;import org.junit.Test;import org.springframework.context.ApplicationContext;import org.springframework.context.support.ClassPathXmlApplicationContext;public class TestOne { @Test public void test(){ //ApplicationContext context = new ClassPathXmlApplicationContext("applicationContext.xml"); ClassPathXmlApplicationContext context = new ClassPathXmlApplicationContext("applicationContext.xml"); Orders orders = context.getBean("orders", Orders.class); System.out.println(orders); System.out.println("第四步 获取创建 bean 实例对象"); System.out.println(orders); //手动让 bean 实例销毁 (ClassPathXmlApplicationContext对象才能实现close操作) context.close(); }}结果:
第一步 执行无参数构造创建 bean 实例第二步 调用 set 方法设置属性值第三步,执行初始化方法com.th.pojo.Orders@1060b431第四步 获取创建 bean 实例对象第五步 执行销毁的方法注意:需要使用ApplicationContext的实现类来实现手动销毁操作。
另外,Bean的完整生命周期还有包括两项在初始化之前的状态。实现这两个状态需要为Spring配置后置处理器。实现后置处理器需要创建一个类并实现BeanPostProcessor接口并重写postProcessBeforeInitialization和postProcessAfterInitialization两个方法,这两个方法对应这额外的两种状态。
public class MyBeanPostProcessor implements BeanPostProcessor { @Override public Object postProcessBeforeInitialization(Object bean, String beanName) throws BeansException { System.out.println("在初始化方法之前执行的方法"); return BeanPostProcessor.super.postProcessBeforeInitialization(bean, beanName); } @Override public Object postProcessAfterInitialization(Object bean, String beanName) throws BeansException { System.out.println("在初始化方法之后执行的方法"); return BeanPostProcessor.super.postProcessAfterInitialization(bean, beanName); }}有了后置处理器后需要将其配置到Spring中。在Spring中,只需要将这个后置处理器像配置bean一样在applicationContext.xml中配置那么这个Spring容器中的全部bean都会加上后置处理器。
<bean id="myBeabPostProcessor" ></bean>输出结果为:
第一步 执行无参数构造创建 bean 实例第二步 调用 set 方法设置属性值在初始化方法之前执行的方法第三步,执行初始化方法在初始化方法之后执行的方法com.th.pojo.Orders@e720b71第四步 获取创建 bean 实例对象第五步 执行销毁的方法Spring 框架一般都是基于 AspectJ 实现 AOP 操作。AspectJ 不是 Spring 组成部分,独立 AOP 框架,一般把 AspectJ 和 Spirng 框架一起使用,AOP 操作可以基于 xml 配置文件实现 或者基于注解方式实现(使用)。
AOP 底层使用动态代理,动态代理有两种,分别为JDK动态代理和CGLIB动态代理。
JDK动态代理 面向有接口的情况
原理:创建接口实现类代理对象,增强类的方法。

使用:
newProxyInstance(ClassLoader loader, 类<?>[] interfaces, InvocationHandler h)InvocationHandler,创建代理对象,写增强的部分。实例
使用动态代理前:
public interface UserDao { public int add(int a, int b); public String update(String id);}public class UserDaoImpl implements UserDao{ @Override public int add(int a, int b) { System.out.println("add() executed"); return a+b; } @Override public String update(String id) { System.out.println("update()executed"); return id; }}使用动态代理增加功能:
第一步:创建代理对象类、 实现InvocationHandler接口。
class UserDaoProxy implements InvocationHandler { private Object obj; /**把创建的是谁的代理对象,就把谁传递过来,通过有参构造传递。比如这里产生的是UserdaoImpl的代理对象。*/ /**为例让这个代理类使用更加广泛,直接传递Object对象,*/ public UserDaoProxy(Object obj) { this.obj = obj; } /**增强的逻辑代码*/ @Override public Object invoke(Object proxy, Method method, Object[] args) throws Throwable { // 被增强方法之前 System.out.println("It was executed before the "+method.getName()+",and the args :"+ Arrays.toString(args)); // 被增强方法执行 Object res = method.invoke(obj, args); // 被增强方法之后 System.out.println("It was executed before ... :"+obj.toString()); return res; }}在创建代理对象代码时,需要代理哪个对象就传递哪个对象。通过代理类的有参构造实现代理对象的传递。
通过重写invoke方法,在其内部添加扩展功能。其中参数:
通过method.invoke(obj, args)方法执行原来UserDao中的方法,method就是传递过来的方法。可以在其之前或者之后对功能进行扩展,
第二步:使用Proxy类创建接口代理对象(获取代理实例执行方法)
public class JDKProxy { public static void main(String[] args) { Class[] interfaces = {UserDao.class}; UserDaoImpl userDao = new UserDaoImpl(); //创建接口实现类的接口对象 UserDao proxyDao = (UserDao) Proxy.newProxyInstance(JDKProxy.class.getClassLoader(), interfaces, new UserDaoProxy(userDao)); //使用代理对象执行方法 int addResult = proxyDao.add(1, 2); System.out.println("add method result:"+addResult); }}newProxyInstance()方法的三个参数:
CGLIB动态代理 面向没有接口的情况
原理:创建子类的代理对象,增强类的方法。
execution([权限修饰符] [返回类型] [类全路径].[方法名称]([参数列表]))举例:
对 com.atguigu.dao.BookDao 类里面的 add 方法进行增强 。
execution(* com.atguigu.dao.BookDao.add(..))
对 com.atguigu.dao.BookDao 类里面的所有的方法进行增强
execution(* com.atguigu.dao.BookDao.* (..))
对 com.atguigu.dao 包里面所有类,类里面所有方法进行增强
execution(* com.atguigu.dao.*.* (..))
AspectJ 注解方式实现AOP
创建类(被增强功能的类),在类里面定义方法。
public class User { public void add(){ System.out.println("add method..."); }}创建增强类(编写增强逻辑)。
public class UserProxy { public void before(){ System.out.println("before..."); }}进行通知的配置。
在 spring 配置文件中,开启注解扫描。
<!--开启注解扫描--><context:component-scan base-package="com.th" />使用注解创建 User 和 UserProxy 对象。@Component
@Componentpublic class User {}@Componentpublic class UserProxy {}在增强类上面添加注解 @Aspect。 @Aspect 用于生成代理对象
@Component@Aspectpublic class UserProxy {}在 spring 配置文件中开启生成代理对象。
proxy-target-class默认状态为false,proxy-target-表示使用JDK动态代理, proxy-target-表示使用cglib动态代理,
<!--- 开启 Aspect 生成代理对象--><aop:aspectj-autoproxy/>配置不同类型的通知。
在增强类里的通知方法上面添加通知类型注解,使用切入点表达式配置。
@Component@Aspectpublic class UserProxy { /**前置通知 @Before 注解表示作为前置通知*/ @Before("execution(* com.th.atguigu.aopanno.User.add(..))") public void before(){ System.out.println("before..."); } /**后置通知(返回通知)*/ @AfterReturning(value = "execution(* com.th.atguigu.aopanno.User.add(..))") public void afterReturning() { System.out.println("afterReturning........."); } /**最终通知*/ @After(value = "execution(* com.th.atguigu.aopanno.User.add(..))") public void after() { System.out.println("after........."); } /**异常通知*/ @AfterThrowing(value = "execution(* com.th.atguigu.aopanno.User.add(..))") public void afterThrowing() { System.out.println("afterThrowing........."); } /**环绕通知*/ @Around(value = "execution(* com.th.atguigu.aopanno.User.add(..))") public void around(ProceedingJoinPoint proceedingJoinPoint) throws Throwable { System.out.println("环绕之前........."); //被增强的方法执行 proceedingJoinPoint.proceed(); System.out.println("环绕之后........."); }}结果:
环绕之前.........before...add method...afterReturning.........after.........环绕之后......... //如果发生异常:环绕之前.........before...afterThrowing.........after.........异常通知:只有在被增强方法内部发生异常时调用。
最终通知:无论是否发生异常都会被执行。而后置通知如果发生异常就不会被执行。
相同的切入点抽取
如上所示,有多种不同类型的通知,在每个通知上都需要相同的注解表达式会比较麻烦,那么可以抽取公共部分简化操作。在通知的注解上使用配置了的方法名即可。
@Pointcut("execution(* com.th.atguigu.aopanno.User.add(..))")public void pointDemo(){}/**前置通知 @Before 注解表示作为前置通知*/@Before("pointDemo()")public void before(){ System.out.println("before...");}设置增强类优先级
当有多个增强类对同一个方法进行增强时,可以设置增强类的优先级。
在增强类上面添加注解 @Order(数字类型值),数字类型值越小优先级越高。
@Component@Aspect@Order(0)public class PersonProxy { @Before("execution(* com.th.atguigu.aopanno.User.add(..))") public void beforePerson(){ System.out.println("before of PersonProxy"); }}before of PersonProxy环绕之前.........before...add method...afterReturning.........after.........环绕之后.........完全使用注解开发 (创建配置类,不需要创建 xml 配置文件)
@Configuration@ComponentScan(basePackages = {"com.atguigu"})@EnableAspectJAutoProxy(proxyTargetClass = true)public class ConfigAop {}@EnableAspectJAutoProxy(proxyTargetClass = true)相当于<aop:aspectj-autoproxy/>。
AspectJ XML配置文件实现AOP
创建两个类,增强类和被增强类,创建方法 。
在 spring 配置文件中(使用bean)创建两个类对象。
<!--创建增强类和被增强类对象--><bean id="book" /><bean id="bookProxy" />在 spring 配置文件中配置切入点。
<!--配置 aop 增强--><aop:config> <!--切入点--> <aop:pointcut id="p" expression="execution(* com.th.atguigu.aopxml.Book.buy(..))"/> <!--配置切面--> <aop:aspect ref="bookProxy"> <!--增强作用在具体的方法上--> <aop:before method="before" pointcut-ref="p"/> </aop:aspect></aop:config>测试
public void testTwo(){ ApplicationContext context = new ClassPathXmlApplicationContext("beanXml.xml"); Book book = context.getBean("book", Book.class); book.buy();}Mybatis使用步骤:
mybatis、mysql-connector-java)mybatis-config.xml)lombok)整合
导包
<dependency> <groupId>mysql</groupId> <artifactId>mysql-connector-java</artifactId> <version>5.1.47</version></dependency><dependency> <groupId>org.mybatis</groupId> <artifactId>mybatis</artifactId> <version>3.5.3</version></dependency><dependency> <groupId>org.springframework</groupId> <artifactId>spring-webmvc</artifactId> <version>5.2.9.RELEASE</version></dependency><dependency> <groupId>org.springframework</groupId> <artifactId>spring-jdbc</artifactId> <version>5.1.9.RELEASE</version></dependency><dependency> <groupId>org.aspectj</groupId> <artifactId>aspectjweaver</artifactId> <version>1.9.4</version></dependency><!-- https://mvnrepository.com/artifact/org.mybatis/mybatis-spring --><dependency> <groupId>org.mybatis</groupId> <artifactId>mybatis-spring</artifactId> <version>2.0.3</version></dependency>mybatis-spring:将 MyBatis 代码无缝地整合到 Spring 中,允许 MyBatis 参与到 Spring 的事务管理之中,创建映射器 mapper 和 SqlSession 并注入到 bean 中,以及将 Mybatis 的异常转换为 Spring 的 DataAccessException。 最终,可以做到应用代码不依赖于 MyBatis,Spring 或 MyBatis-Spring。
http://mybatis.org/spring/zh/index.html

配置mybatis数据源
数据源:用Spring的数据源代替Mybatis的配置 ——————org.springframework.jdbc.datasource
<bean id="DataSource" > <property name="driverClassName" value="com.mysql.jdbc.Driver"/> <property name="url" value="jdbc:mysql://localhost:3306/mybatis?useSSL=true&useUnicode=true&characterEncoding=UTF-8"/> <property name="username" value="root"/> <property name="password" value="mysqlpw"/></bean>数据源的形式是多样的,也可以使用其他形式对数据源进行配置。
获取SqlSessionFactory
<!--sqlSessionFactory--><bean id="sqlSessionFactory" > <property name="dataSource" ref="DataSource" /> <!--绑定mybatis的配置文件--> <property name="configLocation" value="classpath:mybatis-config.xml"/> <property name="mapperLocations" value="classpath:com/th/mapper/*.xml"/></bean>可以在这个SqlSessionFactoryBean配置Mybatis的一些其他配置(别名等)。最主要的是可以直接导入Mybatis的原有配置文件mybatis-config.xml,两种配置可以配合使用。
mapperLocations获取Mapper的路径,相当于在Mybatis对Mappper的注册。
获取和SqlSession, SqlSessionTemplate:就是mybatis中的sqlSession。
<bean id="sqlSession" > <!--只能通过构造器注入sqlSessionFactory,因为它没有set方法--> <constructor-arg index="0" ref="sqlSessionFactory"/></bean>编写实体类
Dao接口
接口实现类XXXMapper.xml和Impl实现类,
Impl实现类是必须的,而在Mybatis中实现类不需要,在Spring中Impl实现类是必须的,用于获取sqlSessionTemplate。
public class UserMapperImpl implements UserMapper{ //我们的所有操作,都用sqlSession来执行,在原来,现在使用SqlSessionTemplate; private SqlSessionTemplate sqlSessionTemplate; public void setSqlSession(SqlSessionTemplate sqlSession) { this.sqlSessionTemplate = sqlSession; } @Override public List<User> selectUserList() { UserMapper mapper = sqlSessionTemplate.getMapper(UserMapper.class); return mapper.selectUserList(); }}当然Impl实现类也可以通过继承SqlSessionDaoSupport类,通过调用 getSqlSession() 方法得到一个 SqlSessionTemplate来执行 SQL 方法。
public class UserMapperImpl2 extends SqlSessionDaoSupport implements UserMapper{ @Override public List<User> selectUserList() { return getSqlSession().getMapper(UserMapper.class).selectUserList(); }}Spring配置文件中创建实现类对象。
<bean id="userMapperImpl" > <property name="sqlSession" ref="sqlSessionTemplate"/></bean>通过继承SqlSessionDaoSupport类的Impl实现类那么在创建其对象时需要传递sqlSessionFactory。
<bean id="userMapperImpl2" > <property name="sqlSessionFactory" ref="sqlSessionFactory" /></bean>通过实现类对象进行业务操作
public void testSelectUserList() throws IOException { ApplicationContext context = new ClassPathXmlApplicationContext("spring-dao.xml"); UserMapper userMapper = context.getBean("userMapperImpl2", UserMapper.class); for (User user : userMapper.selectUserList()) { System.out.println(user); }}事务是数据库操作最基本单元,逻辑上一组操作,要么都成功,如果有一个失败所有操作都失败。
事务分类:
Spring均支持这两种事物,但是推荐使用声明式事物。
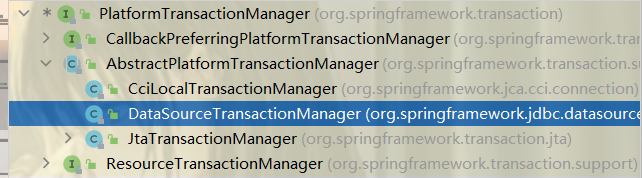
Spring提供一个接口PlatformTransactionManager,代表事务管理器,这个接口针对不同的框架提供不同的实现类,DataSourceTransactionManager为mybatis和JdbcTemplate提供使用。
1、基于注解方式
在 spring 配置文件配置事务管理器
要开启 Spring 的事务处理功能,在 Spring 的配置文件中创建一个 DataSourceTransactionManager 对象:
<bean id="transactionManager" > <!--注入数据源--> <property name="dataSource" ref="dataSource"/></bean>在 spring 配置文件,开启事务注解
在 spring 配置文件引入名称空间 tx
开启事务注解
<tx:annotation-driven transaction-manager="transactionManager"></tx:annotation-driven>在 service 类上面(或者 service 类里面方法上面)添加事务注解@Transactional
@Transactional:这个注解作用在类上,也可以作用在方法上。
@Service@Transactional()public class AccountService {}声明式事务管理参数配置,@Transactional()属性参数的设置。
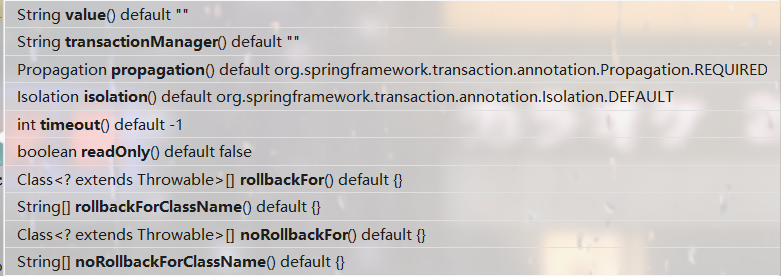
propagation:事务传播行为
多事务方法(对数据库表数据进行变换的操作)直接进行调用,这个过程中事务是如何进行管理的。如一个事物方法调用另一个事务方法,这个被调用的事务方法是否进行事务管理。Spring有7种事务传播行为。

@Transactional(propagation = Propagation.REQUIRED)ioslation:事务隔离级别
事务具有隔离性,不考虑隔离性可能会产生脏读、不可重复读、虚(幻)读问题。
? 脏读:一个未提交事务读取到另一个未提交事务的数据。
? 不可重复读:一个未提交事务读取到另一提交事务修改数据。
? 虚读:一个未提交事务读取到另一提交事务添加数据。
Spring通过设置事务隔离级别,解决读问题:
| 脏读 | 不可重复读 | 幻读 | |
|---|---|---|---|
| READ_UNCOMMITTED | 有 | 有 | 有 |
| READ_COMMITTED | 无 | 有 | 有 |
| REPEATABLE_READ | 无 | 无 | 有 |
| SERIALIZABLE | 无 | 无 | 无 |
@Transactional(isolation = Isolation.SERIALIZABLE)timeout:超时时间
事务需要在一定时间内进行提交,如果不提交则进行回滚 。
默认值是 -1(不超时) ,设置时间以秒单位进行计算。
@Transactional(timeout = -1)readOnly:是否只读
读:查询操作,写:添加修改删除操作
readOnly 默认值 false,表示可以查询,可以添加修改删除操作
设置 readOnly 值是 true,设置成 true 之后,只能查询.
@Transactional(readOnly = true)rollbackFor:回滚
noRollbackFor:不回滚
2、基于 xml 配置文件方式
在 spring 配置文件配置事务管理器
<!--开启 Spring 的事务处理功能--><bean id="transactionManager" > <constructor-arg ref="dataSource" /></bean>配置事物通知,结合AOP实现事物的织入
<tx:advice id="txAdvice" transaction-manager="transactionManager"> <!--给哪些方法配置事物--> <!--new 配置事物的传播特性:propagation--> <tx:attributes> <tx:method name="add" propagation="REQUIRED"/> <tx:method name="delete" propagation="REQUIRED"/> <tx:method name="update" propagation="REQUIRED"/> <tx:method name="query" read-only="true"/> <tx:method name="*" propagation="REQUIRED"/> </tx:attributes></tx:advice>配置事物切入
<aop:config> <aop:pointcut id="txPointCut" expression="execution(* com.th.kuang.mapper.*.*(..))"/> <aop:advisor advice-ref="txAdvice" pointcut-ref="txPointCut" /></aop:config>3、完全注解开发
@Configuration //配置类@ComponentScan(basePackages = "com.th.atguigu") //组件扫描@EnableTransactionManagement //开启事务public class TxConfig { //创建数据库连接池 @Bean public DriverManagerDataSource getDruidDataSource() { DriverManagerDataSource dataSource = new DriverManagerDataSource(); dataSource.setDriverClassName("com.mysql.jdbc.Driver"); dataSource.setUrl("jdbc:mysql://localhost:3306/mybatis?useSSL=true&useUnicode=true&characterEncoding=UTF-8"); dataSource.setUsername("root"); dataSource.setPassword("mysqlpw"); return dataSource; } //创建 JdbcTemplate 对象 @Bean public JdbcTemplate getJdbcTemplate(DriverManagerDataSource dataSource) { //到 ioc 容器中根据类型找到 dataSource JdbcTemplate jdbcTemplate = new JdbcTemplate(); //注入 dataSource jdbcTemplate.setDataSource(dataSource); return jdbcTemplate; } //创建事务管理器 @Bean public DataSourceTransactionManager getDataSourceTransactionManager(DriverManagerDataSource dataSource) { DataSourceTransactionManager transactionManager = new DataSourceTransactionManager(); transactionManager.setDataSource(dataSource); return transactionManager; }}关于No qualifying bean of type 'org.springframework.transaction.PlatformTransactionManager' available: expected single matching bean but found 2: transactionManager,getDataSourceTransactionManager报错问题。
由于在原来注解方式进行事务管理时存在一个数据源和事务管理器,@Transactional()注解时不直接指定,Spring就不知道具体使用哪一个事务管理器来进行事务管理了。使用只要@Transactional(transactionManager = “aaaTransactionManager”) 来进行指定具体的事务管理即可,当然最直接的方法是直接删除原来的事务管理。
整个 Spring5 框架的代码基于 Java8,运行时兼容 JDK9,许多不建议使用的类和方 法在代码库中删除
Spring 5.0 框架自带了通用的日志封装。
Spring5 已经移除 Log4jConfigListener,官方建议使用 Log4j2 。
Spring5 框架核心容器支持@Nullable 注解
@Nullable 注解可以使用在方法、属性,参数上,分别表示方法返回可以为空,属性值可以为空,参数值可以为空 。
Spring5 核心容器支持函数式风格 GenericApplicationContext
//函数式风格创建对象,交给 spring 进行管理@Testpublic void testGenericApplicationContext() { //1 创建 GenericApplicationContext 对象 GenericApplicationContext context = new GenericApplicationContext(); //2 调用 context 的方法对象注册 context.refresh(); context.registerBean("user1",User.class,() -> new User()); //3 获取在 spring 注册的对象 // User user = (User)context.getBean("com.atguigu.spring5.test.User"); User user = (User)context.getBean("user1"); System.out.println(user);}Spring5 支持整合 JUnit4和 JUnit5。
@ExtendWith(SpringExtension.class)@ContextConfiguration("classpath:bean1.xml")public class JTest5 { @Autowired private UserService userService; @Test public void test1() { userService.accountMoney(); }}//使用一个复合注解替代上面两个注解完成整合@SpringJUnitConfig(locations = "classpath:bean1.xml")public class JTest5 { @Autowired private UserService userService; @Test public void test1() { userService.accountMoney(); }}1、SpringWebflux 介绍
是 Spring5 添加新的模块,用于 web 开发的,功能和 SpringMVC 类似的,Webflux 使用 当前一种比较流行的响应式编程出现的框架。
使用传统 web 框架,比如 SpringMVC这些基于 Servlet 容器,Webflux 是一种异步非阻塞的框架,异步非阻塞的框架在 Servlet3.1 以后才支持,核心是基于 Reactor 的相关 API 实现 的。
异步和同步针对调用者,调用者发送请求,如果等着对方回应之后才去做其他事情就是同步,如果发送请求之后不等着对方回应就去做其他事情就是异步。
阻塞和非阻塞针对被调用者,被调用者受到请求之后,做完请求任务之后才给出反馈就是阻塞,受到请求之后马上给出反馈然后再去做事情就是非阻塞。
Webflux 特点:
Reactor为基础实现响应式编程。比较 SpringMVC
Tomet 等容器中。SpringMVC 采用命令式编程(代码一行一行执行),Webflux 采用异步响应式编程。2、响应式编程
响应式编程编程RP,即Reactive Programming,响应式编程是一种面向数据流和变化传播的编程范式。这意味着可以在编程语言中很方便地表达静态或动态的数据流,而相关的计算模型会自动将变化的值通过数据流进行传播。
电子表格程序就是响应式编程的一个例子。单元格可以包含字面值或类似"=B1+C1"的公 式,而包含公式的单元格的值会依据其他单元格的值的变化而变化。
响应式编程的思想是观察者模式。Java8 及其之前版本提供的观察者模式两个类Observer和 Observable。